


![]()
As the complexity of Kubernetes deployments increases, managing and orchestrating application deployments becomes a challenging task. Helm, a popular package manager for Kubernetes, streamlines the process by providing a templating engine and release management for Kubernetes resources. In this blog post, we will explore Helm, its benefits, and how it simplifies application deployment and management in Kubernetes.
In this blog, we are going to provide you with an overview of Helm and Helm Charts description and why is it beneficial. If you are new to Kubernetes, it will be helpful to read Kubernetes Introduction and Its architecture first to familiarize yourself with the basics concept. It also covers the installation and configuration of the helm, and also deployment of microservice using Helm charts Kubernetes and Helm command Kubernetes.
What is Helm
Helm is a tool that enables the packaging, deployment, and management of applications on Kubernetes. It consists of two primary components: Helm Charts and the Helm Client. Helm Charts are pre-configured templates that describe the structure and configuration of a Kubernetes application. The Helm Client is the command-line interface used to interact with Helm and manage application releases.
With Helm you can:
- Install software.
- Automatically install software dependencies.
- Upgrade software.
- Configure software deployments.
- Fetch software packages from repositories.
Benefits of Helm
- Simplified Deployment: Helm simplifies the deployment process by encapsulating all the necessary Kubernetes resources, such as deployments, services, and configmaps, into a single package called a Chart. Charts can be easily shared and versioned, providing a standardized and repeatable way to deploy applications.
- Template-based Configuration: Helm leverages the power of templates to allow users to customize their deployments easily. Templating enables dynamic generation of Kubernetes resource files, allowing for parameterization and configuration management. This makes it easier to manage different environments and streamline the deployment process across multiple clusters.
- Version Control and Rollbacks: Helm provides versioning for Charts, enabling you to track and manage different releases of your applications. This facilitates easy rollbacks to previous versions if issues arise during the deployment process. Helm’s version control capabilities provide greater stability and confidence in managing complex applications.
- Chart Repository Ecosystem: Helm benefits from a vast repository of Charts known as Helm Chart repositories. These repositories contain a wide variety of pre-built Charts for popular applications and services, contributed by the community. Utilizing Helm Chart repositories saves time and effort, as you can leverage existing Charts rather than starting from scratch.
- Extensibility and Customization: Helm allows for extensive customization of Charts and the deployment process. You can define dependencies, hooks, and pre and post-install scripts, enabling you to integrate complex application deployment workflows seamlessly. Helm’s extensibility empowers you to tailor your deployment to specific requirements and integrate it with other tools and processes.
Helm Architecture^
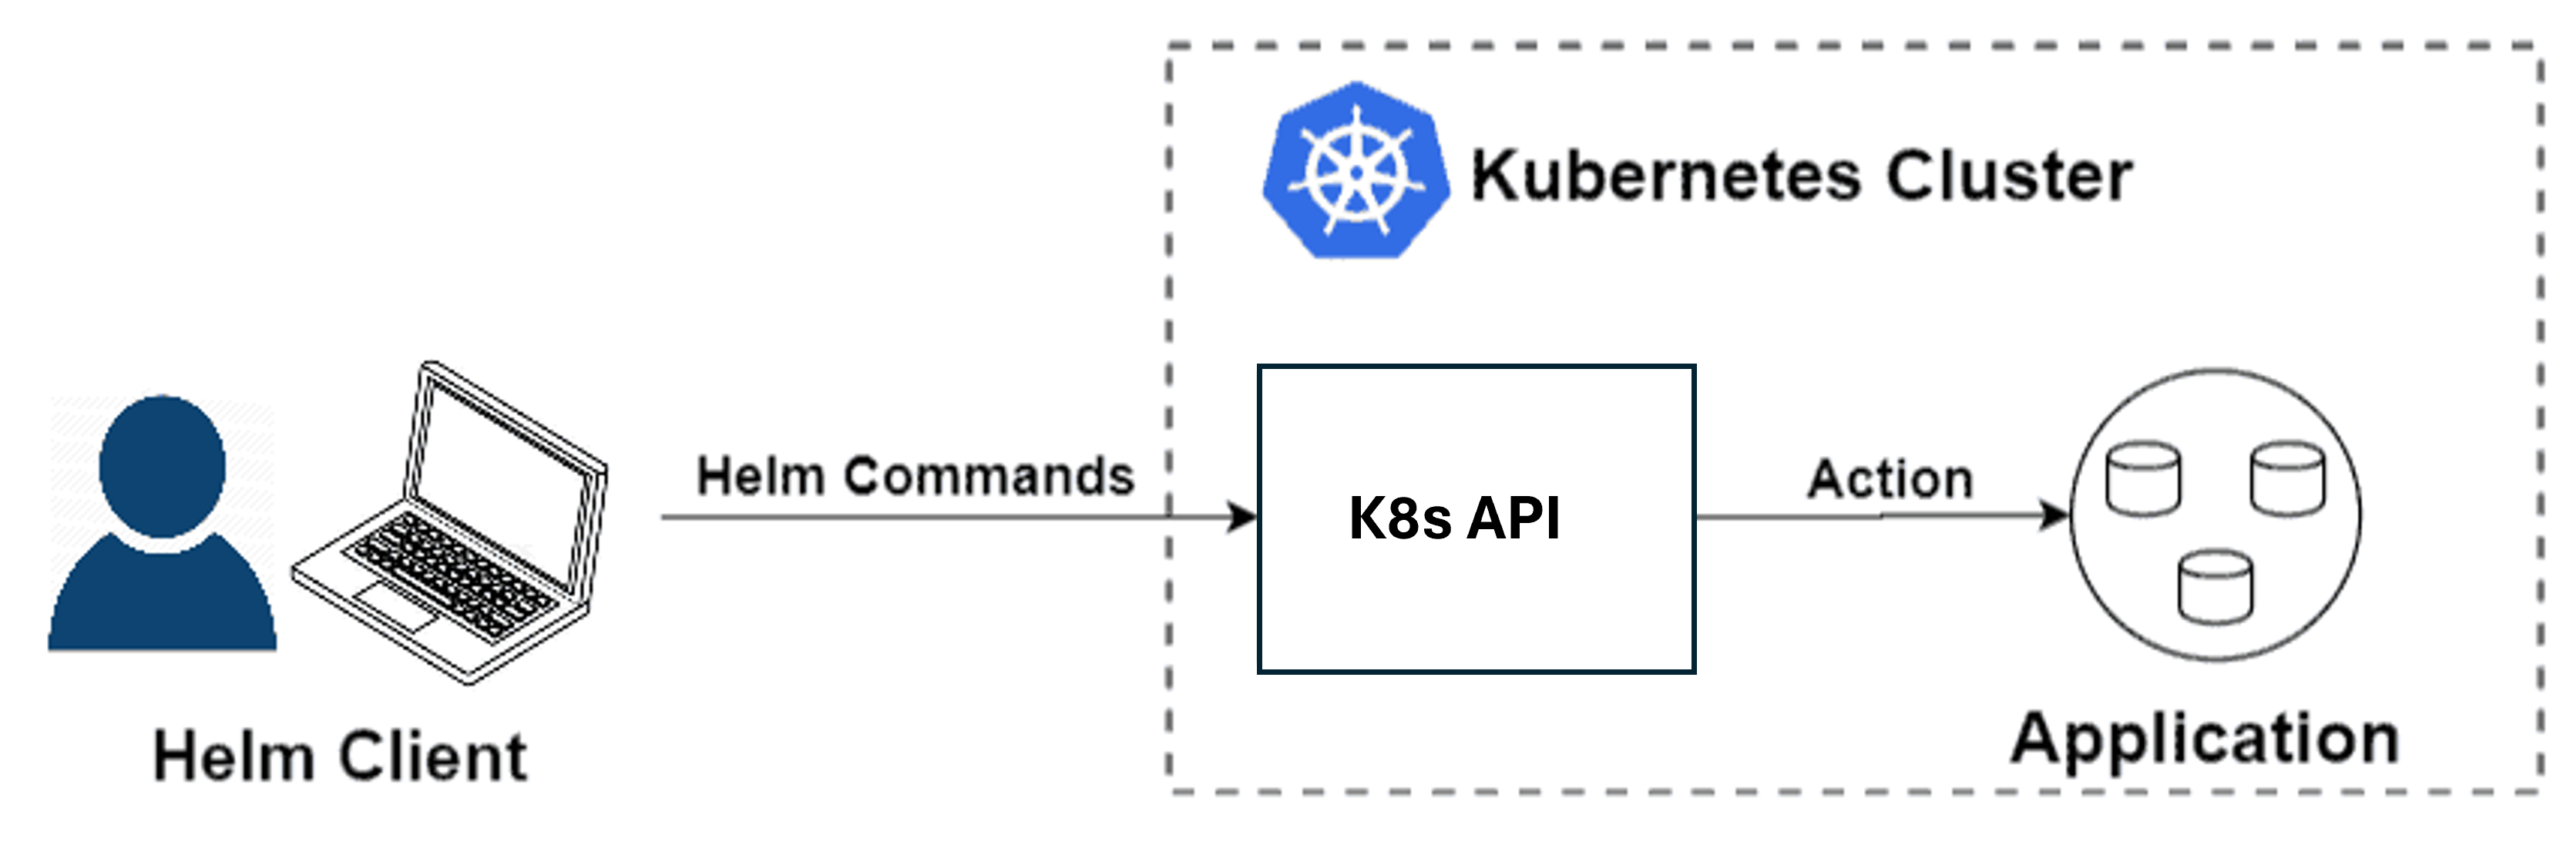
- Client (CLI):
- The Helm client (CLI) resides on the user’s local workstation.
- Users interact with the Helm client to perform operations such as creating, managing, and deploying Helm charts.
- Kubernetes API Server:
- The Kubernetes API server is the central component of the Kubernetes cluster.
- It manages the state of the Kubernetes cluster and exposes an API that allows clients to interact with the cluster.
- Helm Charts:
- Helm charts are packages of pre-configured Kubernetes resources.
- Charts contain templates, values, and metadata necessary to deploy applications on Kubernetes.
- Kubernetes Cluster:
- The Kubernetes cluster consists of one or more nodes that host containerized applications.
- It is managed and orchestrated by the Kubernetes control plane, which includes components such as the API server, scheduler, and controller manager.
With Helm version 3, the architecture has been simplified by removing the server-side component known as Tiller. Instead, Helm directly interacts with the Kubernetes API server to deploy, manage, and upgrade Helm charts. This eliminates the need for an additional server-side component, reducing complexity and improving security.
Check out: to know more about Docker Container Lifecycle Management. Click here
Components Of Helm^
Helm Charts:
As mentioned earlier, Helm is a package manager like apt or yum in Linux systems. The helm charts are nothing but a packaged application. So, the ‘helm charts‘ is a collection of all of the versioned, pre-configured application resource which can be deployed as one unit. Thus, any version of the chart with a different set of configurations can be deployed. On the other hand, a single chart might be used to deploy pods, or something complex, like a full web app stack with HTTP servers, databases, caches, and so on.
Value Files:
One of the built-in objects of Helm is Values. This provides access to values passed into the chart. Its content comes from sources like a separate file, for example, say ‘values.yaml‘ file. Hence, these values file contains information like the name of the deployment, the number of replicas, metadata, etc. Think this as a dictionary having keys and values that will be referred by the Kubernetes manifests file during runtime.
Also read: How to install docker on Windows, Ubuntu and MAC
What Is A Helm Chart? ^
Helm packages are called charts. These charts comprise of a few YAML configuration files and some templates that are rendered into Kubernetes manifest files. To create a new chart, run “helm create YOUR-CHART-NAME”. Chart names must be lower case letters and numbers. Words may be separated with dashes (-). Neither uppercase letters nor underscores can be used in chart names. Dots should not be used in chart names. Click here to know more.
Examples:
drupal
nginx-lego
aws-cluster-autoscaler
Once this is created, the directory structure should look like below:
  YOUR-CHART-NAME/
  |
  |- .helmignore
  |
  |- Chart.yaml
  |
  |- values.yaml
  |
  |- charts/
  |
  |- templates/
- .helmignore: Holds all the files to ignore when packaging the chart. Similar to .gitignore on git.
- Chart.yaml: Here goes all the information about the chart being packaged. For instance, your version number, etc.
- Values.yaml: Here, you define all the values that are to be injected into the templates. For example, if terraform is familiar, think of this as helm’s variable.tf file.
- Charts: If your chart is dependent on some other chart, this is where you store them. You might be calling another chart for your chart to function properly.
- Templates: Inside this folder, you put all the actual manifests that are being deployed with the chart. For instance, you might be deploying an Nginx deployment that needs a service, configmap and secrets. These deployment.yaml, service.yaml, config.yaml, and secrets.yaml all needed to be deployed in the template dir. They will all get their values from values.yaml from above.
Find out about what is Kubernetes Label here.
Why Use Helm? ^
Helm is a client /server application. Helm helps in the following vital ways:
- Improves productivity
- Helm simplifies software deployment
- Enables the adaptation of cloud-native applications
- Reduces the complexity of deployments of microservices
Once the Helm is installed and configured, you would be able to install production-ready applications from software vendors, such as MongoDB, MySQL, and others, into your Kubernetes cluster with one very simple helm install command. Additionally, removing installed applications in your cluster is as easy as installing them.
Also Check: Our blog post on Kubernetes network policy. Click here
Installation And Configuration ^
So, if you are ready to use Helm Kubernetes, installing and configuring Helm for your Kubernetes cluster is a very simple and uncomplicated process. There are multiple versions of Helm that can be installed V3 being the latest, all of which can be configured to your requirements.
Creating your first Helm chart is as easy as installing some charts from the stable repository, which is there on the GitHub. It is a collection of curated applications to be deployed into the cluster. A Helm user can either get charts from the stable repositories or can write an own chart for your applications which Helm a simple Developer’s Guide for getting started.
There is a detailed guide below, on how to install Helm and deploy a microservice using Helm charts and Helm commands on Google Kubernetes Engine.
learn with us: join our Kuberenets Training and understand Kuberenets in an Easy way
Deploying A microservice On GKE ^
The steps to deploy a microservice on GKE are:
Step-1: Create a Helm Kubernetes Cluster
The first step is to create a Kubernetes cluster using the console. In the example below, a new cluster on GKE is created with name ‘helm-cluster’. As Helm is platform-independent,
you can use any other provider like AKS, EKS, OKE, etc.

GKE Cluster
Step-2: Connecting to the Cluster
The second step is to connect to the created cluster. For this, you can either use a cloud shell or a local machine, wherever the Google Cloud Platform is configured.
$ gcloud container clusters get-credentials helm-cluster --zone us-
  central1-c --project [PROJECT_ID]

  Fetching cluster endpoint and auth data.
  kubeconfig entry generated for helm-cluster.
Also Check: How to Create Aks Cluster. Click here
Step-3: Installing Helm
The next step is to install the latest version of the helm, i.e, Helm3 by the following set of commands.
  $ curl -fsSL -o get_helm.sh
  https://raw.githubusercontent.com/helm/helm/master/scripts/get-helm-3

  $ chmod 700 get_helm.sh

  $ ./get_helm.sh
  Helm v3.2.4 is available. Changing from version v3.2.1.
  Downloading https://get.helm.sh/helm-v3.2.4-linux-amd64.tar.gz
  Preparing to install helm into /usr/local/bin
  helm installed into /usr/local/bin/helm
Also Read: Our blog post on Kubernetes for Testers. Click here
Step-4: Configuring Tiller
Service accounts are used to provide identity in Kubernetes. By default, applications will authenticate as the default service account in the namespace they are running in and this has to be changed. So, run the commands given below to setup and configure tiller to use a separate service account for the Tiller.
  $ kubectl create serviceaccount --namespace kube-system tiller

  serviceaccount/tiller created

  $ kubectl create clusterrolebinding tiller-cluster-rule --
  clusterrole=cluster-admin --serviceaccount=kube-system:tiller
  clusterrolebinding.rbac.authorization.k8s.io/tiller-cluster-rule
  created

  $ kubectl patch deploy --namespace kube-system tiller-deploy -p
  '{"spec":{"template":{"spec":{"serviceAccount":"tiller"}}}}'
Also Check: Our blog post on Kubernetes rbac
Step-5: Prepare Helm manifests
The Helm setup is now done. So, as mentioned before the two main components of Helm are Charts and the values files. Therefore, now let us start with the creation of these files in a separate directory. In the below example, the directory is named as ‘helm_directory‘.
$ mkdir
helm_medium
$ cd
helm_medium
And this is where we will be placing our Chart.yaml band the values.yaml. Below is the Chart.yaml file.
Note: The name, the description, and the version can be changed as per your use case.
The next step is to write the values.yaml file in the same directory.
Helm charts uses values.YAML file to separate runtime values from the design-time definition of the charts.
Also Check: What are Pods in Kubernetes. Click here
Step-6: Kubernetes Manifests
The sixth step is to create a new directory inside the ‘helm_medium’ directory and name it as ‘templates’. This templates directory will contain the Kubernetes manifests files. The structure of the directory is shown below:
  $ tree
  .
  ├── Chart.yaml
  ├── templates
  │   ├── deployment.yaml
  │   └── service.yaml
  └── values.yaml
  1 directory, 4 files
The ‘deployment.yaml’ and ‘service.yaml’ will be placed inside the templates directory. The deployment.yaml is given below.
All the parameters are referred to as {{.values}} preceded with the location of the key in the values.yaml file. Considering that, all the deployment-related files are stored under ‘Dep’, the parameters will be referred to as {{.Values.Dep.}}. Same way, the service.yaml will refer to as {{.Values.Svc.}}
Below is the ‘service.yaml’ file and the service is exposed to the outside world because of type: LoadBalancer.
Also Read: Our previous blog post on the Kubernetes cluster. Click here
Step-7: Validation of Helm manifests
After following all the 6 steps, the chart, the values, and the Kubernetes manifests are prepared and correctly placed. Now, we have to ensure if the right values are being referred by the Kubernetes manifests, run this single powerful command given below, and remember to execute the command where the ‘templates’ directory is placed.
  $ helm template . -f values.yaml
  ---
  # Source: helm-demo/templates/service.yaml
  apiVersion: v1
  kind: Service
  metadata:
    namespace: default
    name: helm-demo
  spec:
    type: LoadBalancer
    ports:
    - port: 80
      targetPort: 8080
    selector:
      app: helm-demo
  ---
  # Source: helm-demo/templates/deployment.yaml
  apiVersion: apps/v1beta1
  kind: Deployment
  metadata:
    namespace: default
    name: helm-demo
  spec:
    replicas: 1
    revisionHistoryLimit: 10
    strategy:
      rollingUpdate:
        maxSurge: 1
        maxUnavailable: 1
    minReadySeconds: 5
    template:
      metadata:
        labels:
          app: helm-demo
      spec:
        containers:
        - name: helm-demo
          image: anm237/helloworldnode:v1
          ports:
          - containerPort: 8080
          resources:
            requests:
              cpu: 250m
            limits:
              cpu: 500m
The output from this will be the final service and the deployment file. Thus, the output is the same as what the Kubernetes engine will ingest while
deployments are made. Only validate if all the fields have the proper value.
Check Out: What is Networking in Kubernetes? Click here
Step-8: Deployment using Helm
After you validate, deploy the microservice using the helm command. This command must be executed at the Chart.yaml‘s location.
$ helm upgrade --install --namespace
$NAMESPACE $APP_LABEL
.
And in the final command pass the appropriate NAMESPACE and APP_LABEL. As a result, the microservice will be deployed on the GKE! You can confirm this by navigating through the GKE console for verification. In conclusion, the service will be exposed to the Google HTTP(s) Load balancer.
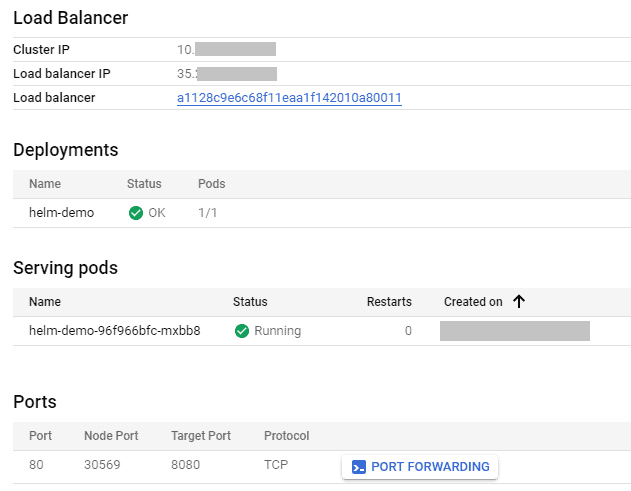
Summary of the exposed service
By clicking on the Load Balancer’s public IP, you can see the output being served by your deployed application (A simple node.js, “Hello World application is deployed for example).
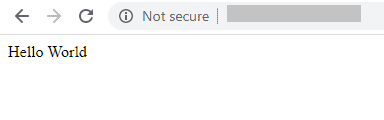
The output of the deployed application
Yayyy! We have finally deployed our first microservice application using Helm Charts Kubernetes and Helm commands Kubernetes on Google Kubernetes Engine (GKE).
Conclusion
Helm simplifies the complexity of deploying applications on Kubernetes by providing a package manager and templating engine. Its benefits, including simplified deployment, template-based configuration, version control, and extensibility, make it a valuable tool for managing application releases in Kubernetes. By leveraging Helm’s capabilities, you can streamline your deployment workflows, increase productivity.
Frequently Asked Questions
What is Helm in Kubernetes?
Helm is a package manager and deployment tool for Kubernetes. It simplifies the management and orchestration of applications by providing a templating engine and release management for Kubernetes resources.
What is a Helm Chart?
A Helm Chart is a collection of files that describe a set of Kubernetes resources required to deploy and manage an application. It includes templates, configuration values, and metadata necessary for deployment.
How does Helm simplify application deployment in Kubernetes?
Helm simplifies application deployment by encapsulating Kubernetes resources into a single package (Chart) and providing a templating engine for dynamic configuration. It also offers versioning, rollbacks, and a repository ecosystem for sharing and reusing Charts.
How does Helm handle configuration management?
Helm uses templating to dynamically generate Kubernetes resource files based on configuration values. It allows users to customize deployments easily by modifying values files, making it simple to manage configurations across different environments.
an Helm be used for managing complex application deployments?
Yes, Helm is suitable for managing complex application deployments. It supports dependencies, hooks, and pre- and post-install scripts, enabling the integration of advanced deployment workflows and customization to meet specific requirements.
What is a Helm Chart repository?
A Helm Chart repository is a collection of packaged Helm Charts hosted in a remote location. These repositories provide a centralized source of Charts that can be easily accessed and installed, saving time and effort in creating deployment configurations from scratch.
Related/References
- Docker Installation Overview
- To know more about “Docker & Kubernetes” visit our YouTube channel
- [Video] Containers (Docker) & Kubernetes In Azure For Beginners
- Docker & Certified Kubernetes Administrator (CKA) Training
- Certified Kubernetes Administrator (CKA) Certification Exam
- (CKA) Certification: Step By Step Activity Guides/Hands-On Lab Exercise & Learning Path
- The YAML files are from – Akash Mahale’s GitHub
Join FREE Class
Discover the Power of Kubernetes, Docker & DevOps – Join Our Free Masterclass. Unlock the secrets of Kubernetes, Docker, and DevOps in our exclusive, no-cost masterclass. Take the first step towards building highly sought-after skills and securing lucrative job opportunities. Click on the below image to Register Our FREE Masterclass Now!

![Microsoft Agentic AI Business Solutions Architect [AB-100] | K21 Academy](https://test.k21academy.com/wp-content/uploads/2025/11/Microsoft-Agentic-AI-Business-Solutions-Architect-AB-100-Exam-Overview1.png)