

![]()
This blog will will give you a summary of Azure job focused program. It will cover entire hands on labs offered by program along with the projects.
The labs and projects summarised here will be provided with steps to complete inside our program of Azure job oriented course. It will help you to prepare on the basis of current job market and make you tackle the obstacles faced while applying for job in field of Azure.
Contents:
- Create free Microsoft Azure account
- Switch to pay as you go account
- Create billing alert using Azure portal
- Requesting Azure Service Quota Increases
- Install Visual Studio Code, Python & GIT on VM
- Creation of WebApp in Azure cloud
- Create Virtual machine of Windows image
- Create Virtual Machine of Linux image
- Deploy & Test Virtual Machine Scale
- Create Resource Group, Virtual Network, Subnet and Virtual Machine
- Create an Azure Firewall
- Create an Azure Bastion host
- Create and Configure VNet Peering
- Create a Hub and Spoke Topology in Azure Using the Azure Portal
- High Availability with Azure Load Balancer
- VPN Gateway Connection
- Create Azure Front door
- Deploy Azure App Service and Add Traffic Manager
- Azure Private DNS Zone
- Create & Manage Application Gateway
1.5 Network Endpoint and Security
- Secure Storage with Service Endpoint
- User-assigned managed identities for Azure resources
- Filter Traffic using Network Security Group
- Secure Data using Key vault
- Create Azure file share
- Create Blob lifecycle management
- Create an Unmanaged Disk & Managed Data Disk
- Create Azure Storage Account & Containers
1.7 Container & Azure Kubernetes Services
- Creation and Testing Azure Container Registry
- Implement Azure Container Instances
- Creation of SQL as a PAAS in AKS
- Deploying Docker containers to Azure App Service web apps
- AKS cluster creation and accessing it
- Configuring and Securing ACR and AKS
1.8 Azure DevOps (CI/CD Tools and pipeline)
- Creating FREE Microsoft Azure DevOps Account
- Enable Parallelism in Azure DevOps
- Deploying a multi-container application in Azure
- Implement Github actions for CI/CD
- Creating Service principal for applications
1.9 Microsoft Entra ID(Azure AD) and On-Prem integration
- Entra ID (Azure Active Directory) Synchronization with On-Premise Active Directory using Entra Connect (AD Connect)
- Role Based Access Control (RBAC) in Azure
- Enabling Microsoft Entra ID (Azure AD) Authentication for Virtual Machines using Azure Portal
1.10 Designing a solution to logging and monitoring for Azure Resources
- Monitor Application Performance with Azure Load Testing
- Azure Monitoring Using Log Analytics
- Azure Network Watcher
- Microsoft defender for cloud
1.11 Azure Migration & Disaster Recovery
- Virtual Machine Replication via Azure Site Recovery
- Backup of Azure VM into Azure Backup Vault
- Backup of On-Premise Server into Azure Backup Vault
- Building a web application on Azure platform as a service offerings
- Retrieve Azure Storage Data with .NET SDK
- Constructing a polyglot data solution
- Deploying compute workloads by using images and containers
- Authenticate by using OpenID Connect, MSAL and .NET SDKs
- Access resource secrets more securely across services
- Create a multi-tier solution by Using Azure Service
- Asynchronously processing messages by using Azure Service Bus Queue
- Enhancing a web application by using the Azure Content Delivery Network
- Monitor services that are deployed to Azure
- Pub & Sub to Event Grid events Using Azure
- API Management
1.13 Power Shell and CLI usage
- Create a Resource group, and Virtual Machine using Azure CLI
- Create and Deploy ARM templates using Azure Portal
- Deployment of 3 tier Architecture in Azure
- Containerize and deploy a Java app to Azure
- Automating Infrastructure deployment using terraform and Azure pipeline
- Deploying multi-container application to AKS
- Migration of resources from On-Premise to Azure
- Migration of resources across Azure regions
- Entra ID (Azure Active Directory) Synchronization with On-Premise Active Directory using Entra Connect (AD Connect)
- Containerized Application Using Azure Kubernetes Service
- Site-to-Site Connection using Azure Portal
- Create WordPress Site on Azure Portal
- Host your Portfolio via Azure Storage (Static Website Hosting)
- Deploy Netflix Clone Application on Kubernetes


Download Azure Job Oriented Brochure

Hands on Lab:
1.1 Azure Basics Labs
1. Register For Azure Free Trial Account
When stepping in cloud, first task you all should do is create a free trial account in Microsoft Azure (Microsoft offers $200 as free credit for one month)
Microsoft Azure is one of the top choices for any organization due to its freedom to build, manage, and deploy applications. Here, we will look at how to register for the Microsoft Azure FREE Trial Account, click here.
Note: Get this first step by step activity guide absolutely FREE from here
2. Switch to Pay as you go account
The pay-as-you-go subscription model is a pricing strategy where customers pay only for the resources they use. This is in contrast to traditional subscription models, where customers are charged a fixed monthly or annual fee regardless of their usage.
In this lab, we will see how we can switch our existing subscription to pay as you go, where if your free trial subscription is out of limit, you can switch to pay as you go subscription and pay the charges for the resources you are going to use.
The PAYG model is becoming increasingly popular for a number of reasons, few of them are given below:
- It gives customers more flexibility and control over their spending.
- Customers can scale their usage up or down as needed, and they only pay for what they use.
- The PAYG model can help businesses to reduce their upfront costs.
- Businesses do not need to commit to a long-term contract or purchase a large upfront license fee.
3. Create billing alert using Azure portal
Azure billing alerts allow you to monitor your Azure spending and receive notifications when your spending exceeds a certain threshold. This can help you to avoid unexpected costs and stay within your budget.
In this lab, we will have clear objective of setting a budget. Once that budget is reached, it will trigger the alert and notify you by either sending notification on app or by sending you sms or via email whichever you have set for the notification.
Billing alerts are based on the following concepts:
- Threshold: A threshold is a value that you specify. When your Azure spending exceeds the threshold, the alert will be triggered.
- Frequency: The frequency is how often the alert condition is evaluated. You can choose to evaluate the alert condition every hour, day, week, or month.
- Alert actions: Alert actions are the steps that are taken when the alert is triggered. You can choose to send an email notification, create an Azure Monitor alert, or call a webhook
4. Requesting Azure Service Quota Increases
Azure quotas are limits on the amount of resources you can consume within your subscription for a given service or region. These limits are in place to manage capacity, protect against accidental overspending, and ensure fair allocation of resources.
While most standard usage fits within these limits, you might occasionally need to request an increase for specific resources like virtual machine vCPUs, storage, or network capacity to support larger deployments or increased workloads.

In this lab, we will see how we can request these essential quota increases directly from the Azure portal. We’ll learn the process for submitting an adjustment request for quotas that are directly adjustable within the portal, such as compute resources.
For services where direct adjustment isn’t an option, we will also demonstrate how to raise a formal support request to initiate a quota increase, ensuring you can scale your Azure resources as per your project’s demands.
5. Install Visual Studio Code, Python & GIT on VM
Modern cloud development heavily relies on having the right tools configured on your local machine or a dedicated development environment, such as a virtual machine. These tools empower developers to write, test, and deploy code efficiently to cloud platforms like Azure.
Establishing a standardized and ready-to-use development setup is crucial for streamlined workflows and productivity, especially when collaborating on projects that involve cloud services, scripting, and version control.
In this lab, we will see how we can prepare a virtual machine by installing essential development tools required for working with Azure. This involves:
- Installing Visual Studio Code, a popular and versatile code editor, onto our virtual machine.
- Installing Python, along with crucial modules and packages necessary for various Azure-related labs, especially those involving scripting and Azure AI services.
- Installing Git for robust version control of our code.
- Installing the Azure CLI to enable powerful command-line interaction and management of our Azure resources directly from within the VM environment.
1.2 Azure Compute Labs
1. Creation of WebApp in Azure cloud
Azure Web Apps are a platform-as-a-service (PaaS) offering provided by Microsoft Azure for hosting web applications. These apps allow developers to build, deploy, and scale web applications using various programming languages, frameworks, and tools.
In this lab, we will get knowledge on how can we create a simple web application and deploy a sample application. Once our application is ready we will further testify the application by accessing domain url of web app and access the content of our application.
Azure WebApp offers features like autoscaling, load balancing, continuous deployment, and integration with popular development tools like Git and GitHub.
 2. Create Virtual machine of Windows image

By leveraging Azure VMs, you can quickly provision and deploy Windows-based virtual machines, allowing you to focus on your applications and business logic without the need for upfront hardware investment or infrastructure management.
In this lab, we will create a Virtual Machine out of Windows. Within this lab we will the features of an IAAS and number of options you have setup when working with an IAAS of Azure cloud.
With Azure VMs, you have the flexibility to create and manage Windows-based virtual machines tailored to your specific needs. You can choose from a wide range of Windows images provided by Microsoft, including different versions of Windows Server and Windows 10.
3. Create Virtual machine of Linux image
Virtual machine instance running the Ubuntu operating system within the Microsoft Azure cloud platform. Azure allows users to create and deploy virtual machines based on Ubuntu, which is a popular open-source Linux distribution.
In this lab, we will create a Virtual machine using a linux image. The process will be almost same for windows and linux but we will consider the settings that will make difference like protocols and VM image along with different ways of both to access the VM.
Ubuntu VMs in Azure offer a flexible and scalable environment for running Ubuntu-based applications, services, and workloads. Users can choose from various versions of Ubuntu, including the Long-Term Support (LTS) releases, which provide stable and supported environments for extended periods.
Related Readings: How to create and connect Ubuntu Virtual Machine in Azure
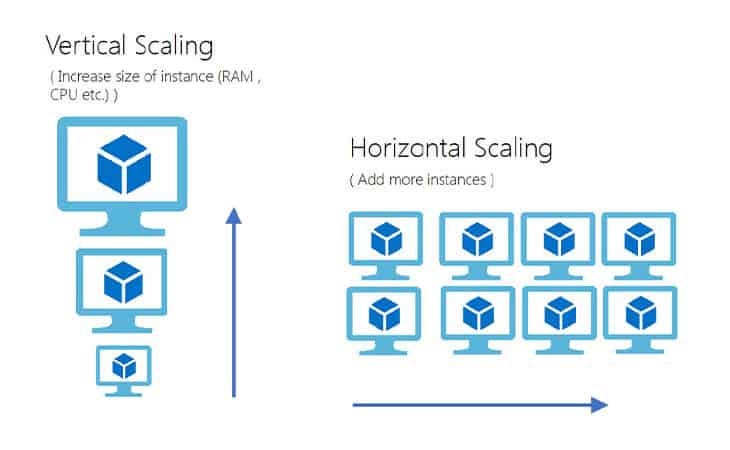
4. Deploy & Test Virtual Machine Scale
A Virtual Machine Scale Set is an Azure compute resource that allows you to Create and manage a group of identical, load-balanced virtual machines (VMs). This means all VMs in the set share the same configuration (OS image, disk setup, installed applications, etc.).
The number of VMs can increase or decrease based on predefined rules (e.g., CPU utilization, network traffic, schedule) or done manually.
In this lab, we will be creating a VMSS resource and further configure some load testing to check that autoscaling works and increase and instance of VM or not.
Related Readings:What is Virtual Machine Scale Set (VMSS) in Microsoft Azure?
1.3 Azure Networking Labs
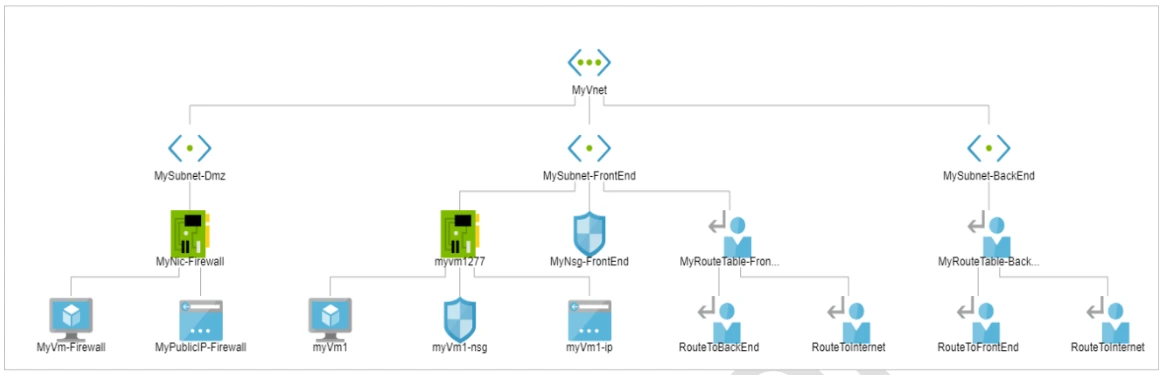
1. Create Resource Group, Virtual Network, Subnet and Virtual Machine

To create a resource there are various components required such as resource group which is a logical container for for organizing and managing related Azure resources. Further if networking is included then its add up by virtual network, subnet.
In this lab, we will get to know how we can create a resource group and within that resource group , how other resources will be created. The resources we will created inside the Resource group will be Virtual Network, Subnet and a VM.
2. Create an Azure Firewall
Azure Firewall is a cloud-native and intelligent network firewall security service provided by Microsoft Azure. It is designed to protect cloud workloads running in Azure by offering stateful firewall capabilities with high availability and scalability.
Within this lab, we will create be creating a VM and a vnet first, then we will create a firewall resource. Once firewall is created, next step would include creating route for the flow of traffic where different rules need to be configured. These rules make sure that correct data is allowed only.
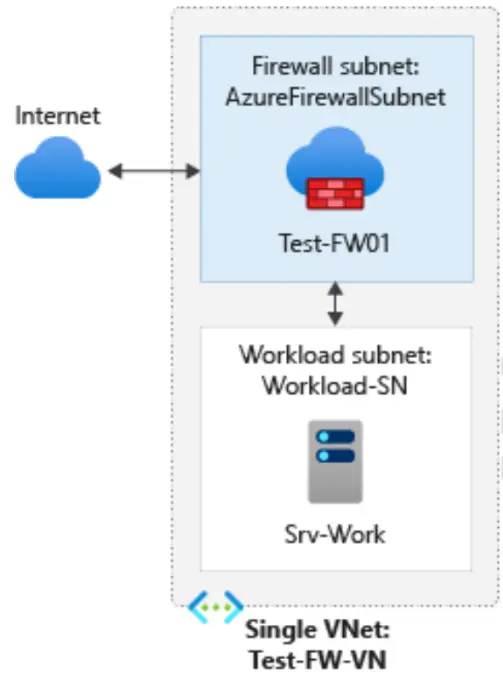
Some of Key features and benefits of Azure Firewall include:
- Threat intelligence-based filtering
- Layer 3 to Layer 7 filtering capabilities
- Transport Layer Security (TLS) inspection
- Simplified deployment and management
- High availability and scalability
- Logging and monitoring
This is just the brief. A detailed blog is available here
3. Create an Azure Bastion host
Azure Bastion is a service provided by Microsoft Azure that allows secure and convenient remote access to virtual machines (VMs) deployed in Azure. It acts as a fully managed platform-as-a-service (PaaS) solution that you can provision within your virtual network. With Azure Bastion, you can establish RDP (Remote Desktop Protocol) or SSH (Secure Shell) sessions to your VMs directly from the Azure portal or using native SSH/RDP clients on your local computer.
Within this lab, we will create a bastion host which is responsible for provding secure access to VM. Further we will connect this Bastion host to Windows VM and access it.
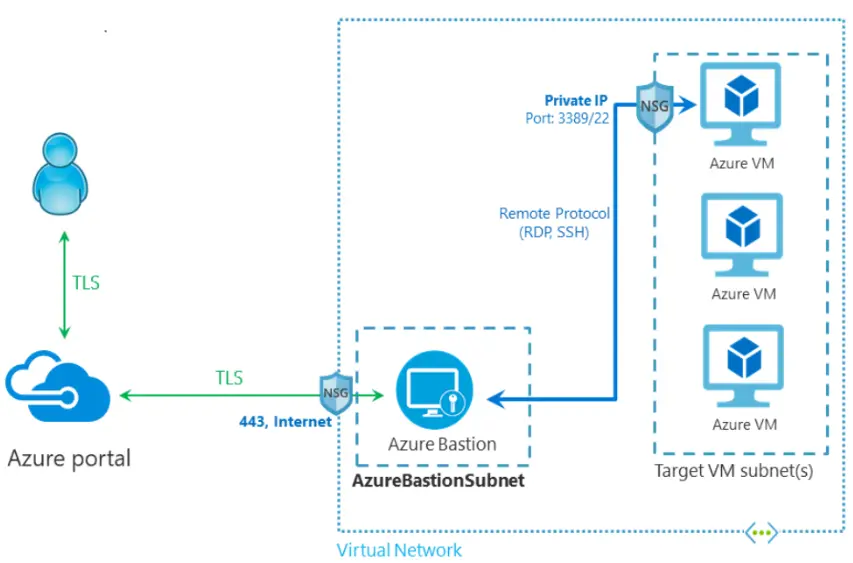
The primary purpose of Azure Bastion is to enhance the security of remote access to VMs by eliminating the need for public IP addresses, agents, or special client software on the VMs.
4. Create and Configure VNet Peering
VNet peering in Azure refers to the capability of seamlessly connecting two or more virtual networks within Azure. It allows the virtual networks to appear as a single network for the purpose of connectivity.
VNet peering uses Microsoft’s backbone infrastructure to route traffic between the virtual machines in the peered virtual networks. This means that the traffic between the virtual machines is routed through Microsoft’s private network only.
In this lab, we will create 2 virtual networks with having one subnet in each. These Virtual networks will be in 2 different regions as shown below. Then further we will do peering between these two Virtual network and test the connectivity bby deploying VMs inside each Vnet.

VNet peering is a useful feature in Azure as it offers several benefits, including:
- Low-latency, high-bandwidth connections between resources in different virtual networks.
- The ability for resources in one virtual network to communicate with resources in a different virtual network.
- Data transfer between virtual networks across Azure subscriptions, Azure Active Directory tenants, deployment models, and Azure regions
Want a comparison of Vnet, VPN, Express route? Browse here
5. Create a Hub and Spoke Topology in Azure Using the Azure Portal
Hub-and-Spoke network topology in Azure refers to the architectural pattern where multiple spoke virtual networks are connected to a central hub virtual network. This setup enhances resource sharing, traffic management, and network isolation across virtual networks.
Azure Virtual Network Manager streamlines the configuration and management of Hub-and-Spoke networks. The hub network acts as a central point for connectivity, while the spoke networks communicate through it.
In this lab, we will be creating a network manager resource and 3 different virtual networks. Within network manager we will setup the VNets which will be acting as hub and the one working as spoke. Once we have configured the connectivity, we will look towards setting up of VM within the VMs.

Hub-and-Spoke topology in Azure offers several benefits, including:
- Centralized network management and security enforcement.
- Optimized traffic flow with reduced latency between spoke networks.
- Enhanced scalability for expanding network resources across multiple virtual networks.
- Secure communication between virtual networks in different Azure subscriptions, Azure Active Directory tenants, and Azure regions.
1.4 Azure Load balancer Labs
1. High Availability with Azure Load Balancer
High Availability with Azure Load Balancer enables you to distribute incoming network traffic across multiple virtual machines (VMs) to ensure application reliability and scalability. By balancing the load, it prevents any single VM from becoming a bottleneck or point of failure, thus maintaining high availability for your services.
Here’s what you need to know about Azure Load Balancer:
- Purpose and Function: Distributes network traffic to healthy VMs for high availability.
- Creating a Virtual Network: Set up the network to host your VMs and load balancer.
- Creating Load Balancer: Configure frontend IP, backend pools, health probes, and rules.
- Creating Virtual Machines: Deploy and configure VMs behind the load balancer.
- Installing IIS: Set up a web server on VMs to test load balancing.
- Testing Load Balancer: Verify traffic is evenly distributed across VMs.

In this lab, you will create a virtual network, configure a load balancer, deploy VMs within these Vnets with IIS server installed on VMS, and test load balancing by accesing the web application running on VMs to ensure high availability.
2. VPN Gateway Connection
A VPN Gateway Connection in Azure is a type of virtual network gateway that enables encrypted communication between a virtual network in Azure and an on-premises network or another virtual network. It establishes a secure and private connection over the internet, allowing organizations to connect their on-premises infrastructure to Azure resources.
Here’s what you need to know about VPN Gateway Connections in Azure:
- Purpose and Function
- Site-to-Site VPN
- Point-to-Site VPN
- Configuration and Management
- VPN Device Compatibility
In this lab, we will setup 2 Vnet’s showing as individual networks available in different region. Further we will also require VPN Gateway for both Vnets. Further we will setup the connection between both the gateways and verify the connectivity through their status.
We have full blog of VPN vs Azure Express route
2. Create Azure Front Door
Azure Front Door is a worldwide content delivery network (CDN) and load-balancing solution for accelerating and protecting your online applications. It works by caching your static content at edge locations all around the world, allowing users to access it fast and reliably no matter where they are. To boost efficiency and availability, Azure Front Door may also disperse traffic among your backend servers.

Within this lab, we will make 2 web apps which will be runing a sample web application. We will further setup and configure Front door resource, supported its backend with webapps we had created. To test the working, we will stop one of the web app and then reaccess the front URL.
3. Deploy Azure App Service and Add Traffic Manager
Azure App Service is a fully managed platform for building, deploying, and scaling web applications, mobile apps, and REST APIs. It offers a broad range of capabilities that enable you to quickly create and manage applications, without the need to set up or maintain infrastructure.
Within this lab we will go little advanced from our frontdoor lab. Here we will use a VM to setup visual studio and also create 2 webapps parallely. Once we have resources ready, we will push the deployment from Visual studio to Webapps and access them with Traffic manager which will be loadbalancing the traffic route.
Adding up Azure app service with Azure traffic manager provides better functionality of managing traffic and equally dividing it for efficient traffic management.
4. Azure Private DNS Zone

Azure Private DNS Zone is a service that provides secure and reliable DNS management for virtual networks, enabling organizations to use custom domain names instead of Azure-provided names. It provides facility of name resolution for resources within the network, supports automatic registration of DNS records, and allows for split-horizon DNS configurations.
In this lab, we will use Azure DNS service to provide a URL to a VM’s IP. This service is responsible for providing a private Domain name just like a normal URL of any website. Here we will create a Azure DNS service. Then we will create a VM and setup its IP address inside Azure DNS as a record. Now when we will ping the Domain URL, it will return the ping repsonses.
This service enhances security by ensuring that internal resources remain inaccessible from the public internet while simplifying network management and improving operational efficiency.
5. Create & Manage Application Gateway
An Application Gateway in Azure is a web traffic load balancer that enables you to manage traffic to your web applications. It operates at the application layer (OSI Layer 7) and provides features like SSL termination, URL-based routing, and web application firewall.
Here’s what you need to know about Application Gateway:
- Purpose and Function: Distributes incoming web traffic based on URL, session affinity, or other routing rules.
- Configure Frontend IP: Assigns public or private IPs to receive client requests.
- Create Backend Pool: Groups backend servers or VMs that serve the application.
- Frontend & Backend Configuration: Set rules, listeners, and probes to control traffic flow.
- Add Backend Servers: Associate servers or VMs to the backend pool.
- Testing: Validate traffic routing and gateway functionality.
In this lab, you will create an Application Gateway, configure its frontend IP and backend pool, add backend servers, and test the gateway to ensure proper web traffic distribution.
Related Readings: Learn Azure Load Balancer, Front Door & Application Gateway
1.5 Network Endpoint and Security
1. Secure Storage with Service Endpoint
Secure Storage with Service Endpoint focuses on making sure our Azure storage (like where we keep files) is super safe and only accessed by the right computers. We do this by creating a special private network inside Azure.
Within this lab, we set up a virtual network with two separate sections: one private and one public. Then, we tell the private section to directly connect to our storage using something called a service endpoint. This connection happens secretly behind the scenes, not on the open internet.

Next, we use Network Security Groups which will make sure only computers in our private section can reach the storage and stop anyone from the public section from even trying. We also make sure we can access our public section for management if needed.
Finally, we put some Virtual Machines (VMs) in both the private and public sections. This is to test our setup: we’ll check if the private VM can easily connect to the storage (it should!), and if the public VM is completely blocked (it should be!). This confirms our storage is locked down tight!
2. User-assigned managed identities
With user-assigned managed identities, resources can obtain credentials from Azure AD without the need to manage or store any secrets or credentials within the application or code. This simplifies the authentication process and enhances security by eliminating the need for developers to manage credentials manually.
Within this lab, we will create custom identity on our own. Then we will utilise the identity to assign it for access to that resource.
The managed identity can be used to authenticate and access other Azure resources, such as Azure Key Vault or Azure Storage, by granting appropriate permissions to the identity.
3. Filter Traffic using Network Security Group
A Network Security Group (NSG) in Azure is a critical security feature used to filter inbound and outbound traffic to Azure resources within a virtual network. NSGs contain security rules that allow or deny traffic based on source, destination, port, and protocol.
Here’s what you need to know about Network Security Groups:
- Purpose and Function: Control network traffic to protect resources and enforce security policies.
- Application Security Groups: Group virtual machines for simplified management of security rules.
- NSG Creation and Association: Apply NSGs to subnets or individual network interfaces for granular control.
- Security Rules: Define custom allow or deny rules for traffic filtering.
In this lab, we will create virtual networks and application security groups, configure network security groups with specific security rules, and associate them with subnets and virtual machines to control network traffic effectively.
1.6 Azure Storage Solution
1. Secure Data using Key vault
By leveraging Azure Key Vault, organizations can enhance the security posture of their applications and services by securely managing cryptographic keys and secrets, reducing the risk of data breaches and unauthorized access to sensitive information.
Here are some benefits provided by Azure key vault:
- Centralized Key and Secret Management
- Secure Key Generation and Storage
- Key Management Operations
- Secret Management
- Access Control and Permissions
- Integration with Azure Services
- Auditing and Monitoring
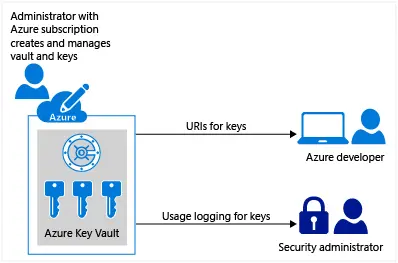
In this lab, we will use Azure Key Vault to keep our sensitive data like encryption keys and connection strings super safe, just like a digital locker. Here, we will set up this secure vault, put some important keys and secret information inside it, and then allow our application to securely fetch these secrets.
Finally, we will demonstrate how our application uses these secrets from the Key Vault to encrypt sensitive data directly within an Azure SQL Database, making sure our information is protected from unauthorised access.
2. Create Azure file share
An Azure file share is a fully managed file storage solution that provides a secure and scalable way to store and share files in the cloud. Azure file shares are accessible via the industry-standard SMB and NFS protocols, making them compatible with a wide range of applications.
In this lab, we will use Azure File Share to create a shared network folder in the cloud, just like you’d have on a local office network, but accessible from anywhere. Here, we will start by creating a virtual machine. Then, we will set up a storage account, which is like a big container for our data.
Within that storage account, we’ll create the actual Azure File Share. Finally, we will connect this file share to our virtual machine using a PowerShell script, making it appear as a normal drive on the VM. This way, multiple virtual machines or even on-premises computers can easily access and share files from one central, cloud-based location, making file management much simpler and more accessible.
3. Create Blob lifecycle management
To improve application performance, consider using Azure Blob Storage, Azure CDN, and Azure Front Door for caching and fast content delivery across the globe.
Blob lifecycle management is a powerful tool for managing the lifecycle of your blobs in Azure Blob Storage. It allows you to automatically move blobs to different storage tiers based on their age or access patterns.
In this lab, we will prepare a couple of storage accounts by enabling features like versioning and change feed, which are important for tracking changes and allowing replication. Then, we configure lifecycle management policies to automatically move our older, less-used data to cheaper storage tiers or even delete it after a set time, saving costs.
further, we will set up blob object replication to automatically copy our blobs from one storage container to another in a different account, ensuring data redundancy and helping with disaster recovery. Finally, we verify that when a file is added to the source, it automatically appears in the destination, confirming our setup is working.
Blob lifecycle management is a feature of Azure Blob Storage that allows you to define rules for how blobs are moved between different storage tiers. These tiers have different costs and performance characteristics.
- Hot tier: The hot tier is the most expensive tier, but it provides the best performance.
- Cool tier: The cool tier is less expensive than the hot tier, but it has slightly lower performance.
- Archive tier: The archive tier is the least expensive tier, but it has the lowest performance.
4. Create an Unmanaged Disk & Managed Data Disk
Create an Unmanaged Disk VM and Managed Data Disk basically means we’re making two different kinds of virtual machines in Azure to show how their storage works.
Within this lab, First, we’ll set up a VM where we handle the disk ourselves, which can be a bit cheaper. We pick an operating system, size it right, and the main thing is, we tell Azure not to manage the OS disk. We’ll even set up a separate storage account for this disk, and make sure it’s replicated for safety. Then, we’ll create another VM, a Windows one, but this time, we let Azure handle its disk automatically – that’s the “managed” part.
After that, we’ll add another new disk to this Windows VM, and this too will be a managed data disk, which Azure takes care of for us. Once both VMs are ready, we’ll connect to the Windows one and quickly format that new data disk so it’s ready to store our stuff. It’s all about understanding how to choose the right disk type for your needs, whether you want to manage it yourself or let Azure do the heavy lifting!
5. Create Azure Storage Account & Containers
An Azure Storage Account provides a secure, scalable, and durable platform to store data objects like blobs, files, queues, and tables. It enables cloud applications to store and retrieve data efficiently.
Here’s what you need to know about Azure Storage Accounts:
- Purpose and Function: Centralized storage for unstructured and structured data.
- Types of Storage: Blob, File, Queue, Table storage options.
- Containers and Blobs: Containers organize blobs (files) within the storage account.
- Access and Security: Manage access via shared keys, SAS tokens, and Azure AD.

In this lab, you will create a storage account, set up a storage container, and upload blobs to the container, enabling you to manage and access unstructured data in Azure.
1.7 Container & Azure Kubernetes Services
1. Creation and testing Azure Container Registry
To design scalable, microservices-based, and serverless architectures, you can leverage Azure App Service, Azure Kubernetes Service (AKS), and Azure Functions. These services allow you to build cloud-native applications that scale automatically and remain highly available.
Azure Container Registry is a cloud-based service provided by Microsoft Azure that enables organizations to store, manage, and deploy container images. It serves as a private registry for hosting Docker container images, allowing developers to easily build, store, and distribute containerized applications within their Azure environment.
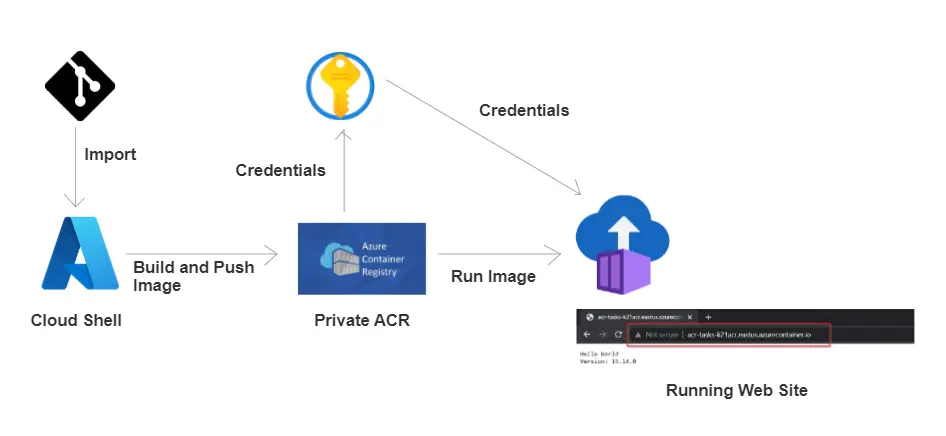
In this lab, we will set up our own private cloud storage for Docker images, which are like packages for our applications. We’ll start by creating the Azure Container Registry (ACR) itself. Then, we’ll build a Docker image of our application and securely push it into this new registry. We’ll also make sure the credentials for accessing ACR are properly secured.
Finally, we’ll use the Azure CLI to deploy our application as a container, pulling that image directly from our ACR, confirming everything works as expected from creation to deployment.
2. Implement Azure Container Instances
Azure Container Instances (ACI) is a fully managed, serverless container orchestration service for running containers in Azure. ACI allows you to run Docker containers without having to provision or manage any virtual machines. This makes it a quick and easy way to deploy and scale containerized applications.
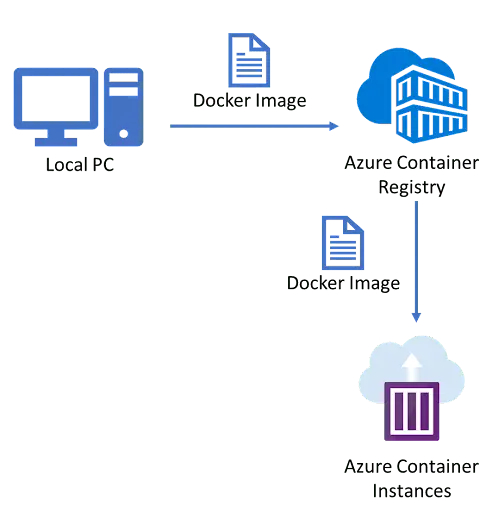
In this lab, we will run a Docker container in Azure without worrying about managing any virtual machines. We’ll simply go to the Azure portal, search for and create a Container Instance, picking a pre-built Docker image to deploy.
We’ll give it a public network address and a DNS name so we can access it easily. Once it’s deployed and running, we’ll open its public URL in a browser to check if our application is working fine.
3. Creation of SQL as a PAAS in AKS
With SQL as a PaaS in AKS, developers can easily provision and configure databases within their Kubernetes clusters using Azure SQL Database. They can take advantage of features like automated backups, high availability, and built-in security mechanisms provided by Azure.
In this lab, we are basically deploying a SQL Server database as a container inside our Azure Kubernetes Service (AKS) cluster. We’ll set up secure passwords and permanent storage for the database using Kubernetes, then deploy the SQL Server and make it accessible. Finally, we’ll connect to this deployed SQL instance to ensure it’s working fine.
By leveraging SQL as a PaaS in AKS, developers can streamline their application deployment processes, improve scalability, and reduce operational overhead associated with managing SQL databases. It provides a convenient and managed solution for storing and retrieving data in a Kubernetes environment, allowing developers to focus on application development and innovation.
4. Deploying Docker containers to Azure App Service web apps
Azure Web App for Containers enables developers to deploy their applications as Docker containers directly to Azure Web Apps. This integration allows developers to take advantage of the benefits of both Docker containers and the Azure Web Apps platform. Azure Web App for Containers provides a managed platform for hosting these Docker container-based applications. It takes care of infrastructure management, scaling, and load balancing, allowing developers to focus on their application code.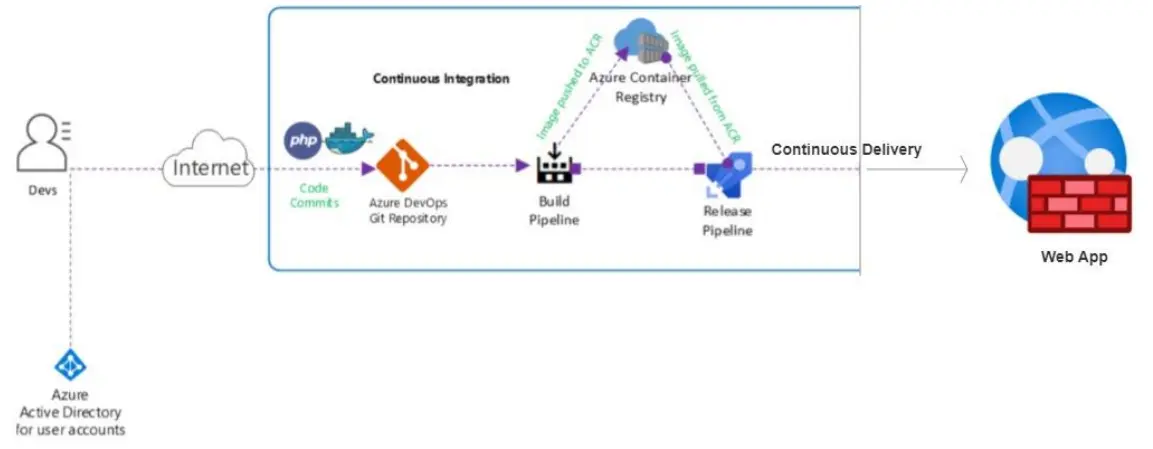
In this lab, we will use Azure pipelines for CI/CD to take our application’s code, package it into a Docker container, and then automatically publish it as a working website using Azure App Service. We’ll prepare our project and code, then configure pipelines that first build our application into a Docker image, and then deploy that image to the App Service.
By leveraging Docker containers, developers can package their applications along with their dependencies into a container image, ensuring consistency and portability across different environments. This eliminates the need for manual configuration and streamlines the deployment process.
5. AKS cluster creation and accessing it
Azure Kubernetes Service (AKS) is a fully managed service that simplifies the deployment, management, and scaling of containerized applications. It abstracts Kubernetes management, allowing developers to focus on their applications. An AKS cluster consists of two key components: the control plane (master node), which orchestrates workloads and manages the cluster, and the worker nodes, which run the application workloads.
In this lab, we will create Kubernetes cluster in Azure, which is like a powerful orchestrator for running our containerized applications. We’ll go to the Azure portal and create this cluster, defining its basic settings, network configuration, and monitoring options.
Once the cluster is deployed and ready, we’ll open the Azure Cloud Shell to connect to it. There, we’ll retrieve the necessary access credentials and then run a simple command to confirm that our connection to the AKS cluster is successful and its nodes are all up and running.
There are multiple ways to deploy an AKS cluster. The Azure Portal provides a user-friendly graphical interface for easy cluster creation and management. The Azure CLI offers command-line tools for more control, while Azure PowerShell is tailored for Windows environments and automation. For infrastructure-as-code, ARM templates and Terraform offer template-driven deployment, ensuring consistent, repeatable setups across environments, making AKS more efficient and scalable.

6. Configuring and Securing ACR and AKS
Azure Kubernetes Service (AKS) simplifies Kubernetes management by offloading tasks like health monitoring and maintenance to Azure. You only pay for the agent nodes, not the master nodes. AKS supports advanced features such as Azure Active Directory (Azure AD) integration and Kubernetes Role-Based Access Control (RBAC) for managing access to resources.
In this lab, linking our private container image storage with our Kubernetes cluster in a secure way. We’ll first create an Azure Container Registry (ACR) and push a container image, like an Nginx app, into it. Then, we’ll set up an Azure Kubernetes Service (AKS) cluster. The key part is then granting our AKS cluster the right permissions to securely pull images from our ACR. Finally, we’ll deploy an application from our ACR onto the AKS cluster
Azure Monitor tracks performance metrics from containers, nodes, and controllers. AKS nodes run on Azure VMs, supporting storage, upgrades, and GPUs. Azure Container Registry allows for efficient storage and management of Docker and OCI images, and Azure Container Registry Tasks automates image builds based on code updates, streamlining container deployment workflows.

1.8 Azure DevOps (CI/CD Tools and pipeline)
1. Creating FREE Microsoft Azure DevOps Account
Azure DevOps account is a cloud-based service provided by Microsoft that enables teams to plan, develop, test, and deliver applications efficiently. Azure DevOps account provides a centralized platform for managing all aspects of software development projects. It includes features such as Azure Boards for agile project management, Azure Repos for version control and code collaboration, Azure Pipelines for continuous integration and delivery, and Azure Test Plans for test management and execution.
In this lab, we will see the steps to setup the Azure DevOps account from scratch and what next things you need to do to get access to micrsoft hosted agents for your pipelines to run.
Want to create free Azure DevOps account? Click Here
2. Enable Parallelism in Azure DevOps
Parallelism in Azure DevOps refers to the ability to execute multiple tasks or stages of a pipeline simultaneously. It allows for the concurrent execution of jobs, which can significantly improve the speed and efficiency of pipeline runs.
In this lab, we will see the process to get the permission to use Microsoft hosted agents for our piprline to run either for public or private projects in Azure DevOps.
The use of parallelism in Azure Pipelines offers several benefits for running pipelines. Firstly, it reduces the overall execution time of pipelines by running multiple jobs in parallel.
Want to enable parallelism in your Azure DevOps account? Click Here
3. Creating Service principal for applications
Creating a service principal in Azure DevOps allows you to securely authenticate and access Azure resources for deployment and automation purposes. A service principal is a security identity that enables applications, services, or tools to interact with Azure resources without requiring manual intervention or user credentials.
By integrating a service principal with Azure DevOps, you establish a secure and automated connection between your Azure subscription and your DevOps pipelines. This connection facilitates seamless deployment, management, and automation of Azure resources while adhering to best practices in security and access control.
In summary, a service principal serves as a bridge between Azure DevOps and your Azure environment, enabling pipelines and automated workflows to efficiently and securely deploy and manage resources in Azure. This approach ensures consistency, scalability, and security in your DevOps processes.

In this lab, we will see how we can create a service principal which is responsible for providing the access to any service/identity to view/create/modify/delete the resource according to the access provided to service principal.
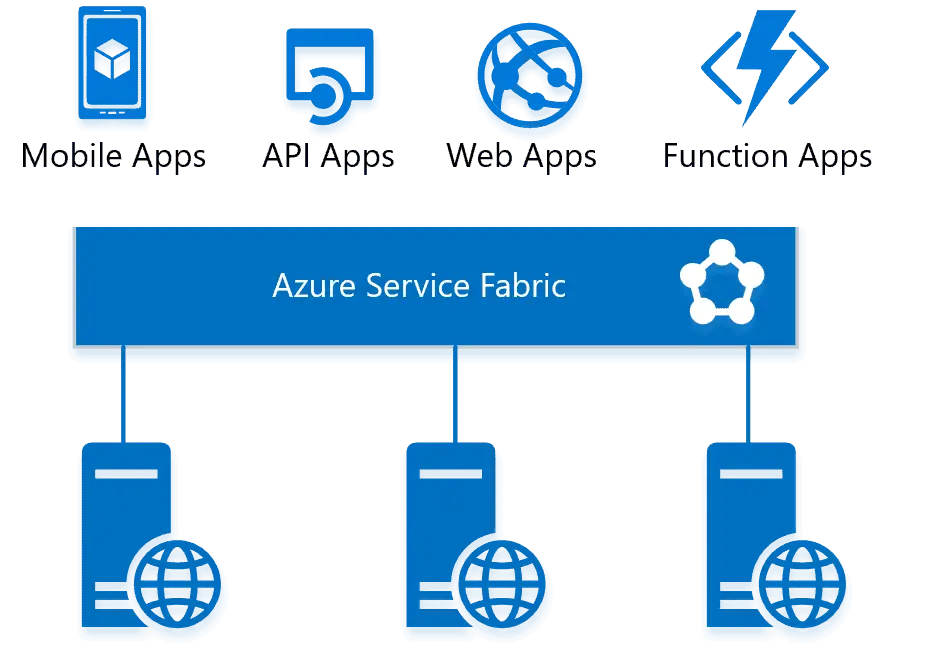
4. Deploying a multi-container application in Azure
Azure provides various options for deploying and orchestrating containers, such as Azure Kubernetes Service (AKS), Azure Container Instances (ACI), and Azure Service Fabric. These services enable you to run, scale, and manage containerized applications efficiently in the Azure cloud.
In this lab, we’re setting up CI/CD pipeline to deploy a complex application, made of multiple containers, to Azure Kubernetes Service (AKS). This involves getting our containers ready in a registry and having an Azure SQL database. Finally, we use automated pipelines to build and deploy this entire multi-container application to AKS, ensuring all parts connect and work together seamlessly.
The approach used here of deploying a multi-container application in Azure is by using Azure Kubernetes Service (AKS). AKS is a managed container orchestration service that simplifies the deployment, management, and scaling of containerized applications using Kubernetes.
5. Implement Github actions for CI/CD
Azure offers its own set of tools for CI/CD on Azure DevOps portal. There are various tools available in market for CI/CD pipelines.One such tool is Github actions offered by Github for CI/CD deployment.
In this lab, we’re setting up an CI/CD directly within GitHub using it service called github action to build and deploy our application to Azure. We’ll prepare our GitHub repository, create a secure connection to Azure, and then use a GitHub Workflow to automatically build and deploy our application whenever we make changes.
Here you will be using Github actions to implement CI/CD deployment on Azure portal. This will deploy web application on Azure portal.
6. Creating Service principal for applications
A Service Principal in Azure is a security identity used by applications or services to access specific Azure resources. It enables automated, secure, and delegated access without requiring user credentials.
Here’s what you need to know about Service Principals:
- Purpose and Function: Secure authentication for applications and automation scripts.
- Creation: Define app identity, assign roles and permissions.
- Service Connection: Links the Service Principal to DevOps or other tools for resource access.
- Management: Control and rotate credentials to maintain security.
In this lab, you will create a Service Principal and set up a Service Connection, enabling secure, automated access for your applications to Azure resources.
1.9 Microsoft Entra ID (Azure AD) and On-Prem integration
1. Entra ID (Azure Active Directory) Synchronization with On-Premise Active Directory using Entra Connect (AD Connect)
Microsoft Entra ID Sync is a component of Microsoft Entra Connect that facilitates the synchronization of identity data between an organization’s on-premises environment and Microsoft Entra ID.
It consists of two main components: the on-premises directory service and the service-side component in Microsoft Entra ID called the Microsoft Entra Connect sync service. The on-premises component is responsible for connecting to the on-premises directory, while the service-side component handles the synchronization process within Microsoft Entra ID.
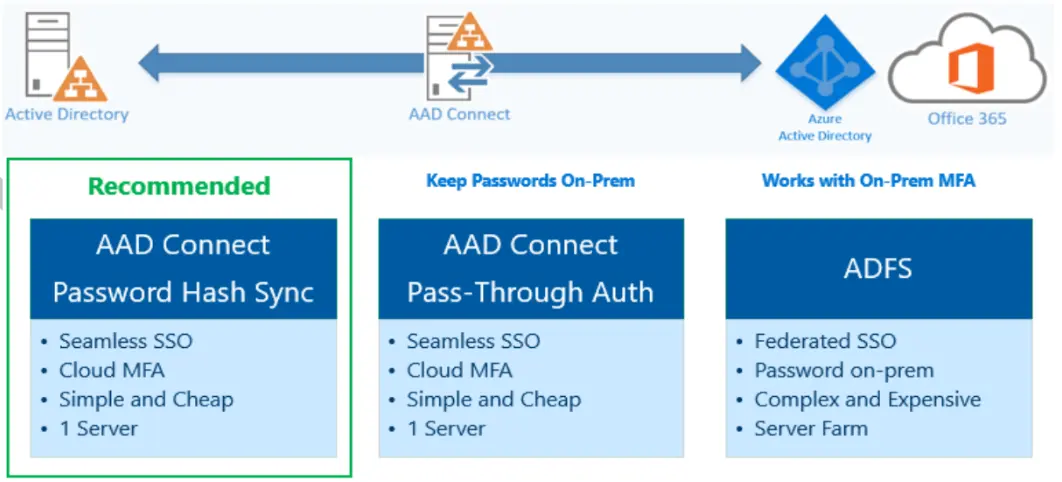
In this lab, we will be connecting our traditional, on-premises user directory with Azure’s cloud-based identity service (Entra ID). We’ll set up a simulated on-premises Active Directory, then install and configure a tool called Entra Connect on it. This tool helps us sync all our users and groups from our on-premises setup into Entra ID, allowing for unified identity management.
Finally, we test the synchronization to ensure all identities are correctly synced and available to the cloud.
2. Role Based Access Control (RBAC) in Azure
Role-Based Access Control (RBAC) restricts network access based on a person’s role within an organization, ensuring they only access information necessary for their duties. Access is defined by authority, responsibility, and job competency. RBAC limits permissions for tasks like viewing, creating, or modifying files, preventing lower-level employees from accessing sensitive data.
This is particularly useful in organizations with many employees or contractors, helping manage access and improve security. By implementing RBAC, companies can safeguard sensitive data and critical applications, reducing the risk of unauthorized access.
In this lab, we will provide the access to user based on diferent work roles. This lab will utilise the Microsoft Entra ID to provide access.
3. Enabling Microsoft Entra ID (Azure AD) Authentication for Virtual Machines using Azure Portal
Configuring Azure Active Directory (Azure AD/Entra ID) authentication for Virtual Machines simplifies access management by replacing traditional authentication with centralized identity control. With Azure AD integration, you can manage permissions and roles for users securely, ensuring streamlined access to Virtual Machines.
By enabling Azure AD login on a Virtual Machine, you provide a seamless and secure way for users to authenticate using their Azure AD credentials. This approach enhances security by centralizing authentication and reducing reliance on locally managed accounts.
In summary, configuring Azure AD authentication for Virtual Machines offers a secure and efficient way to manage access in the cloud. This integration ensures consistency, simplifies identity management, and enhances the overall security of cloud resources by leveraging Azure AD’s robust identity management capabilities.

In this lab, we will create a VM with having Entra ID access configured and then further we will setup the Identity of user which can access that VM.
1.10 Designing a solution to logging and monitoring for Azure Resources
1. Monitor Application Performance with Azure Load Testing
Monitor Application Performance with Azure Load Testing essentially means we’re going to push our web application hard to see how it performs under heavy traffic. The goal is to figure out if it can handle many users simultaneously without slowing down or crashing.
In this lab, we will set up CI/CD pipeline and our code is built and deployed with it, and then, we will configure a load testing service to increase the workload on VMs. We’ll run these tests and validate the results, and then integrate these tests into our automatic deployment system.
This way, every time we update our application, it automatically gets stress-tested, making sure that new changes don’t introduce any performance problems and that our application always performs reliably for real users.
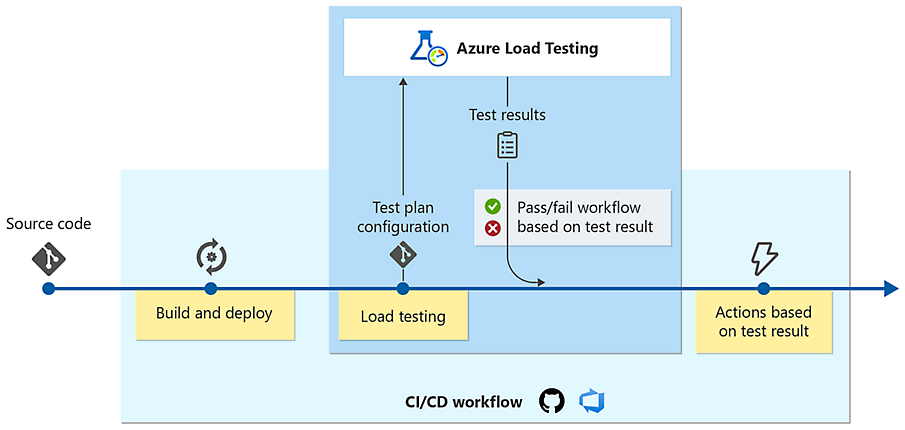
In this lab, we will we’re essentially setting up a CI/CD pipeline to automate to stress-test our application. We first get our application ready with its build and deployment pipelines in Azure DevOps. Then, we deploy and configure Azure Load Testing to simulate heavy user traffic on our app. The main part involves integrating these load tests directly into our CI/CD pipeline, so our application’s performance is automatically validated whenever new changes are deployed.
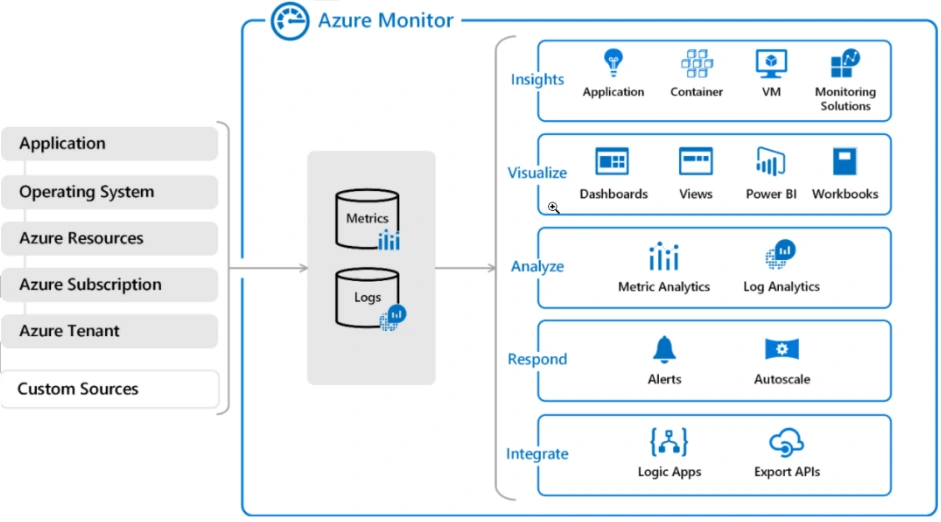
2. Azure Monitoring Using Log Analytics
Azure Monitoring using Log Analytics is a comprehensive monitoring solution provided by Microsoft Azure. It enables you to collect, analyze, and gain insights from logs and metrics generated by various Azure resources and applications.
Log Analytics is a central repository for storing and analyzing monitoring data, allowing you to monitor the health, performance, and availability of your Azure resources.
Here are the key components and features of Azure Monitoring using Log Analytics:
- Log Analytics Workspace: It provides a scalable and secure environment for collecting and analyzing logs from various sources.
- Data Collection: It can collect logs, metrics, and performance data from both Azure and non-Azure sources.
- Data Analysis and Query Language: Log Analytics uses query language called Kusto Query Language (KQL) to analyze and query data
- Alerting and Notification: When an alert condition is met, it can trigger notifications via email, SMS, or other integration options, allowing you to take proactive actions.
- Automation and Remediation: Log Analytics can integrate with Azure Automation and Azure Logic Apps to automate remediation actions based on monitoring data. You can define automated workflows to respond to alerts and perform remedial actions to address issues.
In this lab, a system to gather important information about how our virtual machines are performing. We’ll create a virtual machine and then set up a Log Analytics Workspace, which acts like a central collection point for all our monitoring data.
After that, we’ll create a Data Collection Rule to tell Azure exactly what kind of events and performance details to pick up from our virtual machine and send to that Log Analytics Workspace.
3. Azure Network Watcher
Azure Network Watcher is a comprehensive monitoring and diagnostic service provided by Microsoft Azure. It offers a suite of tools and capabilities to monitor, diagnose, and gain insights into the network health and connectivity of Azure resources.
By utilizing Azure Network Watcher, you can effectively monitor and diagnose network issues, optimize performance, ensure compliance, and enhance the overall reliability of your Azure network infrastructure.
In this lab, We’ll access Network Watcher in the portal to visually check our network’s layout and see how different parts are connected. Then, we’ll use its tools like “Next Hop” to trace network paths and “Connection Troubleshoot” to diagnose why our virtual machines might not be talking to each other properly on certain ports.
4. Microsoft defender for cloud
Microsoft Defender for Cloud is a cloud-native application protection platform (CNAPP) that offers a range of security measures and practices designed to safeguard cloud-based applications from various cyber threats and vulnerabilities.
It combines several capabilities, including:
- Development Security Operations (DevSecOps) Solution
- Cloud Security Posture Management (CSPM) Solution
- Cloud Workload Protection Platform (CWPP)
Microsoft Defender for Cloud facilitates unified DevOps security management across multicloud and multiple-pipeline environments, enabling organizations to keep their cloud applications secure from the start.
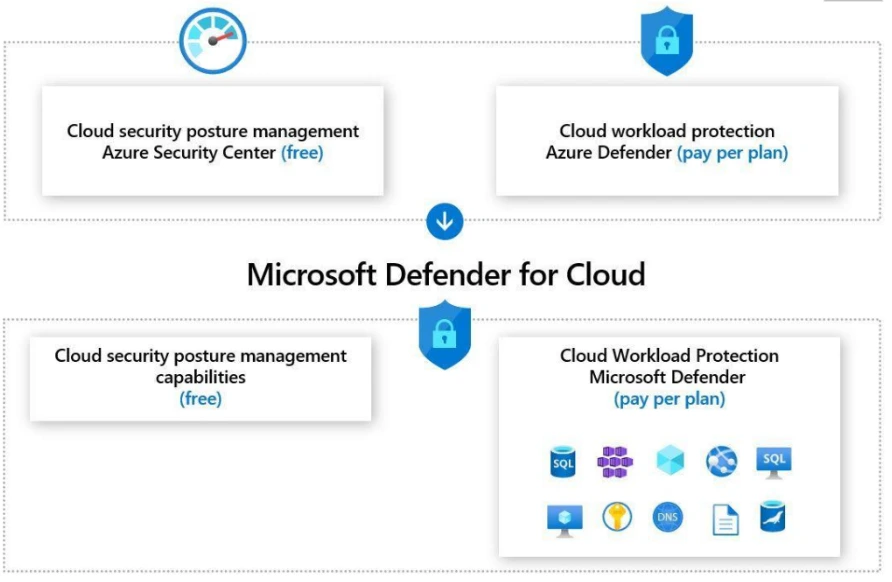
In this lab, We’ll set up Microsoft Defender for Cloud to continuously scan our environment for vulnerabilities. Then, we’ll review the security recommendations it provides, which tell us how to make our systems safer.
1.11 Azure Migration & Disaster Recovery
1. Virtual Machine Replication via Azure Site Recovery
Virtual Machine (VM) replication via Azure Site Recovery is a disaster recovery solution provided by Microsoft Azure. It allows you to replicate and protect your on-premises or Azure VMs by maintaining a secondary copy of the VMs in a different Azure region or on-premises datacenter.
You can achieve high availability and disaster recovery capabilities for your critical VM workloads. It helps minimize downtime, provides data protection, and allows for faster recovery in case of infrastructure failures, natural disasters, or other disruptive events.

In this lab, we will set up a backup plan for our Azure virtual machines in case of a big problem like a regional outage. We’ll use Azure Site Recovery to enable continuous replication, which means our chosen virtual machine will be constantly copied to another Azure region. This way, if our primary location goes down, we can quickly switch over to the replicated copy in the other region, ensuring our services remain available.
2. Backup of Azure VM into Azure Backup Vault
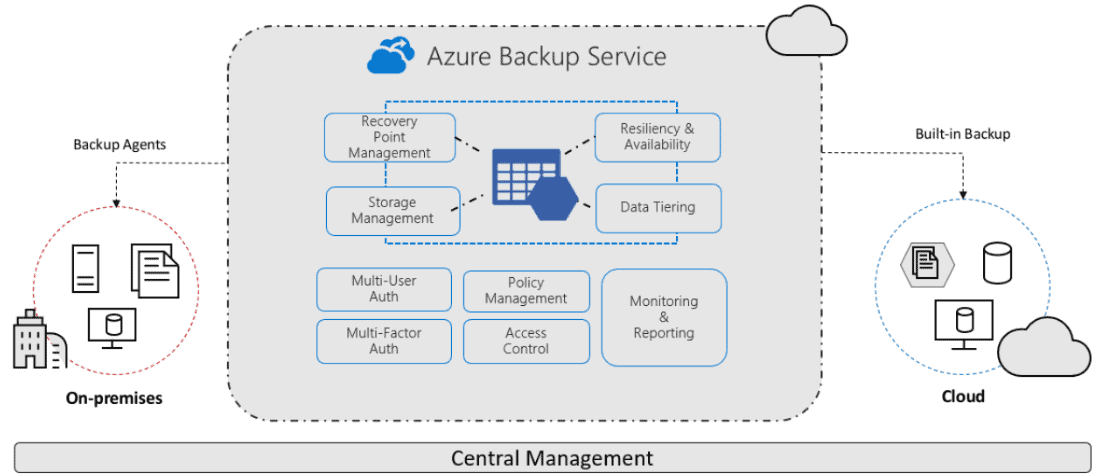
Azure Backup Vault is a scalable and secure cloud-based service provided by Microsoft Azure that allows you to protect and restore your data and applications in the event of accidental deletions, data corruption, or system failures.
When you back up an Azure VM into an Azure Backup Vault, the service takes a snapshot of the VM’s disks and stores them in the vault. This snapshot captures the entire state of the VM at a specific point in time, including the operating system, applications, and data.
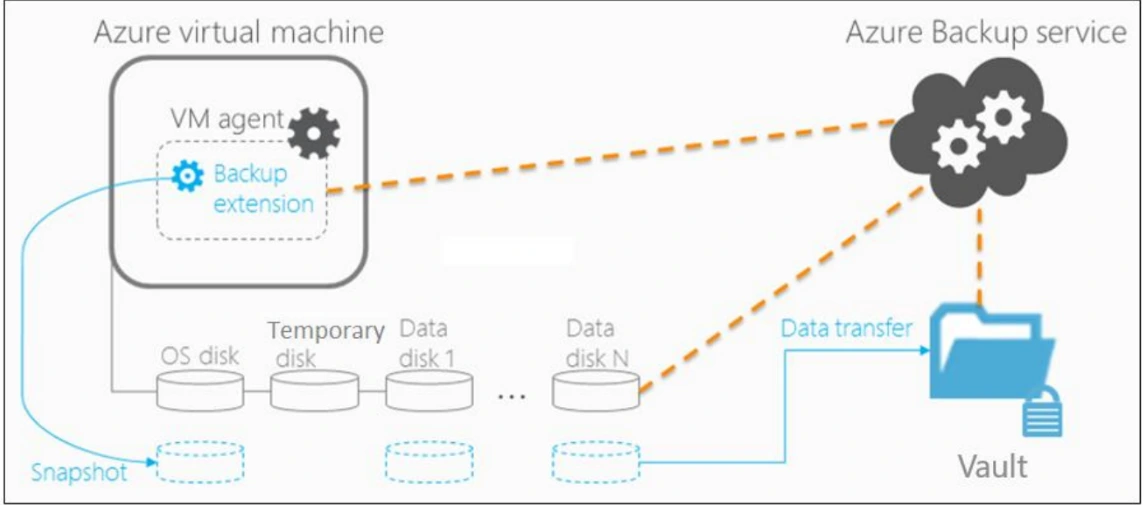
In this lab, We start by creating a Recovery Services Vault, which is like a secure storage place for all our VM backups. Then, we define backup policies to specify when and how often our VMs should be backed up, along with how long those backups should be kept. Finally, we configure our chosen Azure VMs to be backed up into this vault according to those policies, ensuring our data is safe and easily recoverable.
3. Backup of On-Premise Server into Azure Backup Vault
Backing up your on-premises server into an Azure Backup Vault is a Microsoft Azure product that allows you to secure the data on your server by producing and storing backups in an Azure cloud-based backup vault. This backup technique assists in protecting your important data and offers an extra layer of data security in the event of unintentional data loss, hardware failure, or other disruptive circumstances.
Azure Backup provides a reliable and scalable solution for backing up on-premises servers into the cloud. It eliminates the need for maintaining on-premises backup infrastructure and offers the flexibility to store backups. offsite in a secure Azure environment.
In this lab, we will simulate an on-premises server and then set up an Azure Recovery Services Vault in the cloud. We install the MARS Agent on our simulated server to push specific files and folders securely into that Azure vault, and then test restoring the data to ensure it’s safely backed up.
1.12 Azure Developer Labs
1. Building a web application on Azure platform as a service offerings

In this lab, we will be creating and deploying a complete web application using Azure’s ready-to-use services. We’ll set up an Azure Storage account for our backend data and then create separate Azure App Service web apps for both the backend API and the frontend. Finally, we’ll deploy our ASP.NET applications to these web apps, demonstrating how to build a multi-tier application purely on Azure’s Platform-as-a-Service, without managing the underlying infrastructure.
2. Retrieve Azure Storage Data with .NET SDK
Retrieving Azure Storage resources and metadata using the Azure Storage SDK for .NET allows developers to interact with storage accounts programmatically. By installing the appropriate NuGet packages, such as Azure.Storage.Blobs for Blob Storage, developers can authenticate using connection strings or Azure Identity and perform operations like listing containers and retrieving metadata.

In this lab, we will be building a web application that can fetch information from Azure Storage. We’ll start by setting up an Azure Storage account where our data is stored. Then, we’ll create and configure a web app (likely a backend API) where our ASP.NET application will run. The main point here is how this deployed web application uses the .NET SDK to securely connect to that Azure Storage and retrieve specific data, like blobs, to be used by our application.
3. Constructing a polyglot data solution
Building a data solution in Azure involves setting up key resources like Azure Cosmos DB and Storage accounts. First, create an Azure Cosmos DB instance and configure it based on the required settings. Then, set up a Storage account for managing various data types, such as blobs and files, ensuring scalability and security.
After setting up the resources, focus on uploading and validating data. Upload image blobs into Azure Storage and review the JSON data for accuracy. Create a Cosmos DB database and collection, then upload and validate the JSON data. Finally, configure a .NET web application by referencing the data stores and establishing connectivity to Azure Cosmos DB, ensuring the application successfully integrates with and interacts with the data.

In this lab, we will be building an application that uses multiple types of Azure databases to handle different kinds of data efficiently. We’ll set up distinct data stores like Azure Cosmos DB for structured data (like JSON) and an Azure Storage account for unstructured data (like images). Then, we’ll upload the specific data into its respective store. Finally, we’ll configure a .NET web application to connect to and retrieve information from both these diverse data sources simultaneously, proving our polyglot approach works seamlessly.
4. Deploying compute workloads by using images and containers
Deploying compute workloads using images and containers in Azure simplifies the process of managing and scaling applications. First, you create an image that encapsulates the application’s environment, including the operating system, libraries, and dependencies. This image is then used to launch virtual machines (VMs) or containers, providing a consistent environment for workloads across different deployments.
In this lab, we will be taking our application, packaged as a Docker container, and deploying it to different Azure services. We’ll first create and push our Docker image to Azure Container Registry (ACR). Then, we’ll demonstrate deploying this image to an Azure Container Instance (ACI) for quick, simple runs, and also to a more modern and secure Azure Container Apps (ACA) environment for scalable workloads.
Containers are lightweight and portable, offering faster start-up times and resource efficiency. Azure offers services like Azure Kubernetes Service (AKS) and Azure Container Instances (ACI) to deploy and manage containers at scale. With AKS, you can orchestrate containerized applications, ensuring easy scaling, monitoring, and management, while ACI offers simpler, serverless container deployments for quicker setups. By leveraging images and containers, you ensure a streamlined and reproducible deployment process that enhances scalability and maintainability.
5. Authenticate by using OpenID Connect, MSAL and .NET SDKs
This guide provides a modern approach to managing user access using Microsoft Entra ID (formerly Azure AD), Microsoft Authentication Library (MSAL), and .NET SDKs. It offers a detailed step-by-step process to implement Entra ID and MSAL authentication in your .NET projects, helping developers enhance application security.
Designed for Azure developers, this guide focuses on practical security implementations, diving deep into each technology’s capabilities and configuration. The lab involves registering an application in Microsoft Entra ID, adding a user, and testing the user’s access to ensure that Entra ID effectively secures the application. This guide is perfect for those looking to strengthen the security posture of their applications while leveraging the power of Azure’s identity management system.

In this lab, we will set up ASP.NET web application to securely verify user identities using Azure’s identity service, Entra ID (formerly Azure AD). We’ll register our application in Entra ID and configure its authentication. Then, we’ll build our ASP.NET web app, enabling it to connect to Entra ID using OpenID Connect and the MSAL (.NET SDKs) to allow users from a single organization to securely sign in and access the application.
6. Access resource secrets more securely across services

In this lab, we will know how to let Azure services talk to each other safely without hardcoding sensitive information. We’ll create an Azure Key Vault to store our secrets and an Azure Functions app. The key step is giving the Function App a managed identity, which allows it to securely fetch secrets from Key Vault directly. Then, we’ll write code in the Function App to retrieve necessary credentials (like a storage connection string) from Key Vault and use them to access other services, such as Azure Blob Storage, ensuring all communication remains highly secure.
7. Create a multi-tier solution by Using Azure Service
You will create a containerized web app hosted on Azure to serve as the source for your API. You’ll then utilize Azure API Management to build an API proxy, exposing and testing the APIs for developers to query and validate the service’s functionality.
An API gateway functions as a reverse proxy between clients and services, routing client requests to the appropriate service. It can also handle tasks like authentication, SSL termination, and rate limiting. Azure API Management provides a robust platform for managing, securing, and publishing APIs across different environments, ensuring efficient API lifecycle management.

In this lab, we will be setting up a layered application where different parts handle different jobs. We’ll deploy our core web application using a container on Azure App Service. Then, we’ll put Azure API Management in front of it to act as a smart proxy, allowing us to control and modify how requests and responses flow to and from our backend application, making the whole solution more secure and manageable.
8. Asynchronously processing messages by using Azure Service Bus Queue
For implementing scalable messaging solutions in Azure, consider using Azure Service Bus, Azure Event Hubs, and Azure Queue Storage to ensure reliable communication between application components in your cloud infrastructure.”
Integrating Azure Service Bus with .NET Core enables reliable message queuing for seamless communication between distributed applications.
Azure Service Bus facilitates asynchronous messaging by allowing applications to send and receive messages efficiently. A .NET Core application can be configured to leverage Service Bus queues for effective decoupling and message handling.
Key benefits of integrating Azure Service Bus with .NET Core include:
- Reliable message delivery and asynchronous processing.
- Decoupling of application components for improved scalability.
- Secure communication between distributed services.
- Support for message transactions and dead-lettering.

In this lab, we will go though a reliable way for different parts of an application to communicate without waiting for each other. We’ll create an Azure Service Bus Queue, which acts like a message inbox. Then, we’ll build one .NET application to send messages into this queue, and a separate .NET application to read and process those messages from the queue, demonstrating how to handle tasks independently and efficiently.
By utilizing Azure Service Bus, .NET Core applications can achieve robust and efficient message-based communication.
9. Enhancing a web application by using the Azure Content Delivery Network
Azure Content Delivery Network (CDN) enhances performance by caching content closer to users based on their geographic locations.
Azure CDN is configured to store frequently accessed image and video files, minimizing latency and improving load times. A storage account is used to manage these media assets efficiently.
Key benefits of implementing Azure CDN include:
- Reduced latency and faster content delivery.
- Optimized bandwidth usage for large media files.
- Improved user experience with globally distributed caching.
- Seamless scalability to handle high traffic loads.

In this lab, we will see a method for our website to be super fast for users all over the world. We’ll set up our web application and put static content like images in Azure Storage. Then, we configure an Azure Content Delivery Network (CDN) with endpoints. This CDN copies our content to servers closer to users globally, so when someone opens our website, the content loads much quicker from a nearby server, giving them a much smoother experience.
By leveraging Azure CDN, applications can deliver content efficiently, ensuring a responsive experience for users worldwide.
10. Monitor services that are deployed to Azure
Monitoring a .NET Web API with Azure Application Insights enables real-time telemetry collection and performance optimization.
Application Insights is configured to track API requests, response times, and potential bottlenecks. An Azure Web API resource is deployed with autoscaling options to enhance reliability and scalability.
Key benefits of using Application Insights for API monitoring include:
- Real-time telemetry and diagnostic insights.
- Identification of performance bottlenecks and request patterns.
- Autoscale support for handling variable traffic loads.
- Enhanced observability for proactive issue resolution.

In this lab, we will setup monitoring for our web applications to understand their performance and health in real-time. We’ll create an Application Insights resource and an Azure Web API. The key step involves integrating our web API with Application Insights, both locally and after deployment. This allows us to collect and view in-depth metrics, logs, and real-time performance data
By integrating Application Insights, .NET Web APIs can achieve high availability, performance monitoring, and improved troubleshooting capabilities.
11. Pub & Sub to Event Grid events Using Azure
An event-driven architecture can be implemented using Azure Event Grid, Azure Event Hubs, and Azure Functions. These services enable you to build applications that react to events in real-time, making it easy to orchestrate workflows and trigger actions based on events.
Azure Event Grid enables event-driven communication between services, facilitating seamless automation in cloud workflows.
A containerized web application is configured to subscribe to Azure Event Grid events. This web app listens for specific events triggered by Azure resources or custom event sources.
Key benefits of integrating Event Grid with a containerized web app include:
- Real-time event processing and monitoring.
- Simplified event-driven architecture for automation.
- Scalable and efficient handling of event notifications.
- Seamless integration with Azure services and custom event sources.

In this lab, we will create an Azure Event Grid topic, which acts as a central hub for events. Then, we’ll deploy a web app that subscribes to this topic to receive events. Finally, we’ll write a .NET application to publish custom events to the Event Grid topic, demonstrating how events flow from a publisher to a subscriber for real-time reactions.
By deploying a web app that interacts with Azure Event Grid, organizations can enable automated workflows, ensuring efficient and reliable event-driven processing in the cloud.
12. API Management
Azure API Management is a fully managed service that enables organizations to create, publish, secure, and monitor APIs at scale. It acts as a gateway between backend services and API consumers, providing centralized control and analytics.
Here’s what you need to know about Azure API Management:
- Purpose and Function: Simplifies API publishing, security, and monitoring for both internal and external developers.
- API Gateway: Manages API routing, throttling, and security policies such as OAuth and JWT validation.
- Developer Portal: Provides a customizable platform for API documentation and developer onboarding.
- Configuration and Management: Supports versioning, analytics, and integration with Azure services.
In this lab, we will create a new API Management resource and explore its core features. You will also share your learning experience on LinkedIn and community forums.
1.13 Power Shell and CLI usage
1. Create a Resource group, and Virtual Machine using Azure CLI
A Resource Group in Azure acts as a container that holds related resources for an Azure solution, enabling easier management and organization. The Azure CLI provides a powerful command-line interface to create and manage Azure resources efficiently.
Here’s what you need to know about using Azure CLI for resource management:
- Purpose and Function: Manage Azure resources programmatically for automation and consistency.
- Create Resource Group: Define a logical container for related resources using CLI commands.
- Create Virtual Machine: Deploy VMs with specific configurations directly through CLI.
- Access and Login: Securely connect to your VM to manage workloads.
In this lab, we will create a resource group and a virtual machine using Azure CLI commands, then log into the VM to verify deployment and access.
Related Readings : Top Azure CLI Commands For Managing Azure Resources
2. Create and Deploy ARM templates using Azure Portal
Azure Resource Manager (ARM) templates are JSON files that define the infrastructure and configuration for your Azure solutions. Using ARM templates, you can deploy resources consistently and repeatedly through the Azure Portal or automated pipelines.
Here’s what you need to know about ARM templates in Azure:
- Purpose and Function: Enable Infrastructure as Code (IaC) for automated, consistent resource deployment.
- Template Creation: Define Azure resources and their properties declaratively in JSON format.
- Deployment: Use the Azure Portal to deploy and manage these templates easily.
- Configuration and Management: Templates support parameterization and version control for flexible and repeatable deployments.
In this lab, we will create a virtual machine ARM template and deploy it through the Azure Portal, demonstrating template-driven resource provisioning.
Projects
1. Deployment of 3 tier Architecture in Azure
A 3-tier architecture is a software design pattern that separates an application into three logical tiers: presentation, application, and data. Each tier has a specific set of responsibilities and communicates with the other tiers through well-defined interfaces.
| Tier | Responsibilities |
|---|---|
| Presentation | Displays the user interface and handles user interactions. |
| Application | Contains the business logic of the application and processes user requests. |
| Data | Stores and manages the application’s data. |

In this project, we will setup the 3- tier infrastructure within Azure. These Three tier will include Web tier, App Tier, Data Tier. Once done we will create connectivity between all of them and place 2 load balancers to balance the traffic.
2. Containerise and deploy a Java app to Azure
Deployment of a Java app to a web server is a legacy process but as the DevOps field is growing day by day, we will learn to deploy the app inside containers and power, efficiency and simplicity of AKS or kubernetes. This will also improve the hardware usage while deploying a single app and leaving rest hardware usable for other applications.
This project will cover your knowledge on deployment, containers, Azure Kubernetes Service(AKS), CI/CD pipelines, git repository and some more technologies used so far in Azure on daily basis.
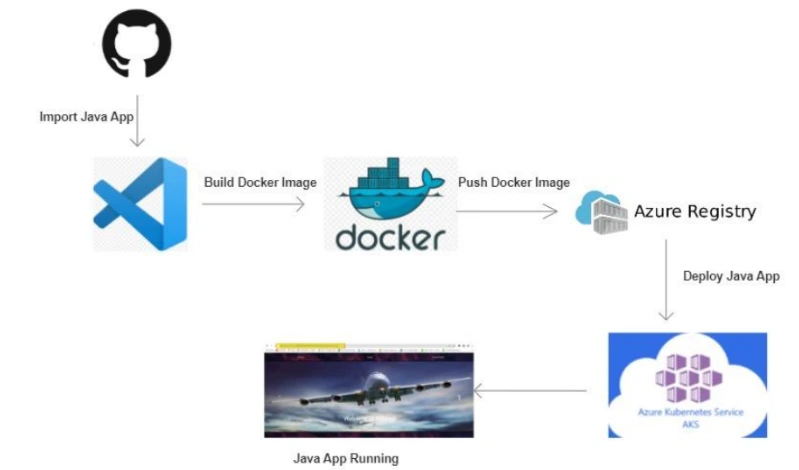
In this project, we will be importing a java application to work environment, then build a docker image for the application. Once done this image will be stored in ACR (Azure container registry). Further, this image will be pulled and run on AKS cluster. This cluster will be configured to acces the application running on cluster.
3. Automating Infrastructure deployment using Terraform and Azure pipeline
For automated deployment, Azure DevOps and Azure Pipelines provide a robust CI/CD framework. You can use Terraform and Azure Resource Manager (ARM) Templates for infrastructure-as-code to automate your entire deployment process.
Terraform is an open-source Infrastructure as Code(IaC) software tool that enables you to safely and predictably create, change, and improve infrastructure. Azure Pipelines is a continuous integration and continuous delivery (CI/CD) service that helps you automate the build, test, and deployment of your code.
By automating infrastructure deployment using Terraform and Azure Pipelines, you can:
- Reduce the risk of human error
- Improve the speed of deployment
- Increase the reliability of deployments
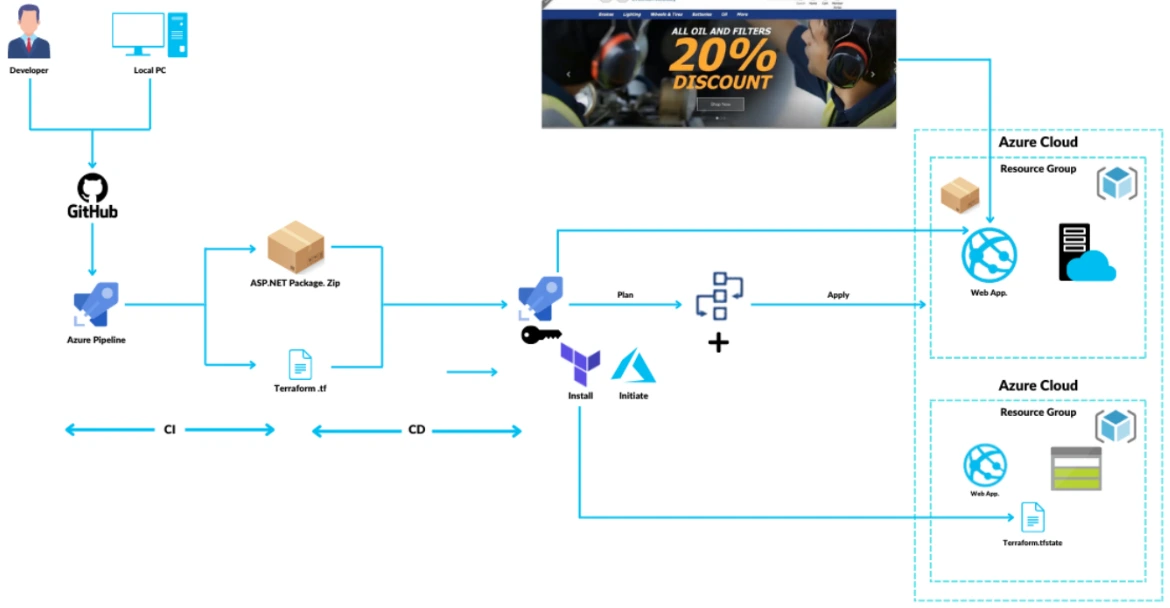
In this project, we will be building a web app application with the help of CI pipeline. The pipeline will also be genrating a terraform file as well, which will be used later on. Once th application is built, it will be further planned to deploy. Before deployment terraform code will be configured to setup infrastructure in Azure and then our application will be deployed on the same resource. Lastly we will testify by accessing the web app url in a web broswer.
Planning to perform this lab? Click here
4. Deploying multi-container application to AKS
Deploying a multi-container application to Azure Kubernetes Service (AKS) is the process of deploying multiple containers to an AKS cluster. AKS is a managed Kubernetes service that makes it easy to deploy and manage containerized applications.
There are many benefits to deploying a multi-container application to AKS, including:
- Scalability: You can scale your application up or down by adding or removing container instances.
- High availability: AKS distributes your containers across multiple hosts, so your application will remain available even if one host fails.
- Security: AKS uses industry-standard security features to protect your applications.
- Cost savings: AKS can help you save money by reducing the need for manual infrastructure management.
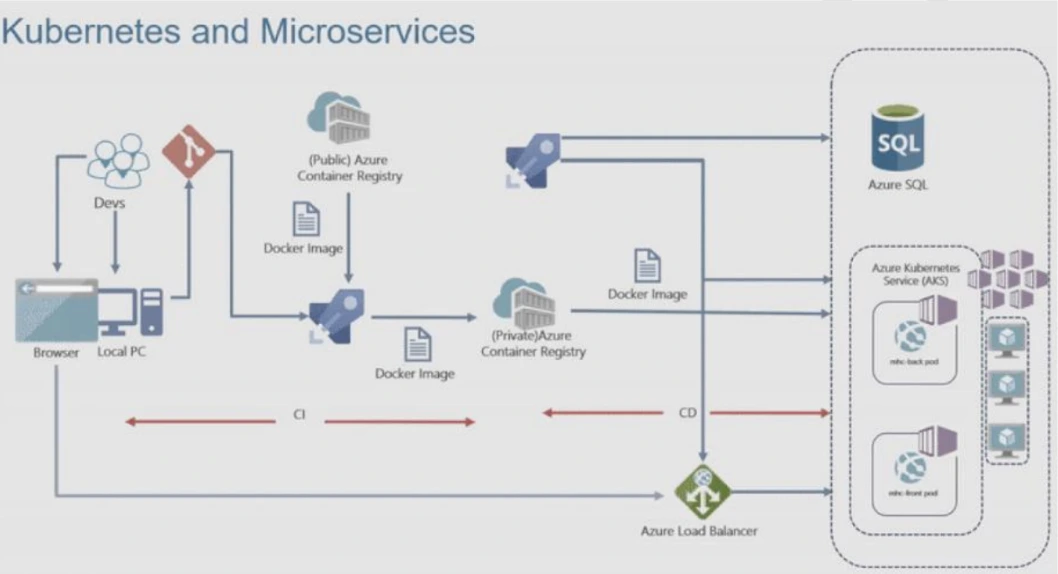
In this project, we will be building a multi-container web application with the help of a CI/CD pipeline. First, our essential infrastructure, including an Azure Kubernetes Service (AKS) cluster, an Azure Container Registry (ACR), and an Azure SQL database, will be created and configured.
Once the application is built and its environment settings are in place, our pipeline will automatically deploy this multi-container application onto the AKS cluster, ensuring all its components connect properly to the database and other resources. Lastly, we will verify its functionality by accessing the web app URL in a web browser.
5. Migration of resources from On-Premise to Azure
Migration of resources from On-Premise to Azure is the process of moving your existing IT infrastructure and workloads from your own data center to the Microsoft Azure cloud platform. This can include servers, virtual machines, storage, databases, and applications.
Why migrate to Azure?
There are many benefits to migrating to Azure, including:
- Scalability and flexibility: Azure offers a wide range of services that can be scaled up or down as needed, giving you the flexibility to meet your changing business demands.
- Reliability and security: Azure is a highly reliable and secure platform, with built-in security features and disaster recovery capabilities.
- Cost savings: Azure can help you save money on IT costs by reducing the need for hardware and software maintenance.
- Innovation: Azure offers a wide range of innovative services that can help you stay ahead of the curve and improve your business operations.

In this project, we will be focusing on moving our existing servers from our local, on-premises data centre into the Azure cloud. This involves first setting up essential Azure components like a Recovery Services Vault and a Storage Account to prepare for the migration process and to hold our data.
Once the cloud environment is ready, we will specifically perform the migration of Hyper-V virtual machines from our on-premises setup directly into Azure, making them run as Azure VMs. This ensures business continuity and leverages Azure’s scalability and reliability for our workloads.
6. Migration of resources across Azure regions
Azure regions are geographically separate locations where Azure resources are hosted. Each region has a unique set of datacenters, which are interconnected with high-bandwidth links. This architecture ensures that Azure resources are highly available and resilient to failures in any one region.
Microsoft provides a variety of tools and services to help you migrate resources across Azure regions. The most common approach is to use the Azure Resource Mover service and Azure Site Recovery.

In this project, we will be focusing on moving our Azure resources, specifically a virtual machine, from one Azure region to another. This involves first creating the source virtual machine. Then, we will set up Recovery Services Vaults in both the source and target regions, which are essential for managing disaster recovery and migration.
Once the vaults are ready, we will enable replication for our virtual machine using these Recovery Services Vaults. This process ensures that our VM’s data is continuously copied to the new region, allowing for a seamless and reliable migration of our resources across different Azure geographies.
7. Entra ID (Azure Active Directory) Synchronization with On-Premise Active Directory using Entra Connect (AD Connect)
Azure Active Directory (Azure AD) or Entra ID is a cloud-based identity and access management service that helps organizations manage user identities and access to cloud applications. Azure AD Connect is a synchronization tool that helps organizations synchronize their on-premises Active Directory (AD) domain with Azure AD now known as Microsoft Entra ID.
It consists of two main components: the on-premises Azure AD and the service-side component in Azure AD called Azure AD Connect sync service. The on-premises component is responsible for connecting to the on-premises directory, while the service-side component handles the synchronization process in Azure AD.
In this project, we will be connecting our local Active Directory with Azure’s cloud identity service (Entra ID). This involves setting up a simulated on-premises Active Directory, and then installing and configuring the Entra Connect tool on it.
This tool will automatically sync users and groups from our on-premises AD to Entra ID, allowing for unified user management across both environments, which we will then verify to ensure all identities are correctly replicated.
8. Containerised application using AKS
A deployment is an AKS object used to manage the deployment and scaling of containerized applications. It provides a declarative way to define and control the lifecycle of application containers within a Kubernetes cluster.
A Kubernetes deployment describes the desired state of the application, including the container image, the number of replicas to run, and the configuration of the application’s pods.
It ensures that the desired state is achieved and maintained by continuously monitoring the actual state of the application and making necessary adjustments

In this project, we will be deploying a containerized application to an Azure Kubernetes Service (AKS) cluster. We’ll set up and configure the AKS cluster, then deploy our application’s container image using deployment files. Finally, we’ll expose the application via a load balancer and verify it’s accessible through a web browser.
9. Site to Site VPN Connection using Azure Portal
A Site-to-Site VPN connection in Azure allows you to connect your on-premises network to your Azure Virtual Network (VNet) over an encrypted IPsec tunnel. This type of connection is often used to connect corporate networks to Azure, or to connect multiple Azure VNets together.
Site-to-Site VPN connections are configured using a VPN gateway. A VPN gateway is a dedicated virtual network appliance that provides secure connectivity between your on-premises network and Azure. To create a Site-to-Site VPN connection, you will need to create a VPN gateway in Azure and configure your on-premises VPN device to connect to it.

In this project, we will be creating a Site-to-Site VPN connection to securely link our Azure virtual network with an on-premises network. This involves setting up an Azure Virtual Network Gateway as our cloud VPN endpoint and a Local Network Gateway to represent our on-premises network.
Finally, we’ll establish the actual VPN connection between these two gateways, ensuring secure, encrypted communication between our cloud and local environments.
10. Create WordPress Site on Azure Portal
WordPress is a popular open-source platform that allows users to create and manage websites easily. You all might have gone through some of the websites designed using wordpress but they are so optimised that you can hardly find that it is working on based of wordpress template.
Here we will be deploying the wordpress website on Azure portal where you can access the website which will be having database and entire wordpress and resulting a working website. This project will be a good start of deploying a website and going through usage of various services of Azure.
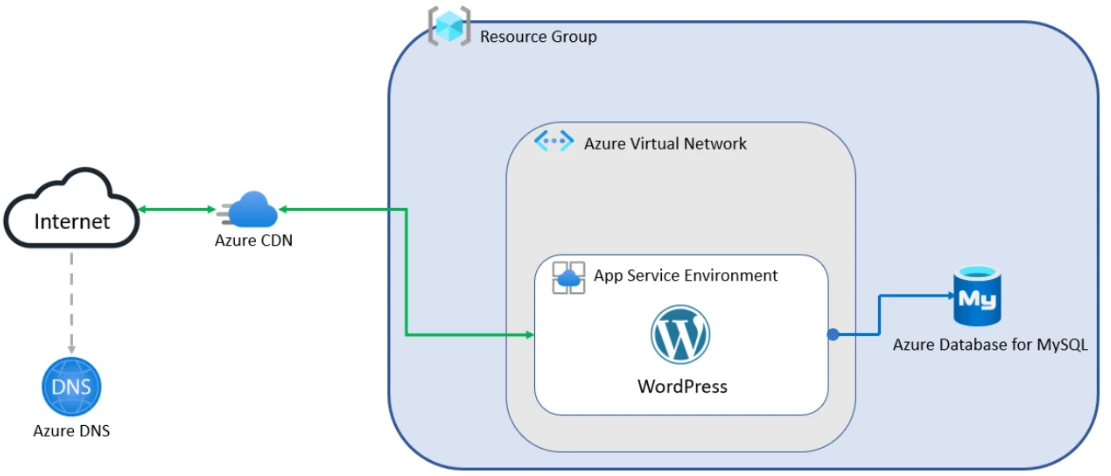
In this project, we will be creating a WordPress website directly on the Azure Portal. This involves simply searching for WordPress in the portal and then configuring its basic details like the resource group, region, a globally unique web app name, and setting up the WordPress admin credentials.
Once deployed, we’ll access the public URL of our new WordPress site in a web browser, and also log into its admin dashboard to verify full functionality, showcasing how easily a professional website can be launched on Azure.
11. Host your Portfolio via Azure Storage (Static Website Hosting)
Azure Storage is a cloud storage solution by Microsoft that provides highly available, scalable, durable, and secure storage for various data objects in the cloud. It offers a range of storage services and features, for IT professionals to interact & manage data stored in Azure Storage accounts.
One of the most cost-effective and scalable ways to host your portfolio online is by using Azure Blob Storage and Azure Static Website Hosting. With Azure Blob Storage, you can store and retrieve any amount of data from anywhere on the web, while Azure Static Website Hosting allows you to host static websites without the need for a web server or any other infrastructure.

In this project, we will be hosting a static portfolio website directly from Azure Storage for cost-effective and high-performance delivery. We’ll convert our content (like a CV) into HTML and upload it to an Azure Storage account configured for static website hosting.
To make it faster and use a custom domain, we’ll then set up an Azure CDN profile and configure a CNAME record with our domain provider, ensuring our portfolio is accessible globally under our chosen domain name.
12.Deploy Netflix Clone Application on Kubernetes
Deploying a Netflix Clone Application on Kubernetes using CI/CD with Jenkins involves automating the deployment process to ensure seamless integration and delivery.
Jenkins, an open-source automation server, facilitates continuous integration and deployment, streamlining the workflow for Kubernetes-based applications. The deployment process includes containerizing the Netflix Clone application using Docker and orchestrating it with Kubernetes.
In this project, we will be deploying a Netflix Clone application onto a Kubernetes cluster, showcasing a proper secure and automated CI/CD pipeline, you see. What we’ll do is, we’ll first set up the required virtual machines to get our Kubernetes cluster environment ready.
Then, we’ll configure Jenkins to manage our continuous integration and continuous deployment process smoothly. Most importantly, we will integrate SonarQube for checking code quality and Trivy for scanning container image vulnerabilities right into our pipeline for better security.
This whole integrated setup will then fully automate the secure deployment of our Netflix Clone application onto the Kubernetes cluster.

Key benefits of deploying on Kubernetes with Jenkins include:
- Automated build, test, and deployment processes.
- Scalable and resilient infrastructure for handling traffic spikes.
- Efficient management of microservices through Kubernetes orchestration.
- Seamless integration with CI/CD pipelines for faster development cycles.
By leveraging Kubernetes and Jenkins, this deployment ensures high availability, reliability, and a modern approach to application delivery.
Next Task For You
Begin your journey toward Mastering Azure Cloud and landing high-paying jobs. Just click on the register now button on the below image to register for a Free Class on Mastering Azure Cloud: How to Build In-Demand Skills and Land High-Paying Jobs. This class will help you understand better, so you can choose the right career path and get a higher paying job.
![Microsoft Agentic AI Business Solutions Architect [AB-100] | K21 Academy](https://test.k21academy.com/wp-content/uploads/2025/11/Microsoft-Agentic-AI-Business-Solutions-Architect-AB-100-Exam-Overview1.png)