

![]()
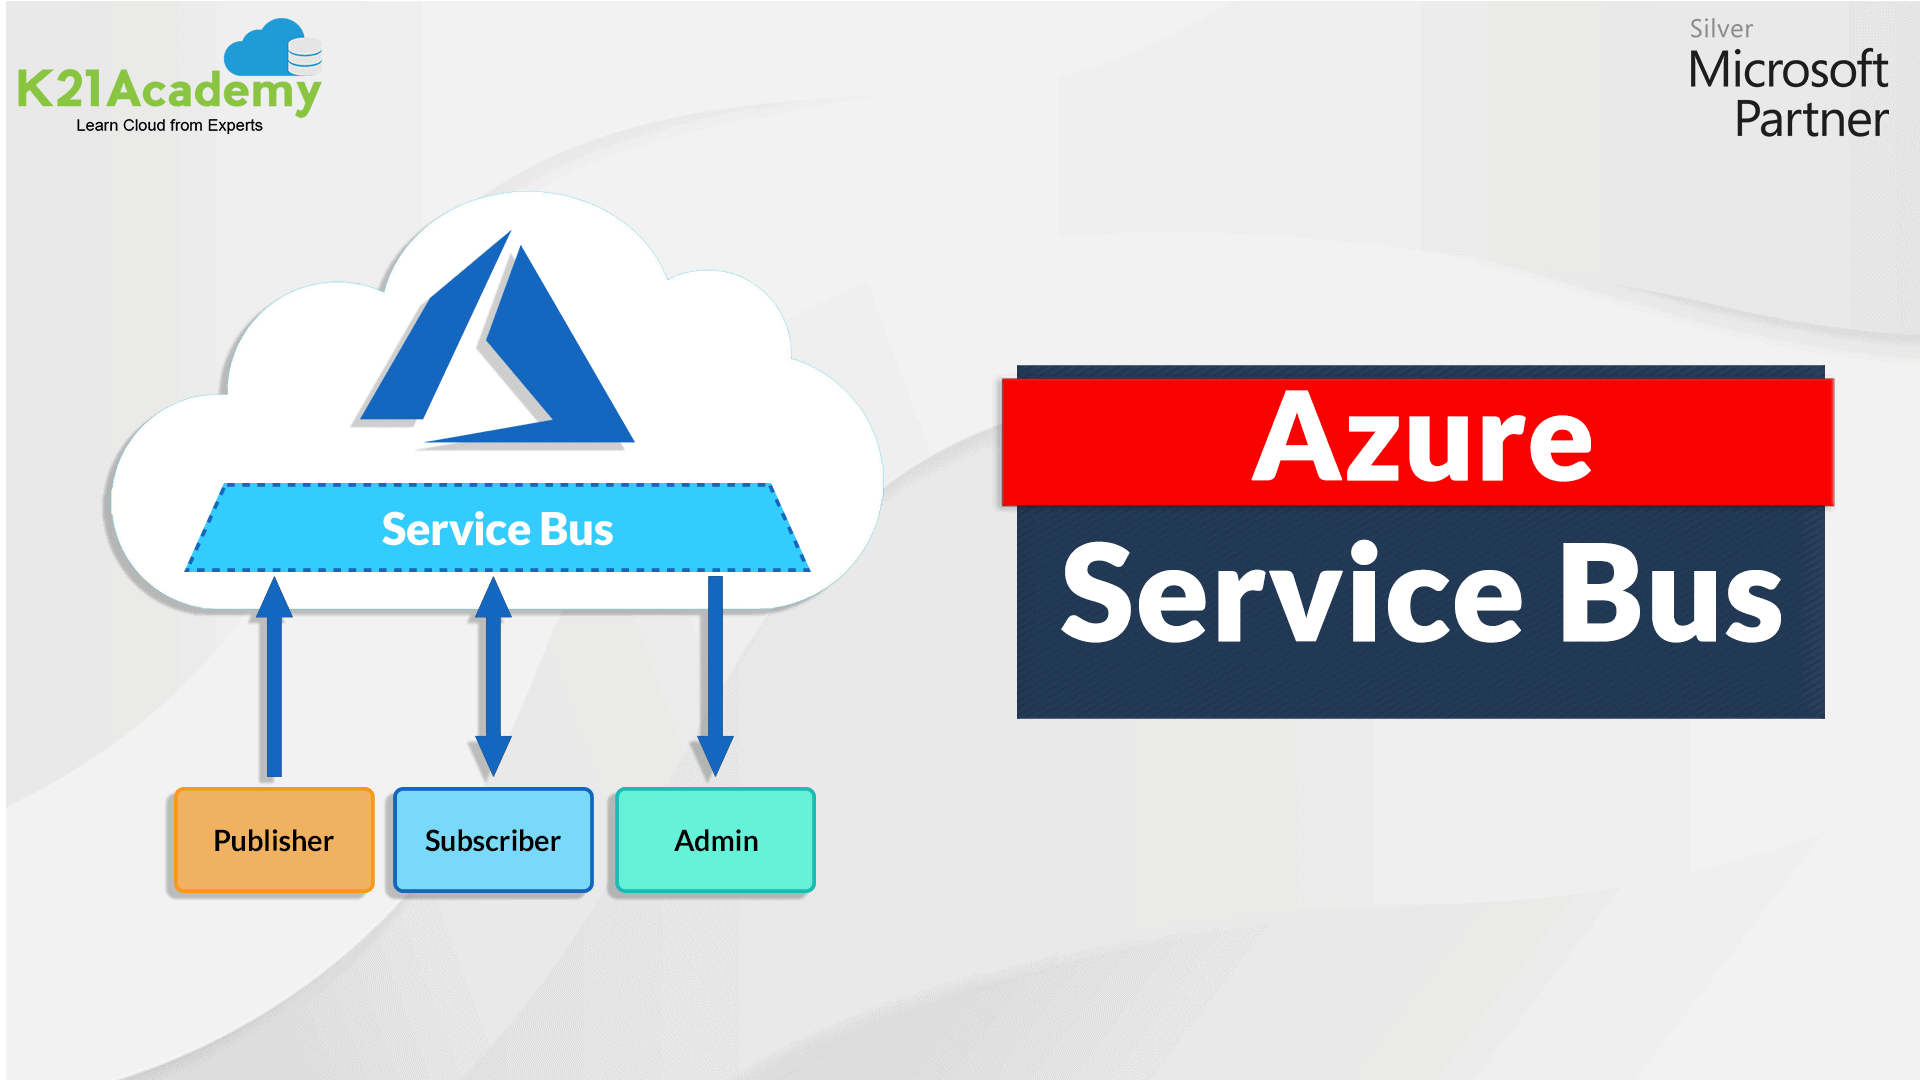
Imagine you are working on the Azure platform, and let say you have three applications working on its cloud premise. Now, you want to connect one of your apps with some other device/application (including cross-platform). So how would you communicate with those devices or application? Calm down, because Azure Service Bus is at your service.
So, in this blog, we will explore one of the messaging services of Microsoft Azure, i.e. Azure Service Bus. The blog contains the following topic
-
- Azure Service Bus Overview
- What is Azure Service Bus
- Why Service Bus?
- Azure Service Bus Queue
- Azure Service Bus Topic and Subscription
- Guide to create Queue and Topic
- Conclusion
- FAQs
Azure Service Bus Overview
Azure Service Bus is a versatile messaging service that can be used for a variety of situations such as creating separate processes, using event-driven architectures, supporting cloud communication, and more.
What is Azure Service Bus
Azure Service Bus is a cloud-based technology for messaging and communicating between different applications and devices. Azure Service Bus avails ‘message brokers‘ to conduct the processing of messages and ‘messaging stores‘ to cache the messages. It helps enhance the availability by constructing topologies with a routing system.
Why Service Bus?
As Azure Service Bus is a fully managed system, the Azure team will be responsible for scaling and availability. Integrates with other Azure services such as Event Grid, Logic Apps, Stream Analytics, and more. Azure Service Bus provides a safe and secure asynchronous media communication platform and facility to delay events or data.
Before using Azure Service Bus, one should know its capabilities to be sure of it. The various features of Azure Service Bus are as follows:
- Sessions Messaging – This attribute of Service Bus contributes to handling the unbounded message sequences. Request-Response and FIFO are the two patterns where Session messaging is enabled.
- Dead-lettering – It is a process that helps in holding the messages that have not to be processed or delivered. DLQ (Dead-Letter-Queue) inspect them to take further action.
- Scheduled Delivery – Messages can be scheduled to be delivered at a particular time into the Queue or the topic.
- Partitioned – Azure Service Bus enables partition in queue/topic that partition messages across message brokers and stores. Through partition, the transaction is also supported.
- Filtering – Subscription in Azure Service Bus can set a filter on the type of message it wants to receive. Service Bus makes use of three types of filters: SQL, Boolean and Correlation filters. Learn more about Azure Service Bus filters.
- Batching – When a batch is enabled, it groups the messages into batches to reduce the number of operations. For example: when multiple messages are sent simultaneously, the Azure Service Bus group them under a single batch and send in fewer operations.
- Deferral of Message – When a receiver is not ready to receive specific messages due to some circumstances, then those messages are sent back to queue/topic and remain there.
- Auto Forwarding – This feature helps automatically send messages from one queue/subscription to another under the same namespace.
Azure Service Bus consists of Queue and Topic, explained below in detail.
Azure Service Bus Queue
Service Queue works on First In, First Out (FIFO) model. The communication between the application occurs via a broker, i.e. Queue. The message sender sends the message to this intermediary (queue), then these messages are then pulled from the queue by the Message Receiver. Message sender doesn’t wait for the confirmation from the receiver; it keeps on processing messages as the queue delivers the message to the receiver in the same order as added to the Queue.
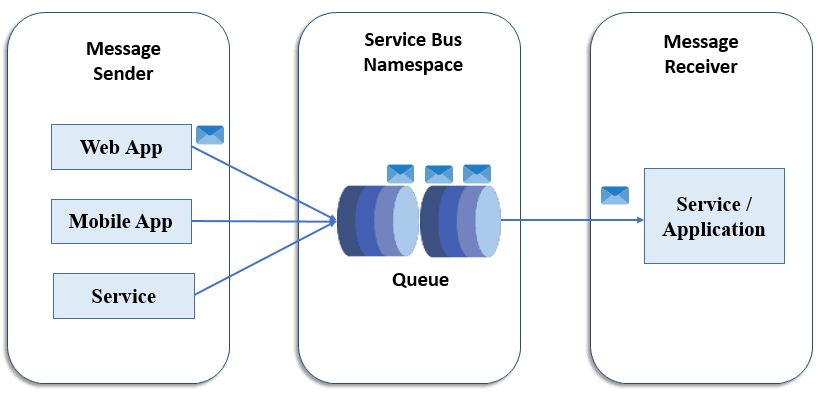
Queue helps when one needs to communicate between web app and Azure application. Further, on-premise cloud and hybrid solution’s hosted apps can make a connection with each other. In addition to that, distributed application’s components can communicate with various organisation.
Queue Benefits
Queue helps in achieving the application scalability and ensure resilience to the application architecture. The load-levelling feature helps the receiver and the sender convey messages at different rates. Application components decoupling is achieved with the queue, which means the sender and the receiver need not communicate simultaneously.
Also Read: Our blog post on ARM Template.
Azure Service Bus Topic
Azure Service Bus Topic follows the ‘publish and subscribe‘ model. The topic is almost similar to the queue, but it has an independent subscription associated with it. Service Bus Topic ensures a one-to-many form of communication. When messages processes in the Topic, they get copied to each independent subscription. A subscription helps set the filter rules for receiving a message from the topic.
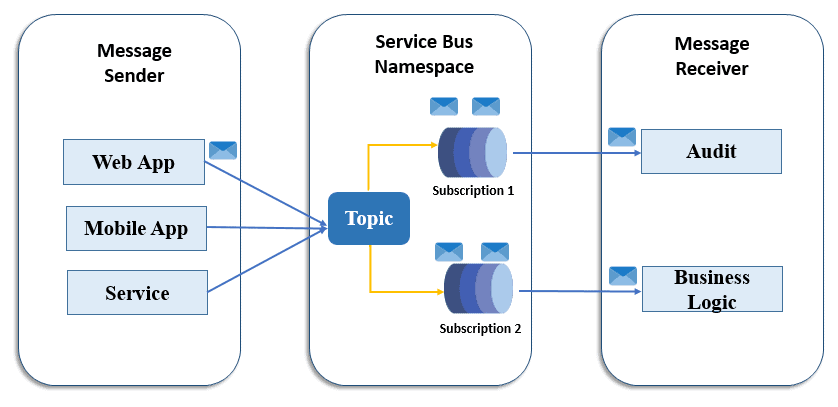
Topic Benefits
Apart from all the benefits offered by the queue, Topic ensures competing consumer, Load Balancing, and Loose Coupling.
Note: Learn about Azure Managed Services.
Steps to create Azure Service Bus
Prerequisites: You will be required with the Azure Services subscription plan. You can also create a free account valid for one month.
Learn how to create a FREE TRIAL SUBSCRIPTION ACCOUNT.
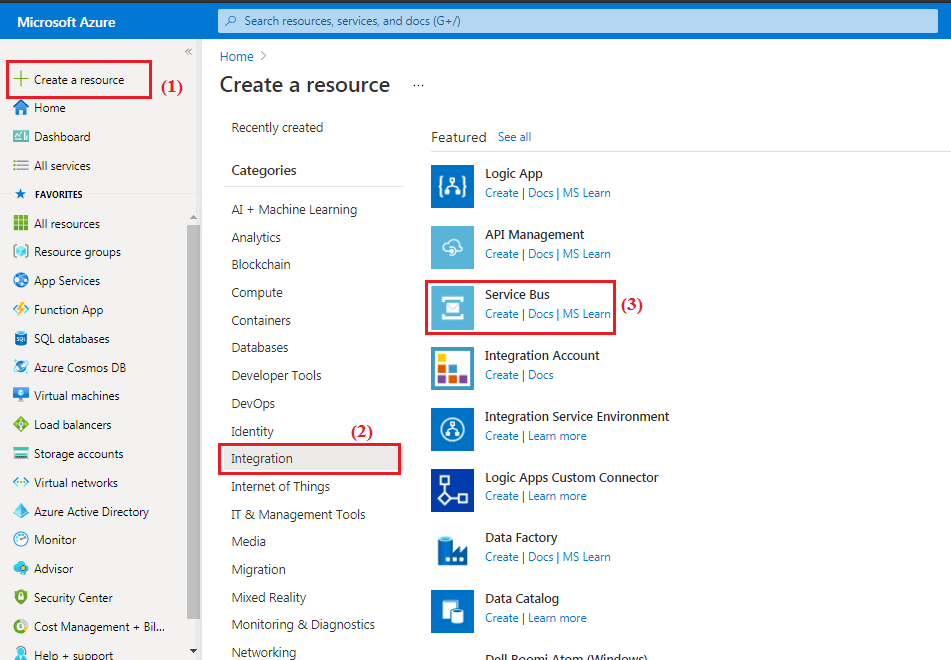
Step 1) Log in to Azure Portal.🚀
Step 2) On the top left corner of the Page, you will see the ‘Create a Resource‘ option, select it and then select ‘Integration‘ to take you to the ‘Service Bus‘ option.
Check Out: Our blog post on Azure Networking.
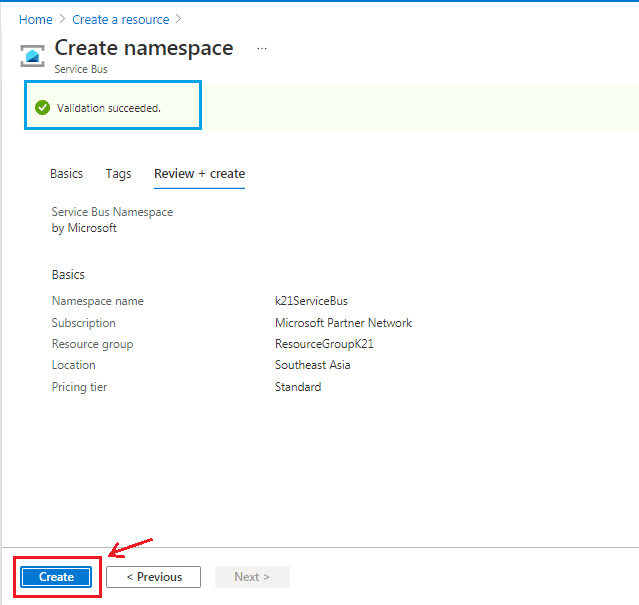
Step 3) To commence the Azure Service Bus facilities, create a unique namespace. The namespace acts as a container to communicate with Service Bus in an application.
A dialogue box will appear with the name ‘Create Namespace’ where you will specify the name of the namespace, Subscription, Resource group, Location, and Pricing Tier.
After filling in all the details, click on the ‘Create’ button.
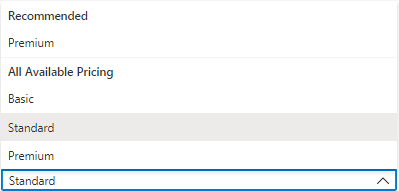
The different types of pricing tier offered are shown in the image below. You have to keep in mind that you won’t be able to create a Topic with the Basic tier. A Standard/ Premium tier is mandatory to proceed further for Topics.
Also Read: Our blog post on Serverless Computing Azure.
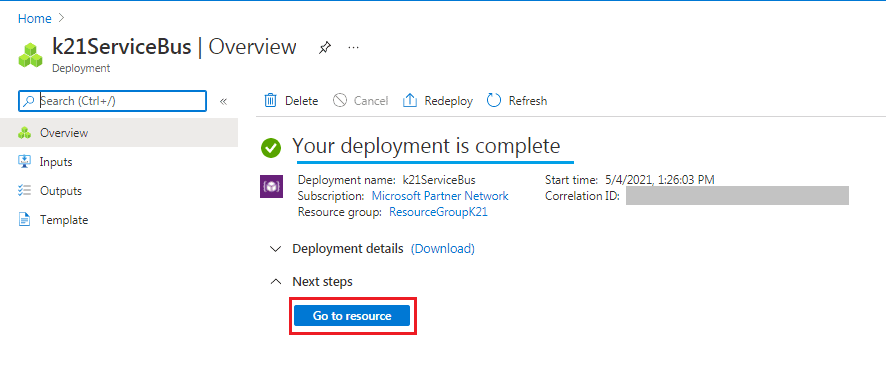
Step 4) After clicking on the ‘Create‘ button in the above step, deployment gets initiated. It takes several minutes to deploy the resource. Click on ‘Go to Resource‘ to proceed for Service Bus creation.
Step 5) The successful deployment of the service bus namespace can be verified when the following homepage appears. Azure Service Bus provides two entities: Queue and Topic (refer to the image below).
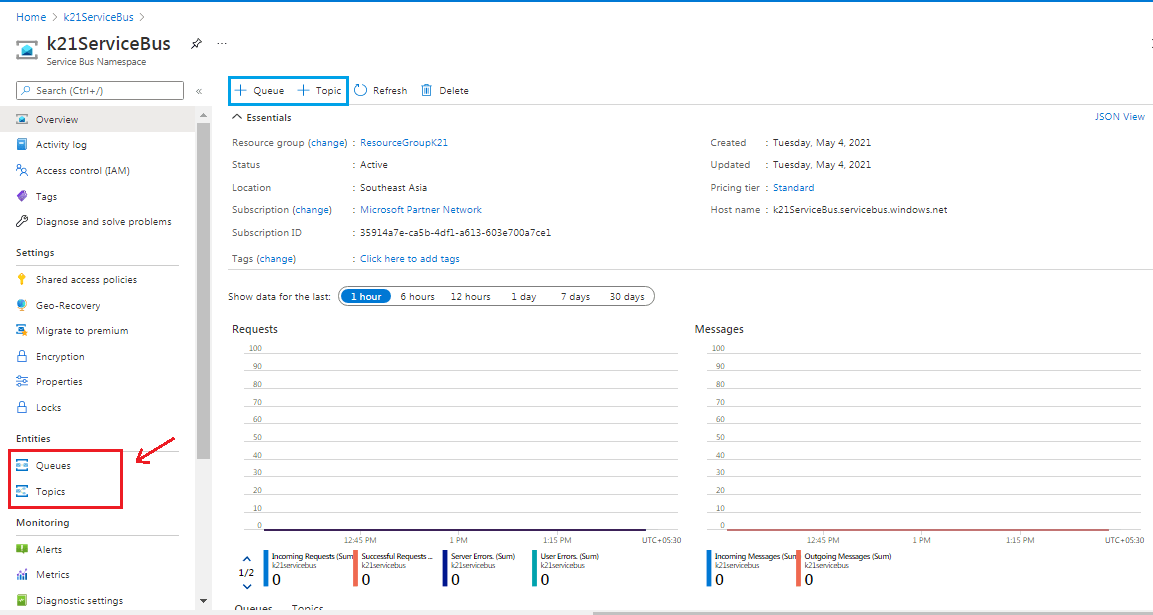
Here we will create both entities, i.e. Queue and Topic.
First, we will “Create a Queue.”
Step 6) From the created Service Bus Namespace (k21ServiceBus, in this case) page, select ‘Queue’ from the navigational menu, then select ‘+ Queue‘ to create the queue.
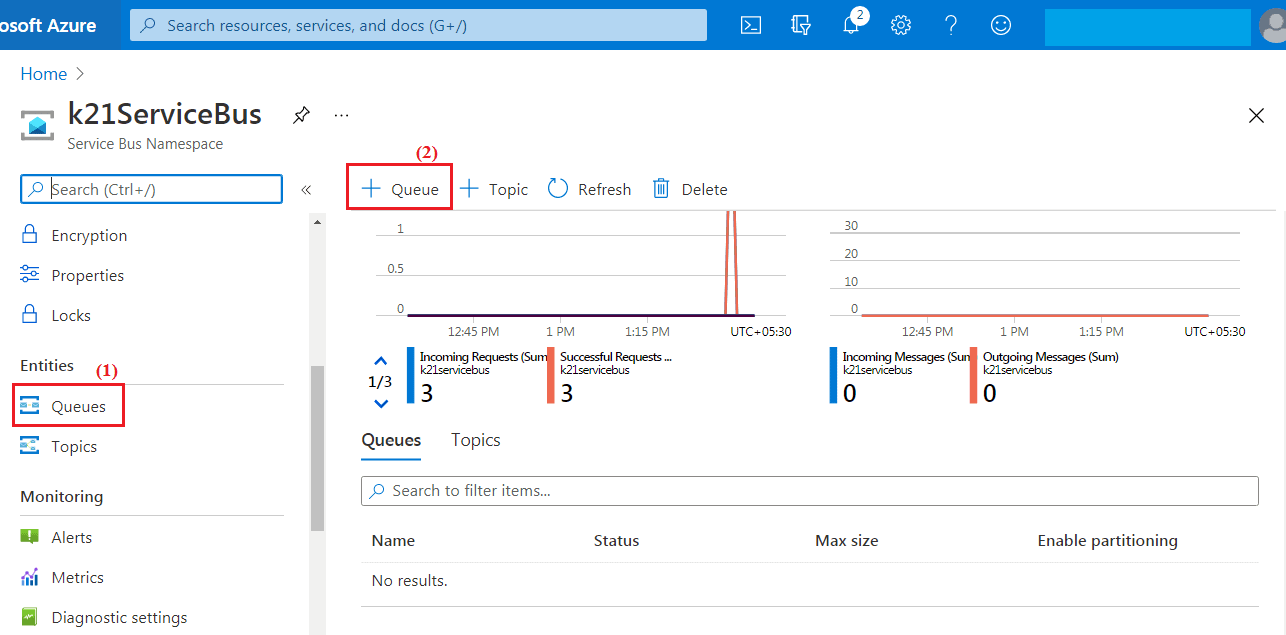
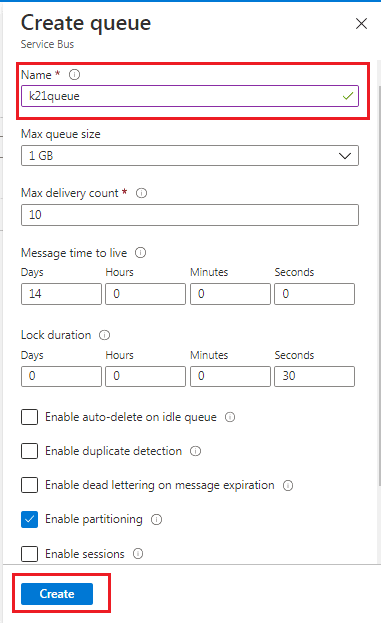
Step 7) On the Create Queue page, specify the queue’s name, check for the green right tick mark, then click on ‘Create’. The default values get filled automatically.
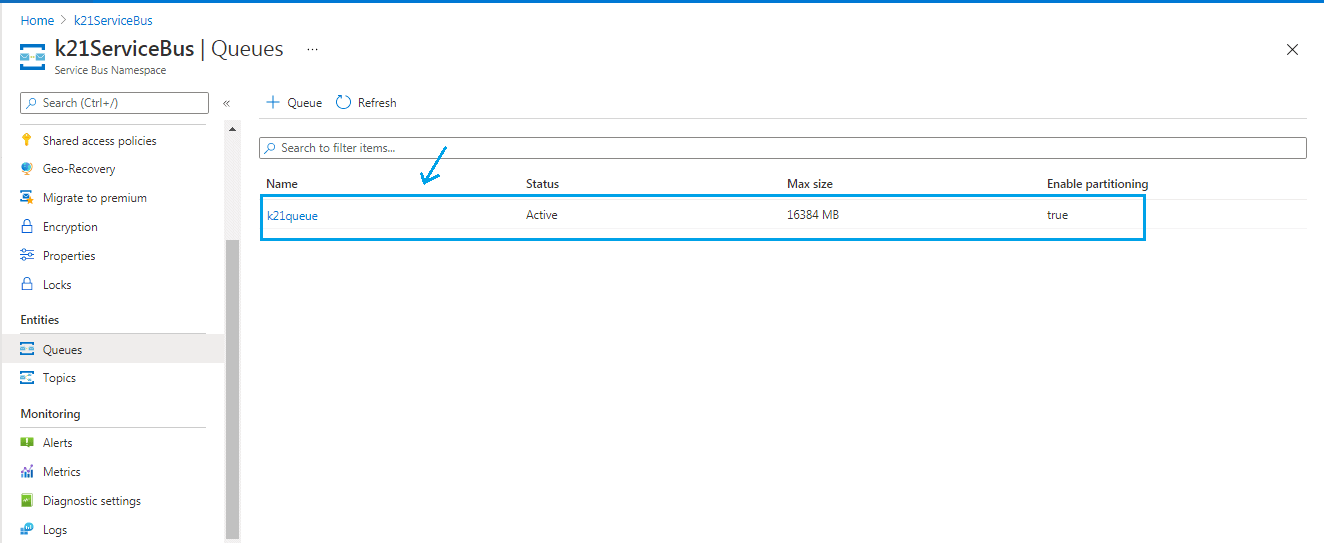
Step 8) Under the Queue page, we will see the created queue.
Now, we will look at how to create a Topic.
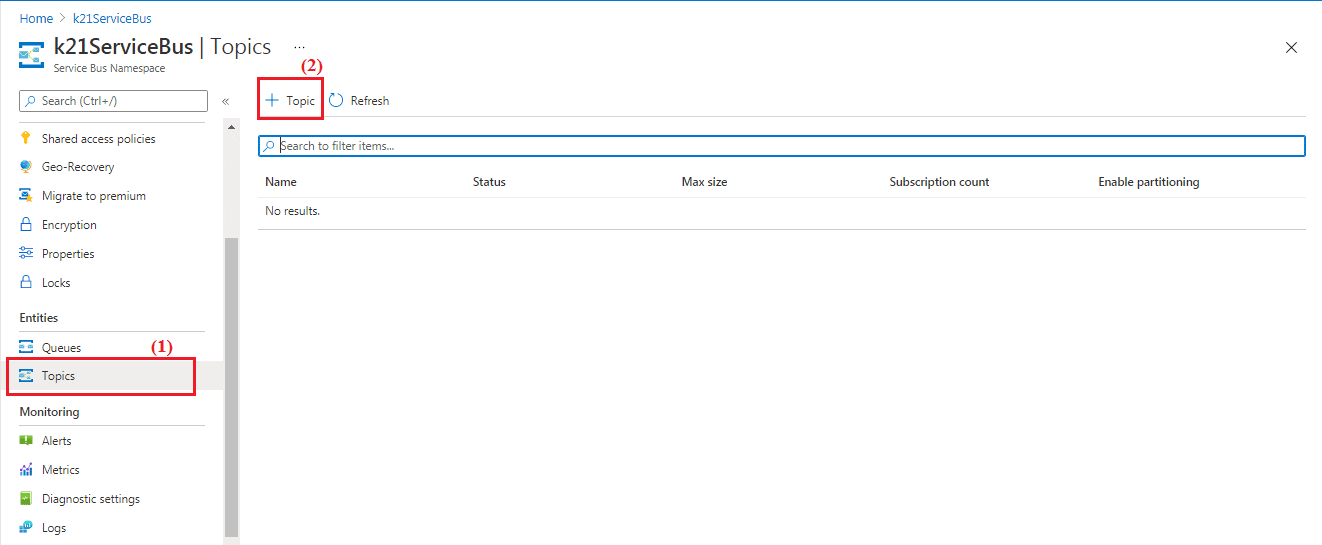
Step 9) From the created Service Bus Namespace (k21ServiceBus, in this case) page, select ‘Topics’ from the navigational menu, select ‘+ Topic’ to create the topic.
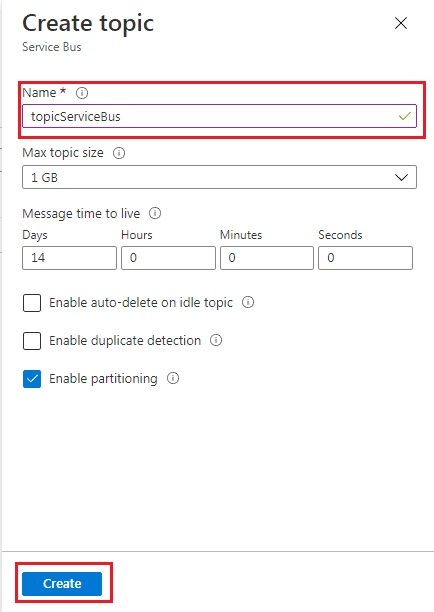
Step 10) On the Create Topic page, specify the topic’s name, then click on ‘Create‘. The default values get filled automatically.
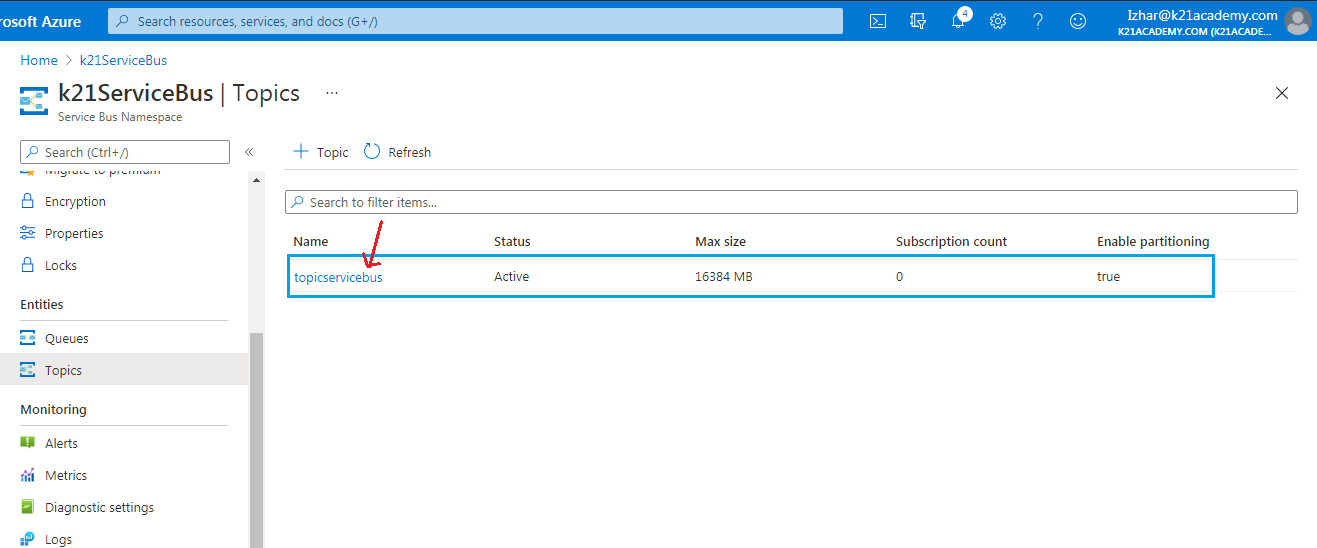
Step 11) Under the Topics page, we will see the created topic.
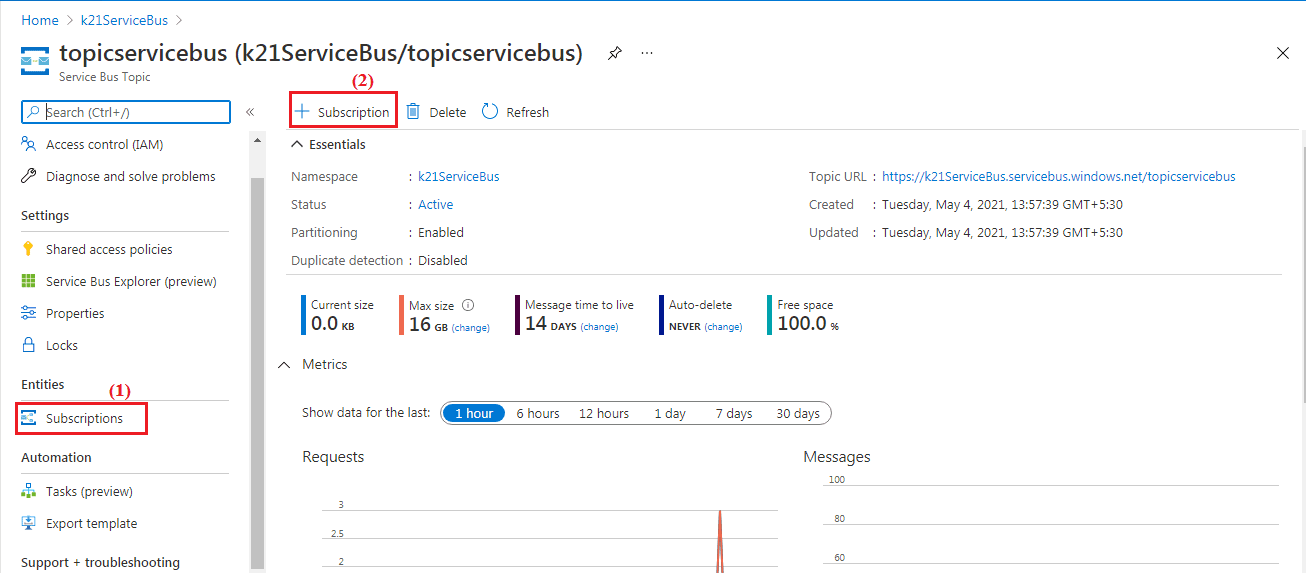
Step 12) Topic includes the additional step of creating a subscription. The subscription option come under the page named Service Bus Topic. (1) – Select the ‘Subscription’ from the navigation menu, and click on (2) ‘+Subscription’.
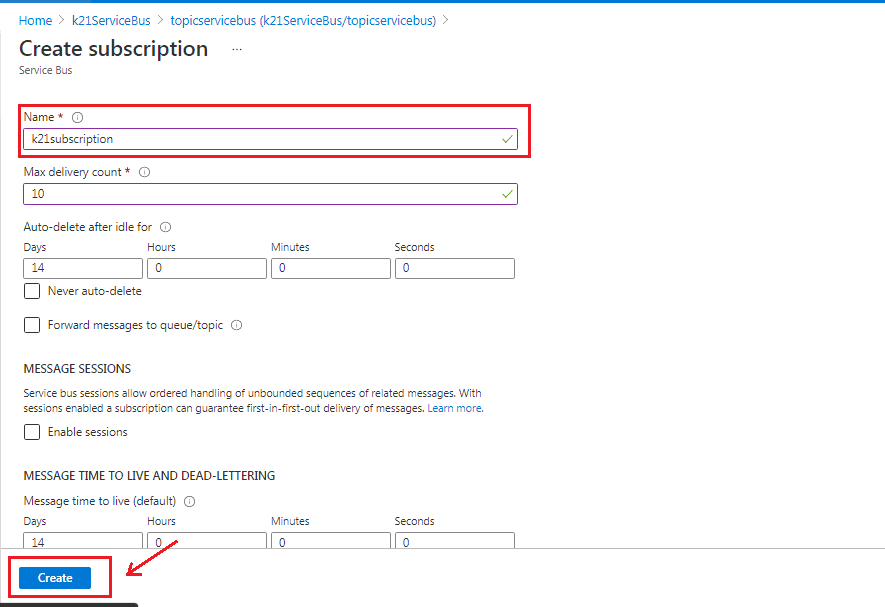
Step 13) The ‘Create subscription‘ page will appear, specify the details and click on ‘Create’, the subscription will be created.
Step 14) Connection Strings are required to connect and provide information to the application to communicate with the Azure Storage Account.
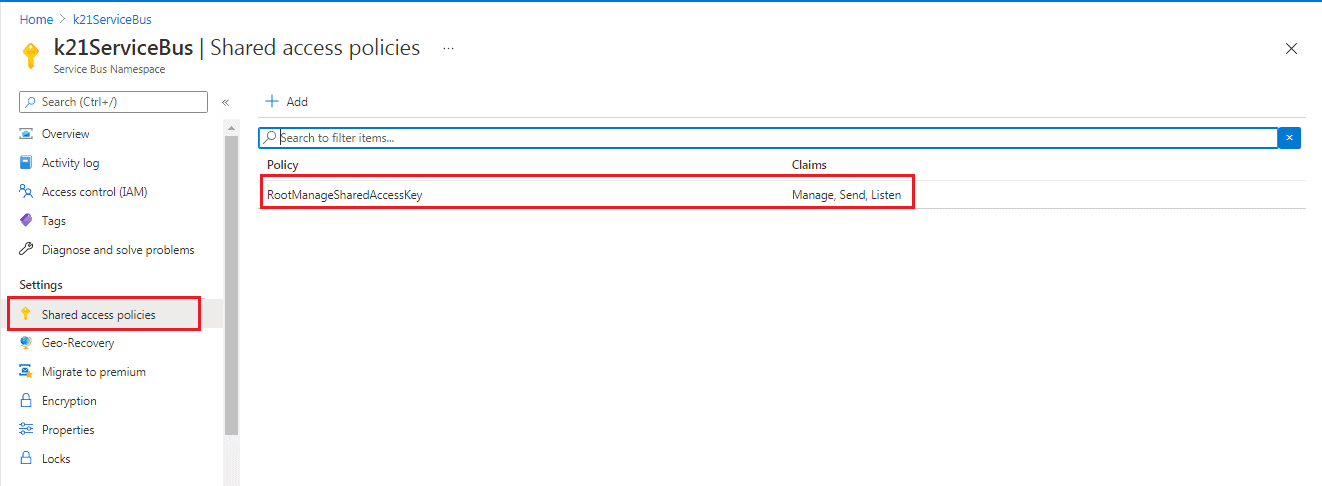
To get connection String for Service Bus namespace. Under the ‘All resource’, click on the namespace you created. Select Shared access policies. Select RootManageSharedAccessKey.
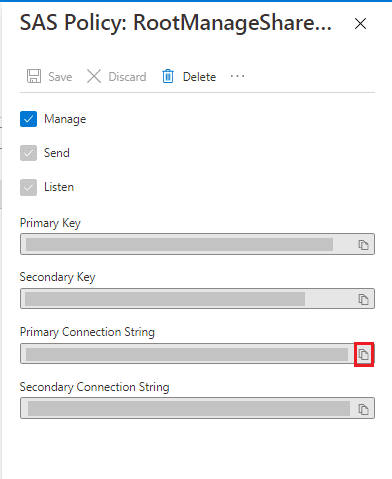
Step 15) Under the RootManageSharedAccessKey page, you will see the primary and secondary key with the primary and secondary connection string. Copy the key and string for later use.
Conclusion
In this blog, we have covered the Azure Service Bus; we have seen that it consists of Queue and Topic. We even know how to create them in Azure Portal. One cannot compare between the Queue and Topic; both have their characteristics. By leveraging Azure Service Bus, one can use its great features like dead-lettering, transactional, filtering, and sessions. It helps conduct seamless communication between application and device (on-premise or not). I hope this blog has improvised your skills. Keep Reading.
Frequently Asked Questions
What is the connection limit for Azure Service Bus?
Service Bus enables up to 1000 concurrent connections to a messaging entity. This limit is enforced at the namespace level, and queues, topics, or subscriptions are capped by the limit of concurrent connections per namespace.
What data types does Azure Service Bus use?
The data can be any kind of information, including structured data encoded with the common formats such as the following ones: JSON, XML, Apache Avro, Plain Text. Some common messaging scenarios are: Messaging.
How many queues can be created in Service Bus?
A maximum of 10,000 queues can be created within a single Service Bus Namespace. If there is a need to create more than 10,000 queues within a single Service Bus Namespace, Azure support team can be contacted.
How many messages can Service Bus handle?
The total size of the message can't exceed the maximum message size supported by the service tier. When clients communicate with Service Bus queues over the TCP protocol, the maximum number of concurrent connections to a single Service Bus queue is limited to 100. This number is shared between senders and receivers.
Related/References
- Microsoft Azure Solution Architect AZ-303/AZ-304: Everything You Need To Know
- [AZ-303] Microsoft Azure Architect Technologies Certification Exam: Everything You Need To Know
- [AZ-900] Microsoft Azure Fundamentals Certification Exam: Everything You Must Know
- [AZ-104] Microsoft Azure Administrator Certification Exam: Everything You Need To Know
- Microsoft Azure Solutions Architect | AZ-303 vs AZ-304
- Exam AZ-305: Azure Solutions Architect Expert Certification
Next Task For You
Begin your journey toward Mastering Azure Cloud and landing high-paying jobs. Just click on the register now button on the below image to register for a Free Class on Mastering Azure Cloud: How to Build In-Demand Skills and Land High-Paying Jobs. This class will help you understand better, so you can choose the right career path and get a higher paying job.

![Microsoft Agentic AI Business Solutions Architect [AB-100] | K21 Academy](https://test.k21academy.com/wp-content/uploads/2025/11/Microsoft-Agentic-AI-Business-Solutions-Architect-AB-100-Exam-Overview1.png)


