

![]()
Let’s have a walkthrough of the Step-By-Step Activity Guides of the [AZ-104] Microsoft Azure Administrator training program that you must perform to learn this course.
You can use these exact steps to bring you and your team for integration with On-Premise & Cloud application to implement, monitor, and maintain Microsoft Azure solutions. The walkthrough of the Step-By-Step Activity Guides of [AZ-104] Microsoft Azure Administrator training program will prepare you thoroughly for the AZ 104 certification and apply for the exam.
- Register For Azure Free Trial Account
- Pay as you go subscription
- Create & Connect to Windows Virtual Machine
- Create & Connect to Linux (Ubuntu) Virtual Machine
- Install IIS Server in Virtual Machine
- Implement Azure Policy
- Create RG, VNet & Subnet, VM, Extra Subnet
- Configure Network Security Group
- Create Firewall in azure
- Create Private DNS
- Point to Site in Azure
- Configure VNet Peering in Azure
- Configure Azure Availability-Set and Azure Load Balancer
- Deploy Azure App Service and Traffic Manager
- Create an Application Gateway
- Filter Network Traffic using Network Security Group (NSG) & ASG
- Virtual Machine Scale Set
- Generate SSH Keys
- Create an Azure Bastion Host
- Create an Azure Snapshot
- Create Container, Manage Storage Account via Storage Explorer, Access Keys, and SAS Keys
- Create an Unmanaged Disk VM and Managed Data Disk
- Disk Migration From On-Premises Server to Azure
- Configure Azure File Share and File Sync
- Configure Azure Blob Lifecycle Management and Object Replication
- Entra ID (Azure Active Directory) Synchronization with On-Premise Active Directory using Entra Connect (AD Connect)
- Configure Role-Based Access Control In Azure.
- Create Custom RBAC Roles
- Azure Monitoring Using Log Analytics
- Configure Azure Network Watcher
- Backup of Azure VM into Azure Backup Vault
- Backup of On-Premise Server into Azure Backup Vault
- WebApps Creation With 2 Deployment Slots
- Configure Azure Container Service
- Configure Azure Kubernetes Service
- Create Resource Group and Virtual Machine via Cloud PowerShell
- Authenticate to Azure Tenant via PowerShell
- Create an Azure managed disk by using Azure PowerShell
- Create a Resource group, and Virtual Machine using Azure CLI
- Create and Deploy ARM templates using Azure Portal
Activity Guides:
1) Register For Azure Free Trial Account
The first thing you must do is to get a Trial Account for Microsoft Azure. (You get 200 USD FREE Credit from Microsoft to practice)
Microsoft Azure is one of the top choices for any organization due to its freedom to build, manage, and deploy applications. Here, we will look at how to register for the Microsoft Azure FREE Trial Account, click here.
After you register for Microsoft Cloud Trial Account, you should get an Email Like the below from Microsoft:

2) Pay as you go subscription
The Pay-As-You-Go subscription is a flexible pricing model offered by Azure, where you pay only for the services and resources you use. There are no upfront costs or long-term commitments, making it ideal for businesses and individuals who want to scale their usage based on demand.
Key Benefits of Pay-As-You-Go Subscription:
-
Cost-Effective: You pay for what you use, with no additional fees for unused resources.
-
Flexibility: Easily scale your usage up or down based on the needs of your application or business.
-
Transparency: Clear and detailed billing, allowing you to track and manage your expenses more effectively.
-
No Upfront Costs: Start using Azure services immediately without having to pay large upfront fees.
3) Create & Connect to Windows Virtual Machine
Azure Virtual Machines (VM) is one of the most versatile on-demand, scalable computing resources that Azure offers. When you need more control over the computing environment compared to other Azure services, Virtual Machines (VMs) are an excellent choice.
In this Activity Guide, you’ll learn various methods for creating and managing Azure Virtual Machines (VMs). The guide begins with the creation of a VM through the Azure portal, where you’ll configure essential settings such as the operating system and network. Once your VM is deployed, you’ll connect to it using the portal and an RDP file—first from a Windows PC and then from a Mac using a compatible Remote Desktop application.

4) Create & Connect to Linux (Ubuntu) Virtual Machine
Azure Virtual Machines (VMs) are versatile, on-demand computing resources that provide you with full control over your environment. In this activity guide, we’ll focus on creating and managing Azure Virtual Machines (VMs) running Linux (Ubuntu).
You’ll start by deploying a Linux (Ubuntu) VM through the Azure portal, where you will configure important settings such as the operating system version, disk options, and networking. After the deployment, you’ll connect to the Azure Virtual Machine (VM) using Secure Shell (SSH) from a terminal. Detailed instructions are provided for connecting from both Linux/macOS and Windows systems, with guidance on using an SSH key pair for secure access.

5) Install IIS Server in Virtual Machine
Azure Virtual Machines (VMs) provide a scalable and flexible platform for hosting applications. In this activity guide, you will learn how to install and configure the Internet Information Services (IIS) web server on a Windows Virtual Machine.
You’ll start by creating a Windows Server VM using the Azure portal, ensuring it meets the necessary system requirements for hosting IIS. Once the VM is deployed, you’ll connect to it via Remote Desktop Protocol (RDP) and use the Server Manager or PowerShell to install the IIS role. After installation, you’ll verify the web server is running by accessing the default IIS webpage from a browser. This guide also explores enabling additional features like HTTP bindings or hosting static websites on IIS.

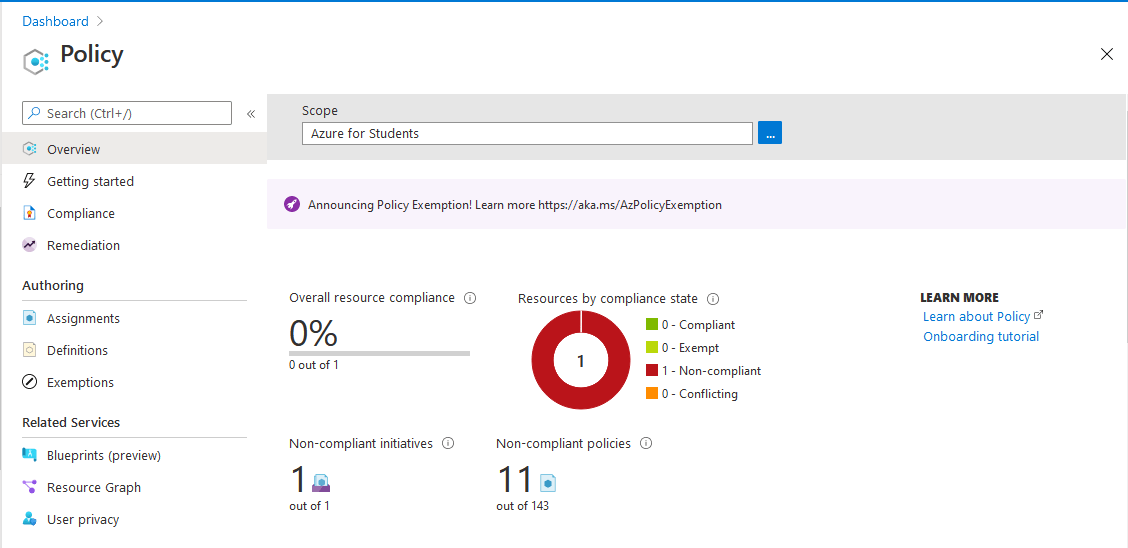
6) Implement Azure Policy
Azure Policy restricts resource creation in a specific location and it can also be used in more depth also.
Here, you need to create an Azure Policy to restrict resource creation in specific regions and test your policy, also.
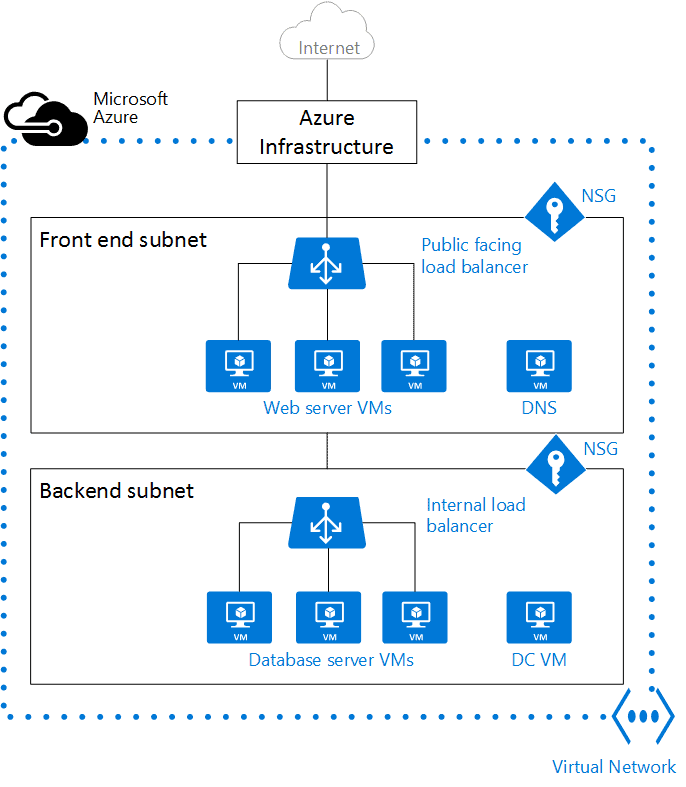
7) Create Resource Group, Virtual Network & Subnet, VM, Extra Subnet
In Azure, a Resource Group is a logical collection of all resources. The resource group stores metadata about the resources. It is generally created on an environment basis such as development, production, or testing resource groups.
Basically, it provides a way to monitor, control access, provision, and manage to bill for collections of assets/resources that are being used by a client.
Azure Virtual Machines (VM) is one of several types of on-demand, scalable computing resources that Azure offers. Typically, you choose a VM when you need more control over the computing environment than the other choices offer.
Azure Virtual Network (VNet) is the fundamental building block for your private network in Azure. VNet enables many types of Azure resources, such as Azure Virtual Machines (VM), to securely communicate with each other, the internet, and on-premises networks. VNet is similar to a traditional network that you’d operate in your own data center but brings with it additional benefits of Azure’s infrastructure such as scale, availability, and isolation.

A subnet, or subnetwork, is a segmented piece of a larger network. More specifically, subnets are a logical partition of an IP network into multiple, smaller network segments.
All Azure resources deployed into a virtual network are deployed into a subnet within a virtual network.
Read More: About Azure Front Door.
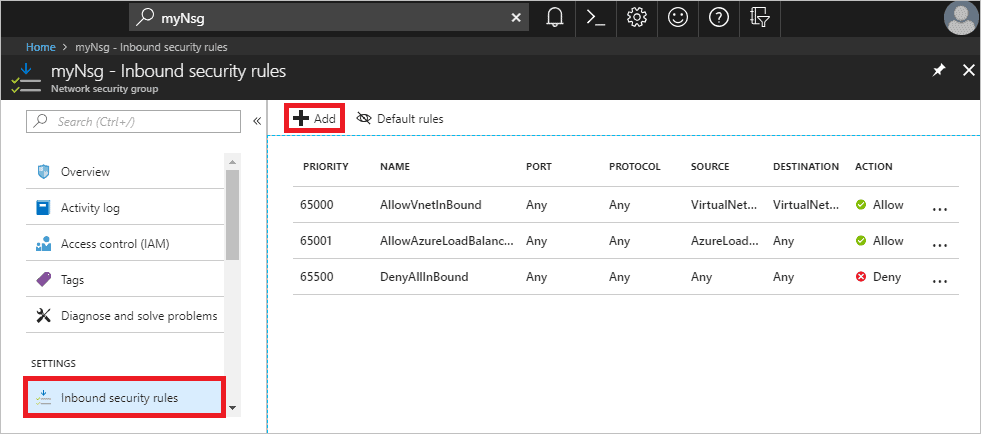
8) Configure Network Security Group
A network security group contains security rules that allow or deny inbound network traffic to, or outbound network traffic from, several types of Azure resources. For each rule, you can specify source and destination, port, and protocol.
In this Activity Guide, We will walk you through the steps to browse through the Azure Portal and how to make your virtual network more secure with the help of network security groups.
9) Create Firewall in Azure
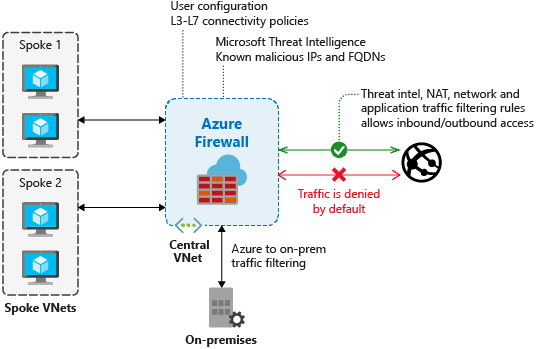
Azure Firewall is a managed, cloud-based network security service that protects your Azure Virtual Network Resources. It’s a fully stateful firewall as a service with built-in high availability and unrestricted cloud availability. The benefit of the Azure firewall is that you can centrally create, enforce and log application and network connectivity policies across subscription and virtual networks. Azure Firewall uses a static public IP address for your virtual network’s resources allowing outside firewalls to identify traffic organizing from your Virtual network.
In Azure Firewall, the number of VMs that your application uses can scale up and out to whatever is required to meet your needs you don’t have to worry about network security group (NSG) filters or pay the extra license costs associated with a third-party network virtual appliance.
In this Activity Guide, we will walk you through the steps to browse through the Azure Portal and how to create a route table and configure Azure Firewall
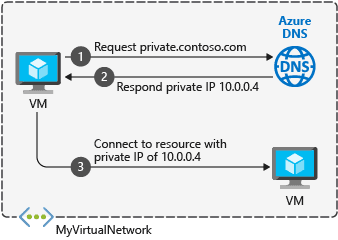
10) Create Private DNS
Azure Private DNS provides a reliable and secure DNS service for your virtual network. Azure Private DNS manages and resolves domain names in the virtual network without the need to configure a custom DNS solution. By using private DNS zones, you can use your own custom domain name instead of the Azure-provided names during deployment.
In this Activity Guide, we will walk you through the steps to browse through the Azure Portal and how to Configure AZ-Private DNS, Create Record Set.
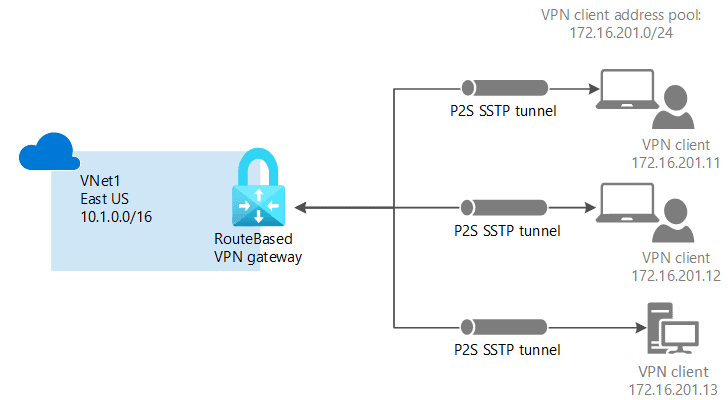
11) Configure Point to Site in Azure
A Point-to-Site (P2S) VPN gateway connection allows you to establish a secure connection to your virtual network from a single client computer. A Point to Site connection is established by starting it from the client computer. This solution is very useful for telecommuters who want to connect to Azure VLANs from a remote location.
Point to Site VPN is a useful tool used instead of Site to Site VPN if you have some customers who need to connect to vent from remote locations.
In this Activity Guide, we will walk you through the steps to browse through the Azure Portal and how to Create & Configure Server-Side Deployment & Configure the Client-Side Deployment.
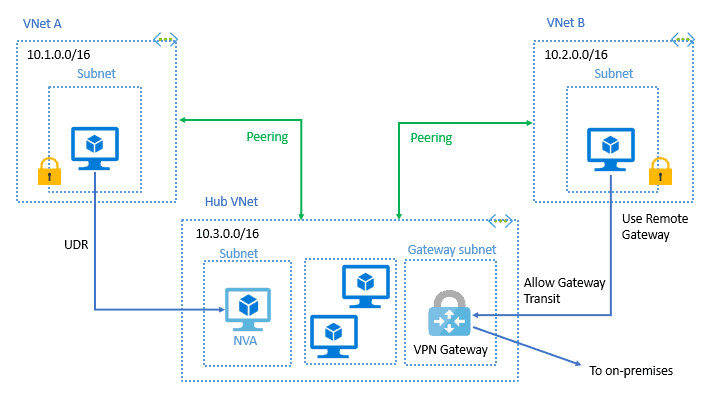
12) Configure VNet Peering in Azure
You can connect virtual networks to each other with virtual network peering. These virtual networks can be in the same region or different regions (also known as Global VNet peering).
Once virtual networks have peered at, resources in both virtual networks are able to communicate with each other.
In this Activity Guide, we will walk you through the steps to browse through the Azure Portal and how to do VNet peering and also communicate between the two virtual networks.
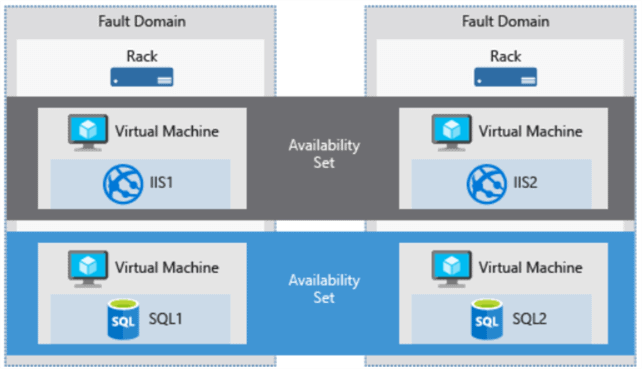
13) Configure Azure Availability Sets and Load Balancer
An availability set is a group of virtual machines that are deployed across fault domains and update domains. Availability sets make sure that your application is not affected by single points of failure, like the network switch or the power unit of a rack of servers.
Each virtual machine is assigned an update domain and a fault domain:
- Update domains define the group of VMs that can be updated and restarted at the same period. During planned maintenance, only one update domain is rebooted at a time. By default, there are 5 update domains and you can configure up to 20 update domains.
- Fault domain defines a group of VMs that share a common set of hardware, network switches, and power source.
In this Activity Guide, we will walk you through the steps to browse through the Azure Portal and Create Two Virtual Machines with Availability Sets
Load Balancer distributes inbound flows that arrive at the load balancer’s front end to backend pool instances. These flows are according to configured load balancing rules and health probes.
- A public load balancer can provide outbound connections for virtual machines (VMs) inside your virtual network.
- Internal load balancers are used to load balance traffic inside a virtual network.
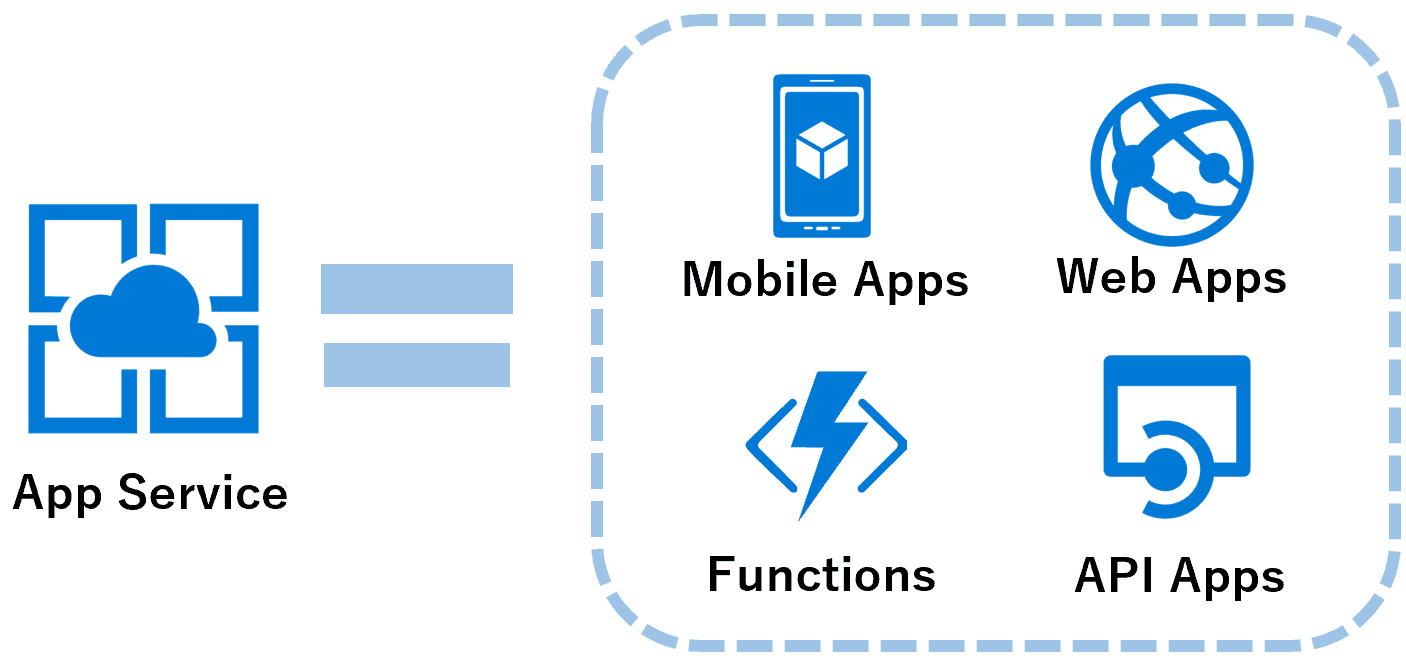
14) Deploy Azure App Service and Traffic Manager
Azure App Service is a fully managed Platform as a service that is used for publishing Web & Mobile Apps which run on different frameworks and can be written in different programming languages including 3rd party programming languages. App Service not only adds the power of Microsoft Azure to your application, such as security, load balancing, autoscaling, and automated management.
You can also take advantage of its DevOps capabilities, such as continuous deployment from Azure DevOps, GitHub, Docker Hub, and other sources, package management, staging environments, custom domain, and TLS/SSL certificates.
Azure Traffic Manager is a DNS-based traffic load balancer service. The Traffic Manager allows the user or admins to distribute traffic to their public-facing applications across the global Azure regions.
Traffic Manager uses DNS to direct the client requests to the appropriate service endpoint based on a traffic-routing method.

In this Activity Guide, we will walk you through the steps to browse through the Azure Portal and Creating Web Apps in App service of Azure & Traffic manager.
15) Create an Application Gateway
Azure Application Gateway is a web traffic load balancer that enables you to manage traffic to your web applications. In this activity guide, you’ll learn how to create and configure an Application Gateway using the Azure portal.
You’ll begin by deploying the Application Gateway, specifying configurations such as the backend pool, HTTP settings, routing rules, and listener details. The guide also covers essential prerequisites, like setting up a virtual network and ensuring your backend servers are ready. After deployment, you’ll test the gateway by accessing a web application hosted on one of the backend servers. This labs helps you understand how Application Gateway enhances scalability, security, and performance for web applications.

16) Filter Network Traffic using Network Security Group (NSG) & ASG
Azure Network Security Groups (NSGs) and Application Security Groups (ASGs) allow you to control and secure network traffic effectively. In this activity, you’ll create an NSG to define traffic rules and an ASG to group virtual machines for simplified rule management. By linking NSG rules to ASGs, you’ll enable scalable traffic filtering and secure your Azure resources efficiently. The guide concludes with testing the setup to verify the rules in action.

17) Virtual Machine Scale Sets
This lab guides you through the process of deploying and testing Virtual Machine Scale Sets (VMSS) in Azure, enabling scalable and highly available solutions for your workloads.

Key Steps:
- Navigate to the Azure portal and create a Virtual Machine Scale Set, configuring VM size, instance count, and region.
- Attach a load balancer to distribute traffic across the VM instances.
- Configure scaling policies to automatically adjust the number of VM instances based on performance metrics.
- Deploy the scale set and test its functionality by simulating increased traffic and validating scaling behavior.
- Monitor the scale set’s performance and ensure high availability through Azure metrics.
By the end of this lab, you will have successfully deployed and tested a Virtual Machine Scale Set, gaining practical experience in building scalable and resilient Azure solutions.
18) Generate SSH Keys
SSH keys come in many sizes, but a popular choice is RSA 2048-bit encryption, which is comparable to a 617 digit long password. On Windows systems, it is possible to generate your own SSH key pair by downloading and using an SSH client like PuTTY.
On Mac and Linux systems, it is possible to generate an SSH key pair using a terminal window.
In this guide, we will discuss how to generate SSH keys and use them for connecting your Linux VM.

19) Create an Azure Bastion host
The Azure Bastion service is a new fully platform-managed PaaS service that you provision inside your virtual network. It provides secure and seamless RDP/SSH connectivity to your virtual machines directly in the Azure portal over TLS.
When you connect via Azure Bastion, your virtual machines do not need a public IP address.

To know more about this service, click here.
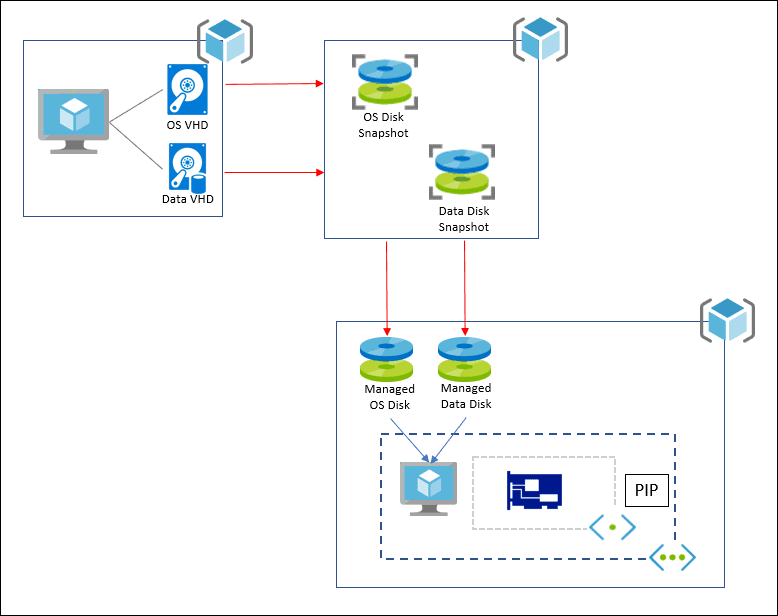
20) Create an Azure Snapshot
A snapshot is a representation of an object at a specific point in time. A snapshot incurs billing for the incremental size of the data it holds. Azure snapshot is a full read-only copy of a virtual hard disk (VHD). You can take a snapshot of an OS or data disk VHD to use as a backup or to troubleshoot virtual machine (VM) issues.
In this Activity Guide, we will walk you through the steps to browse through the Azure Portal and Create a Snapshot also Create an OS Disk from Snapshot.
21) Create Container, Manage Storage Account via Storage Explorer, Access Keys, and SAS Keys
Microsoft Azure Storage Explorer is a standalone application that simplifies working with Azure Storage data on Windows, macOS, and Linux.
Two access keys are generated for each storage account: the primary access key and the secondary access key. These keys are essential for authentication when accessing your Azure Storage account.
A Shared Access Signature (SAS) is a URI that grants restricted access rights to Azure Storage resources. You can provide a SAS to clients who should not have access to your storage account key but whom you wish to delegate access to certain resources within your Azure Storage account.
In this Activity Guide, we’ll walk you through the steps to browse through the Azure portal and:
- Manage Azure Storage using Azure Storage Explorer
- Manage Azure Storage Account via Access Keys
- Delegate access with a Shared Access Signature (SAS)
22) Create an Unmanaged Disk VM and Managed Data Disk
Managed Disks are fully managed by Microsoft Azure, meaning you do not need to create a separate storage account when creating a new disk. Since Azure handles the storage account, you do not have full control over the disks being created.
On the other hand, Unmanaged Disks require you to create a storage account before creating any new disks. Since the storage account is owned and managed by you, you have complete control over all the data within that account. Additionally, you are responsible for encryption, data recovery plans, and other storage management tasks.
Data Disk: A data disk is a managed disk that is attached to a virtual machine (VM) to store application data or any other data that needs to be preserved. Data disks are registered as SCSI drives and are labeled with a letter of your choice.
In this Activity Guide, we’ll walk you through the steps to browse through the Azure portal and:
- Create a Virtual Machine with an Unmanaged Disk
- Locate and Validate the Disk
- Attach a Managed Data Disk
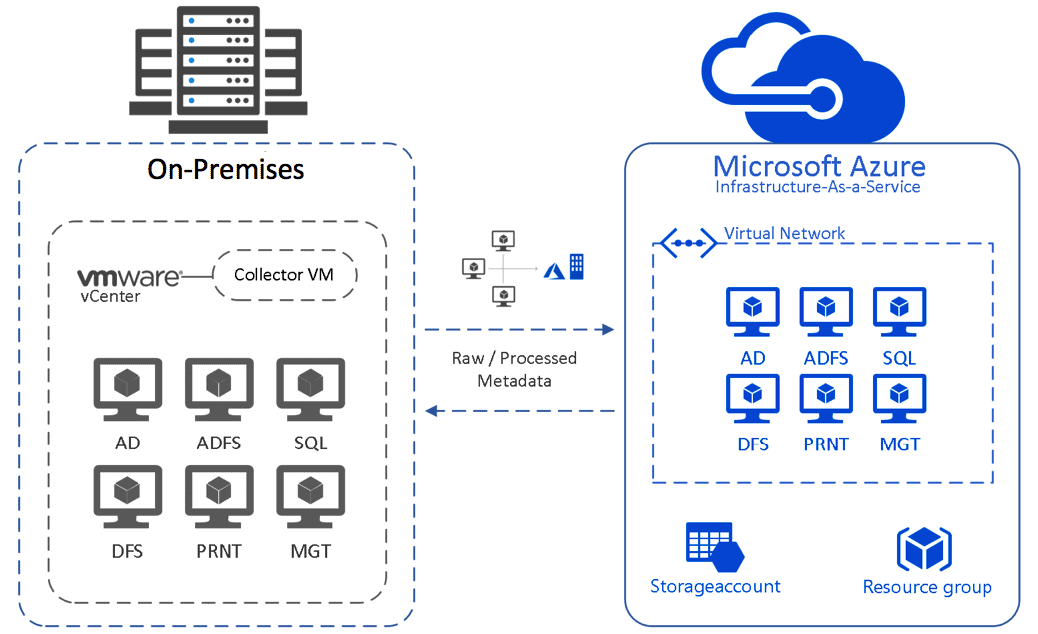
23) Disk Migration From On-Premises Server To Azure
Cloud migration is the process of moving digital assets such as data, workloads, IT resources, or applications to cloud infrastructure. In the case of Disk Migration, this involves migrating on-premises disks to Azure cloud storage.
In this lab, we have covered the following steps:
- Create a Virtual Machine in Azure
- Migrate On-Premises VM Data Disk to Azure
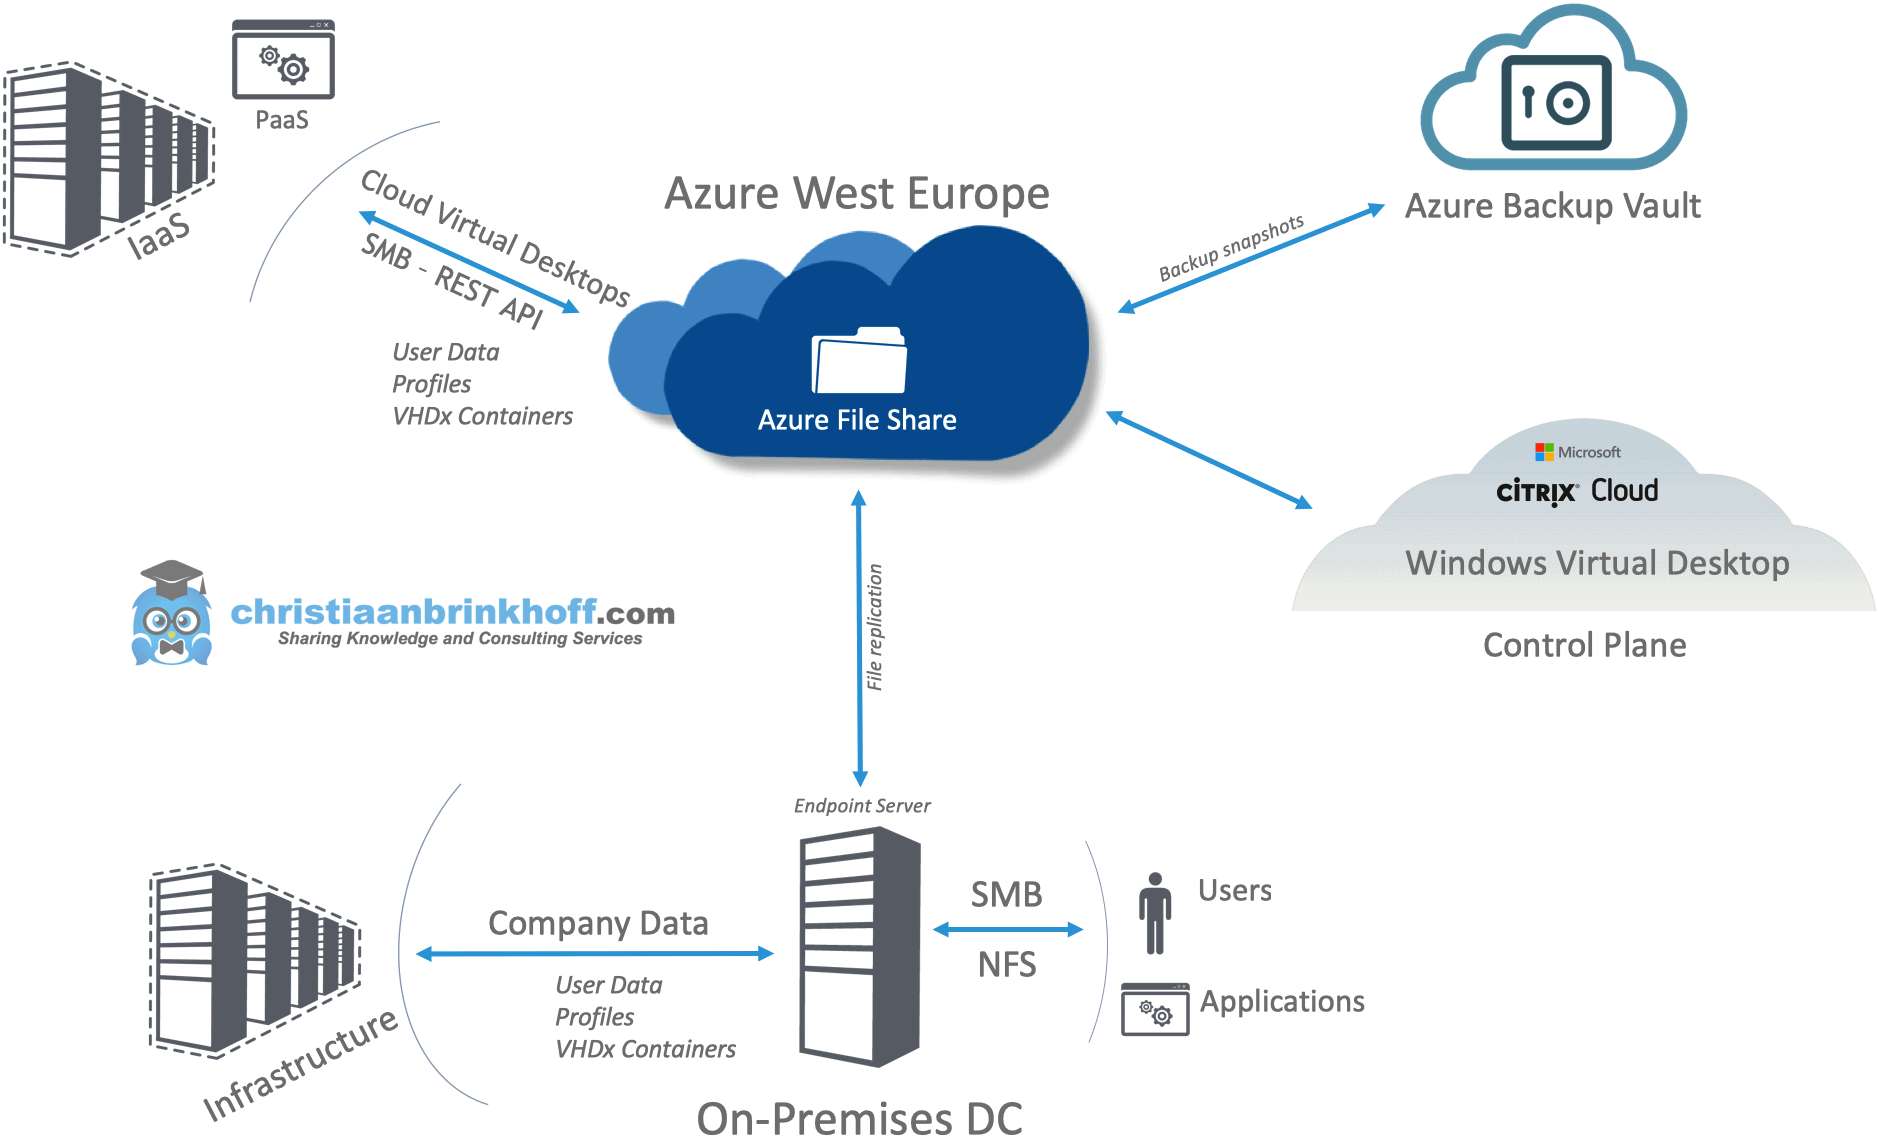
24) Configure Azure File Share and Azure File Sync
An Azure File Share is a convenient storage location for cloud applications to write logs, metrics, and crash dumps. Applications can write logs via the File REST API, and developers can access these logs by mounting the file share on their local machines.
Azure File Share is deployed within Azure Storage Accounts, which are top-level objects representing a shared pool of storage resources.
Azure File Sync is a service that enables you to cache multiple Azure File Shares on an on-premises Windows Server or cloud VM. While the files are cached locally, they are stored in the cloud within Azure File Shares for scalable, secure storage.
25) Configure Azure Blob Lifecycle Management and Object Replication
Azure Blob storage is Microsoft’s object storage solution for the cloud. Blob storage is optimized for storing massive amounts of unstructured data. Unstructured data is data that doesn’t adhere to a particular data model or definition, such as text or binary data.
Microsoft Azure provides tiering for your blob data, which you can set as the default level. (either upon creation of the storage account or at a later date). To check the default storage tiering of your storage account, go to the Azure Portal, choose the configuration, and then the access tier that the blobs default to in that storage account is shown. Azure Blob Storage lifecycle management offers a rich, rule-based policy that you can use to transition your data to the best access tier and to expire data at the end of its lifecycle.

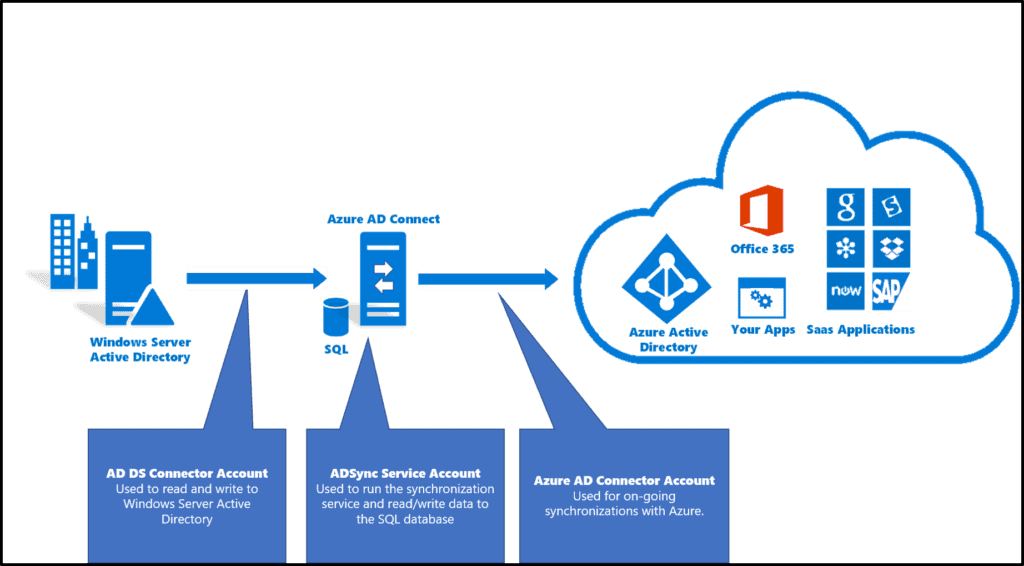
26) Entra ID (Azure Active Directory) Synchronization with On-Premise Active Directory using Entra Connect (AD Connect)
Microsoft Entra ID is an identity and access management (IAM) solution designed to secure access to resources across both Microsoft and third-party services. It offers key features like single sign-on, multifactor authentication, and conditional access, all aimed at enhancing security and streamlining user access in hybrid and cloud environments.
In this Activity Guide, you will learn how to connect Microsoft Entra ID (formerly Azure AD) with your on-premises Active Directory using Entra Connect (Azure AD Connect). This integration simplifies user provisioning, improves security, and ensures consistent access across both cloud and on-premises environments, making identity management more efficient and less complex for administrators.
27) Configure Role-Based Access Control In Azure
Azure Role-Based Access Control (RBAC) is the authorization system used to manage access to Azure resources. To grant access, you assign roles to users, groups, service principals, or managed identities at specific scopes.
Access management for cloud resources is a critical function for any organization using the cloud. Azure RBAC allows you to manage who has access to Azure resources, what actions they can perform on those resources, and the specific areas or scopes to which they have access.
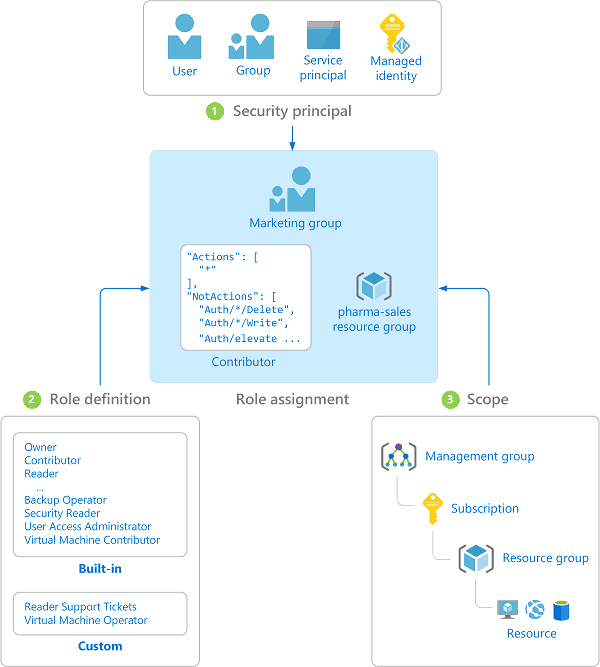
In this guide, we will provide you the information on how to Configure RBAC Roles.
28) Create Custom RBAC Roles using Azure Portal
If the Azure built-in roles don’t meet the specific needs of your organization, you can create your own custom roles. Just like built-in roles, you can assign custom roles to users, groups, and service principals at the management group, subscription, and resource group scopes.
Custom roles can be shared between subscriptions that trust the same Azure AD directory. There is a limit of 5,000 custom roles per directory. (For Azure Germany and Azure China 21Vianet, the limit is 2,000 custom roles.) Custom roles can be created using the Azure portal, Azure PowerShell, Azure CLI, or the REST API.
29) Azure Monitoring Using Log Analytics
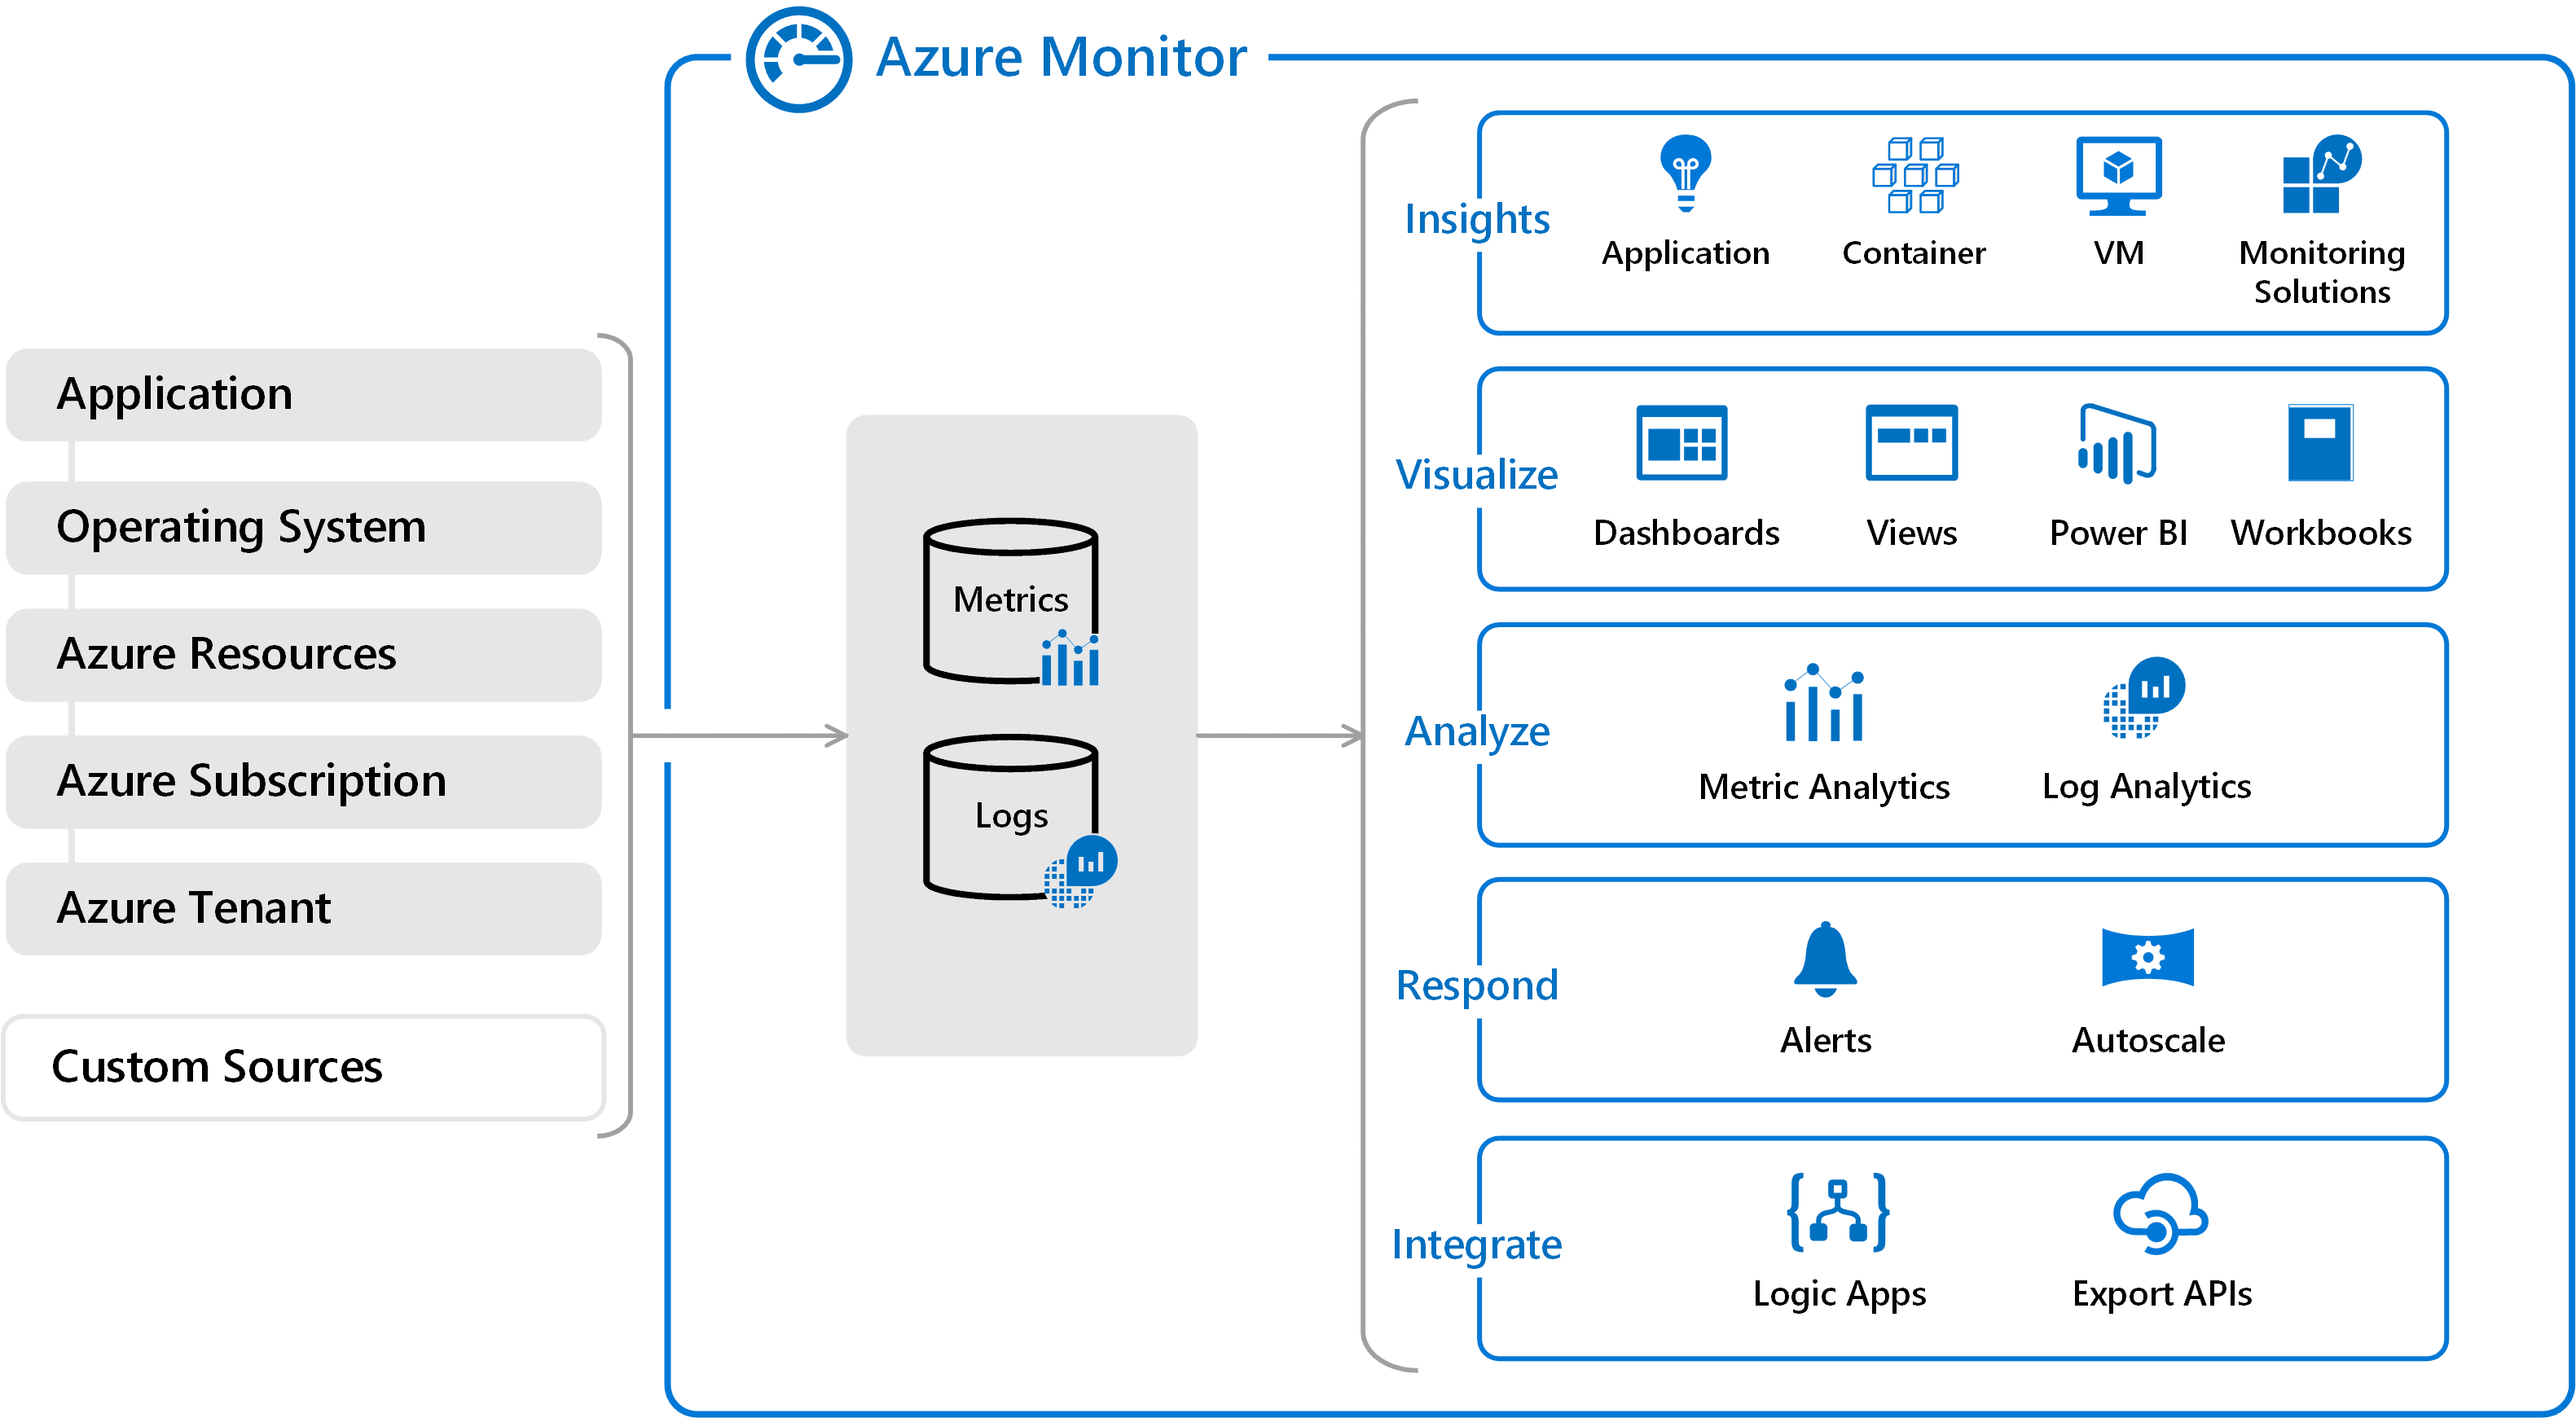
Azure Monitor helps you maximize the usability and performance of your applications and services. It provides comprehensive solutions for telemetry collection, analysis, and monitoring from both cloud and on-premises environments. This valuable information helps you understand how your applications function and proactively identify any issues that may affect them or the resources they depend on.
What you can do with Azure Monitor includes:
- Detect and diagnose problems with applications and dependencies in Application Insights.
- Link infrastructure issues to VM Insights and Container Insights.
- Drill Log Analytics tracking data for troubleshooting and in-depth analysis.
- Support large operations with smart alerts and automatic actions.
- Create visualizations using Azure dashboards and workbooks.
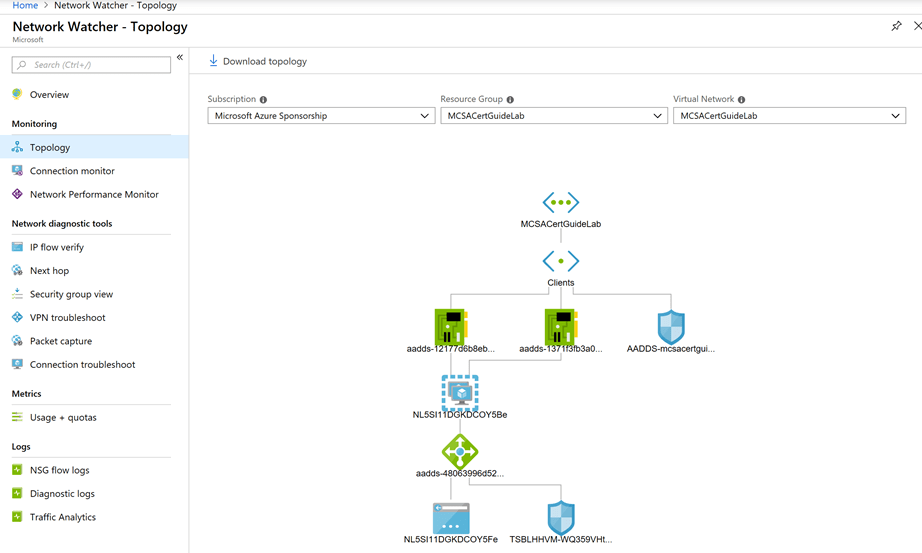
30) Configure Azure Network Watcher
Azure Network Watcher provides tools to monitor, diagnose, view metrics, and enable or disable logs for resources in an Azure virtual network. Network Watcher is designed to monitor and repair the network health of IaaS (Infrastructure-as-a-Service) products which includes Virtual Machines, Virtual Networks, Application Gateways, Load balancers, etc.
By using Network Watcher, you can Monitor communication between a virtual machine and an endpoint.
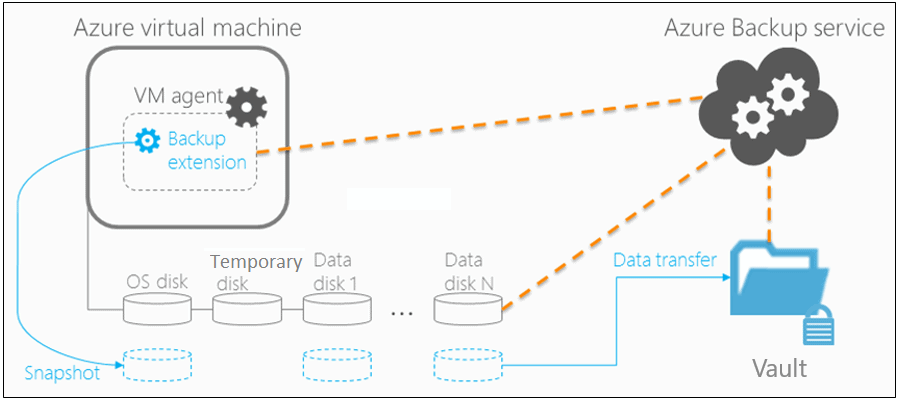
31) Backup of Azure VM into Azure Backup Vault
Azure offers an end-to-end backup and disaster recovery solution that is simple, secure, scalable, cost-effective, and can be integrated with on-premises data protection solutions. In the event of a service disruption, accidental deletion, or data corruption, you can recover your business services in a timely and orchestrated manner. The Azure backup and disaster recovery solution is easy to architect, cloud-native, highly available, and resilient.
You can back up on-premises Windows machines directly to Azure using the Azure Backup Microsoft Azure Recovery Services (MARS) agent. Please note that Linux machines are not supported.
In this Lab, we Configure the Backup and Site Recovery.
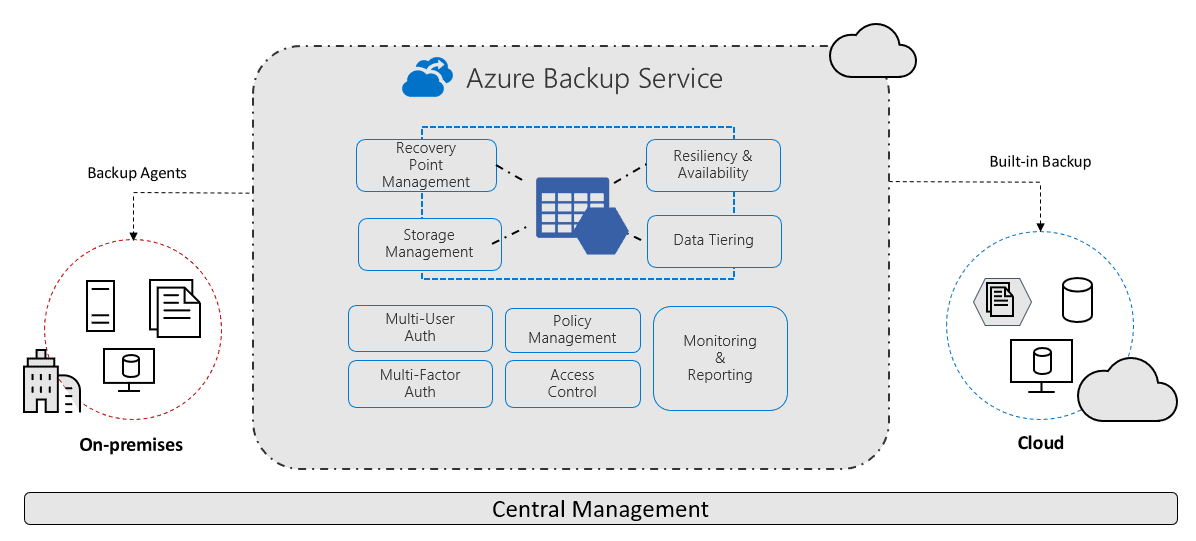
32) Backup of On-Premise Server into Azure Backup Vault
Azure offers an end-to-end backup and disaster recovery solution that is simple, secure, scalable, and cost-effective—and can be integrated with on-premises data protection solutions. In the case of a service disruption, accidental deletion, or data corruption, you can recover your business services in a timely and orchestrated manner. The Azure backup and disaster recovery solution is easy to architect, cloud-native, highly available, and resilient, ensuring that your critical data is always protected.
In this Lab, we Create Recovery Service Vault and Configure Backup
33) WebApps Creation With 2 Deployment Slots
When you deploy your web app, web app on Linux, mobile back end, or API app to Azure App Service, you can use a separate deployment slot instead of the default production slot, provided you’re using the Standard, Premium, or Isolated App Service plan tiers.
Deploying your application to a secondary slot offers the following benefits:
- You can validate app changes in a staging secondary deployment slot before swapping it with the production slot.
- Deploying to a secondary slot first and then swapping it into production ensures that all instances of the app are running smoothly.
- After a swap, if the changes deployed to the production slot aren’t as expected, you can immediately reverse the swap to restore your “last known good site.”
34) Configure Azure Container Service
Containers are becoming the preferred way to package, deploy, and manage cloud applications. Azure Container Instances offers the fastest and simplest way to run a container in Azure, without having to manage any virtual machines and without having to adopt a higher-level service. Azure Container Instances is a great solution for any scenario that can operate in isolated Containers offer significant startup benefits over virtual machines (VMs).
Azure Container Instances also supports executing a command in a running container by providing an interactive shell to help with application development and troubleshooting. Access takes place over HTTPS, using TLS to secure client connections.
35) Configure Azure Kubernetes Service
Azure Kubernetes Service (AKS) simplifies deploying a managed Kubernetes cluster in Azure by offloading the operational overhead to Azure. As a hosted Kubernetes service, Azure handles critical tasks, like health monitoring and maintenance. Since Kubernetes masters are managed by Azure, you only manage and maintain the agent nodes. Thus, AKS is free; you only pay for the agent nodes within your clusters, not for the masters.
You can configure an AKS cluster to integrate with Azure AD. With Azure AD integration, you can set up Kubernetes access based on existing identity and group membership.
In this Lab, we have deployed an Azure Kubernetes Service Cluster & Deploy Pods into the Azure Kubernetes Service Cluster.
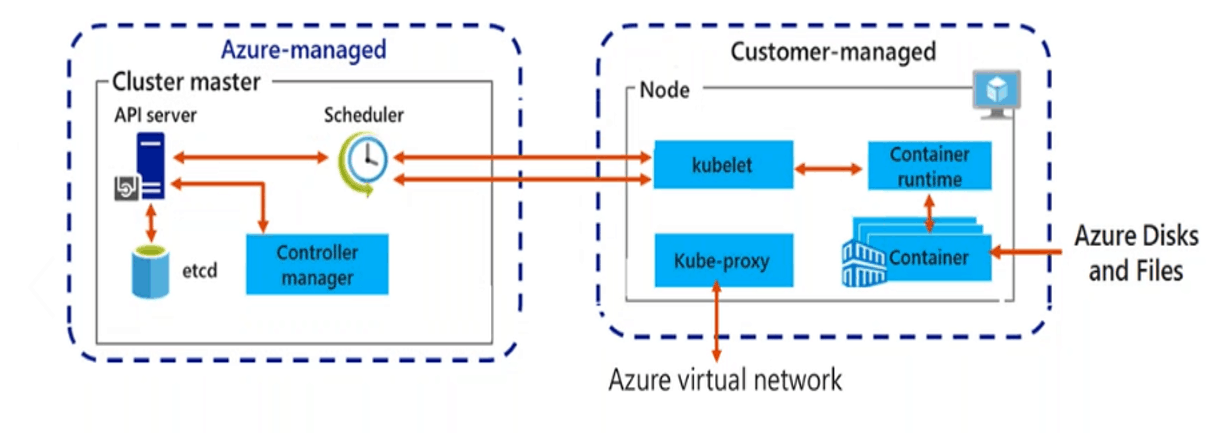
Check our blog for more information on Azure Kubernetes Service.
36) Create Resource Group and Virtual Machine via Cloud PowerShell
The Azure Cloud Shell is a free interactive shell that you can use to run the steps in this article. It has common Azure tools preinstalled and configured to use with your account.
This Activity Guide covers Steps for:
- How to create a Resource group using Cloud PowerShell.
- How to create a Virtual Machine using Cloud PowerShell and to connect it.
37) Authenticate to Azure Tenant via PowerShell
Azure PowerShell is a set of cmdlets for managing Azure resources directly from the PowerShell command line. Azure PowerShell is designed to make it easy to learn and get started with but provides powerful features for automation. Written in .NET Standard, Azure PowerShell works with PowerShell 5.1 on Windows, and PowerShell 7.x and higher on all platforms.
The Az PowerShell module is a set of cmdlets for managing Azure resources directly from PowerShell. PowerShell provides powerful features for automation that can be leveraged for managing your Azure resources for example in the context of a CI/CD pipeline.
A tenant represents an organization. It’s a dedicated instance of Azure AD that an organization or app developer receives at the beginning of a relationship with Microsoft. The relationship could start with signing up for Azure, Microsoft Intune, or Microsoft 365.
38) Create an Azure managed disk by using Azure PowerShell
Azure-managed disks are block-level storage volumes that are managed by Azure and used with Azure Virtual Machines. Managed disks are like a physical disk in an on-premises server but, virtualized. With managed disks, all you have to do is specify the disk size, the disk type, and provision the disk. Once you provision the disk, Azure handles the rest.
This Activity Guide covers steps How to:
- Start a PowerShell session in Azure Cloud Shell
- Create a resource group and an Azure managed disk by using Azure PowerShell
- Configure the managed disk by using Azure PowerShell
39) Create a Resource group, and Virtual Machine using Azure CLI
VM is one of several types of on-demand, scalable computing resources that Azure offers. Typically, you choose a VM when you need more control over the computing environment than the other choices offer. This article gives you information about what you should consider before you create a VM, how you create it, and how you manage it.
Azure Cloud Shell is a browser-based shell experience to manage and develop Azure resources. Azure Cloud Shell is an interactive, authenticated, browser-accessible shell for managing Azure resources, it provides the flexibility of choosing the shell experience that best suits the way you work, either Bash or PowerShell.
This Activity Guide Cover steps for:
- Creating a Resource Group using Azure CLI
- Adding Name
- Region and subscription
- Create a Virtual Machine using Azure CLI
- Assign name and resource group
- Assigning OS and username, password
- Selecting Networking
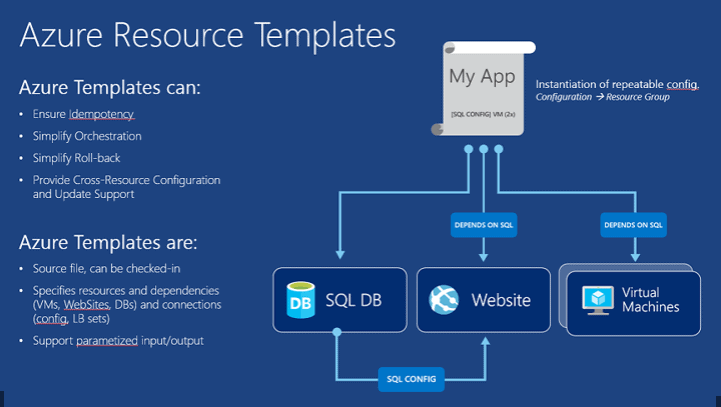
40) Create and Deploy ARM templates using Azure Portal
Azure Resource Manager templates (ARM templates). The template is a JavaScript Object Notation (JSON) file that defines the infrastructure and configuration for your project. The template uses declarative syntax, which lets you state what you intend to deploy without having to write the sequence of programming commands to create it. In the template, you specify the resources to deploy and the properties for those resources.
In this Activity Guide, we are going to create and deploy an Azure VM ARM Template using the Azure portal.
Related
- [AZ-104] Microsoft Azure Administrator Certification Exam: Everything You Need To Know
- [AZ-104] Region, Availability Zone, Availability Sets and Fault Domain, Update Domain In Microsoft Azure
- Virtual Network (VNet) Peering in Azure
- Azure Web APP : Working, Features, And Steps to Create
- Job Oriented Azure Cloud Program: Step-by-Step Hands-on Lab & Projects
Next Task For You
Begin your journey toward Mastering Azure Cloud and landing high-paying jobs. Just click on the register now button on the below image to register for a Free Class on Mastering Azure Cloud: How to Build In-Demand Skills and Land High-Paying Jobs. This class will help you understand better, so you can choose the right career path and get a higher paying job.

![Microsoft Agentic AI Business Solutions Architect [AB-100] | K21 Academy](https://test.k21academy.com/wp-content/uploads/2025/11/Microsoft-Agentic-AI-Business-Solutions-Architect-AB-100-Exam-Overview1.png)


