


![]()
This blog post provides a detailed walkthrough of the Step-By-Step Activity Guides for the AZ-900 Microsoft Azure Fundamentals training program. These hands-on lab exercises are designed to help you gain practical experience and a deeper understanding of Azure fundamentals, ensuring you’re fully prepared for the course and the exam.
You can use these walkthroughs to familiarise yourself with the Azure cloud processes and interface. The walk through of the Step-By-Step Activity Guides of [AZ-900] Microsoft Azure Fundamentals training program will prepare you thoroughly for the AZ-900 certification.
-
- Register For Azure Free Trial Account
- Create and Connect to Windows Virtual Machine.
- Create a Web App
- Deploy Azure Container Instances
- Create Resource Group, Virtual Network, Subnet and Virtual Machine
- Create Blob Storage
- Create a SQL Database
- Implement an Azure IoT Hub.
- Implement Azure Functions
- Create a VM with a Template.
- Create a VM with PowerShell.
- Create a VM using CLI.
- Implement Azure Key Vault.
- Secure Network Traffic.
- Manage Access with RBAC.
- Manage Resource Locks.
- Implement Resource Tagging.
- Create an Azure Policy.
- Explore the trust Center.
- Use Azure pricing calculator.
- Use the Azure TCO calculator.
- Access Azure preview features.
- Create VM of Linux image
- Open A Support Request
Activity Guides:
1: Register For Azure Free Trial Account
The first thing you must do is to get a Trial Account for Microsoft Azure. (You get 200 USD FREE Credit from Microsoft to practice)
Microsoft Azure is one of the top choices for any organization due to its freedom to build, manage, and deploy applications. Here, we will look at how to register for the Microsoft Azure FREE Trial Account, click here.
Note: To know how to create a free Azure account, check our Step-by-step blog How To Create Azure Free Trial Account
After you register for Microsoft Cloud Trial Account, you should get an Email Like the below from Microsoft:

2: Create and Connect to Windows Virtual Machine
Azure Virtual Machines (VM) are one of the most versatile and scalable computing resources available in Microsoft Azure. Typically, you choose an Azure VM when you need more control over the computing environment than other options provide. In this Azure Virtual Machines Activity Guide, you’ll explore the process of creating and managing VMs in Azure. You’ll begin by creating a VM through the Azure portal, configuring essential settings like the operating system and network.
After deployment, you’ll connect to the VM via the portal and an RDP file, first from a Windows PC and then from a Mac using a compatible Remote Desktop application.

3: Create a Web App
In this Activity Guide, you will create and test a Web App in Azure. Starting in the Azure portal, you configure a new Web App by selecting the appropriate runtime stack, region, and resource group, and then deploy it to the designated environment.
Once the Web App is live, we access it through its public URL to verify its functionality, confirming that it is successfully deployed and running as expected.

4: Deploy Azure Container Instances
In this Activity Guide, you will focus on deploying a Docker image using Azure Container Instances (ACI) and review its functionality. You start by creating an Azure Container Instance through the Azure portal, where you will specify the Docker image from a container registry and configure necessary settings such as resource allocation and networking options.
Once the deployment gets completed, you will test the functionality of the Azure Container Instance by accessing its endpoints and verifying that the application within the Docker image is running as expected.
This hands-on experience with ACI highlights the ease of deploying and managing containerized applications in the Azure environment.

5: Create A Resource Group, Virtual Networks, Subnet and VM
Azure Virtual Network (VNet) is the fundamental building block for your private network in Azure. VNet enables many types of Azure resources, such as Azure Virtual Machines (VM), to securely communicate with each other, the internet, and on-premises networks. VNet is similar to a traditional network that you’d operate in your data center but brings with it additional benefits of Azure’s infrastructure such as scale, availability, and isolation.
In this Activity Guide, you will go through the process of creating a Virtual Network (VNet) on the Azure portal. After setting up the initial VNet, you will add an additional subnet to expand its address range and support more resources.
Next, you create a Virtual Machine (VM) within the VNet, ensuring it is properly connected to the subnet.
The VM’s default Dynamic IP address is changed to a Static IP to maintain a consistent address across sessions, which is crucial for certain network configurations.
Once the setup is complete, we connect to the Azure VM using its Public IP address. Remote Desktop Protocol (RDP) is used to establish a remote connection from a Windows machine, allowing you to manage and interact with the VM’s environment directly.
 Check out: Microsoft Azure provides governance features and services in order to implement policy-based management for all Azure services available on cloud and on-premises. In this blog post, we’ll cover Topic 3.4 Microsoft Azure Governance, which includes Azure Blueprints & Azure Policy.
Also Read: Our blog post on Virtual Networks In Microsoft Azure: VNet Peering, ExpressRoute, VPN Gateway.
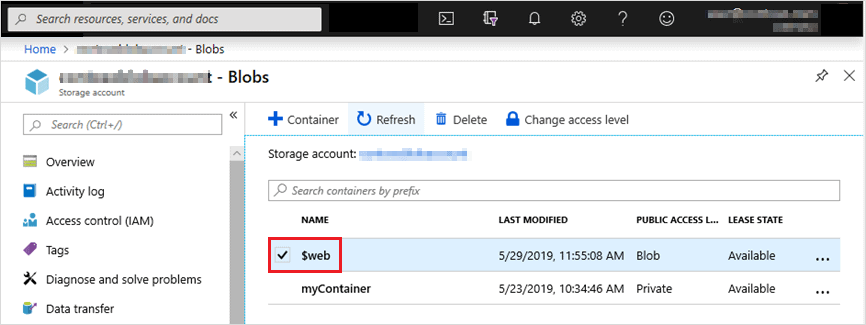
6: Create Blob Storage
Microsoft Azure Storage provides massively scalable, durable, and highly available storage for data on the cloud, and serves as the data storage solution for modern applications.
This activity guide gives you step-by-step information on how to connect to Blob Storage to perform various operations such as create, update, get, and delete blobs in your storage account.
7: Create a SQL Database
SQL (Structured Query Language) is a standardized programming language used for managing and manipulating relational databases. It is essential for working with data stored in relational database management systems (RDBMS) such as MySQL, SQL Server, PostgreSQL, and Oracle.
This activity guide cover steps to
- Create the database
- Test the database

8: Implement an Azure IoT Hub
Azure IoT Hub is a fully managed cloud service that facilitates secure and reliable bi-directional communication between Internet of Things (IoT) applications and the devices they manage. It serves as a central message hub, enabling the connection, monitoring, and control of millions of IoT devices.
This activity guide cover steps to
- Create an IoT hub
- Add an IoT device
- Test the device using the Raspberry Pi Simulator

9: Implement Azure Functions
Azure Functions is a powerful serverless compute service that allows developers to build event-driven applications without managing infrastructure.Whether you’re looking to create lightweight APIs or automate tasks, this step by step guide will provide a solid foundation for using Azure Functions efficiently.
This activity guide cover steps to :
- Create a Function app
- Create a HTTP triggered function and test

10: Create a VM with a Template
Azure Resource Manager (ARM) templates are JSON files that help you define and deploy resources in Microsoft Azure. By automating the deployment process, ARM templates enable consistent, efficient, and scalable infrastructure management across environments.
In this tutorial, you’ll deploy a virtual machine (VM) using an Azure QuickStart template. These pre-configured templates simplify deployment and save time.
Afterward, you’ll explore Azure Monitor to track and manage the performance of your VM, ensuring smooth operation and quick issue resolution.
Leveraging ARM templates, QuickStart templates, and Azure Monitor helps streamline deployment and enhances resource management in Azure.

11: Create a VM with PowerShell
In this lab, you will learn how to create a Resource Group and a Virtual Machine (VM) using Azure PowerShell.
You will begin by executing PowerShell commands to create a new Resource Group, specifying the desired location and name.
Once the Resource Group is established, you will proceeded to create a Virtual Machine within that group, configuring essential settings like the operating system, size, and network options.
After successfully deploying the VM, you will connect to it using PowerShell commands.
This process involves retrieving the VM’s public IP address and utilizing Remote Desktop Protocol (RDP) to access the VM.
This lab will provide a practical understanding of managing Azure resources programmatically using PowerShell, enhancing our ability to automate cloud infrastructure management.


12: Create a VM with CLI
In this lab, you will use Azure CLI to create a Resource Group and deploy a Virtual Machine (VM). We began by executing an Azure CLI command to create a new Resource Group, specifying the location and name as parameters.
Next, we used another CLI command to create the Virtual Machine within the newly created Resource Group, setting up the necessary configurations like operating system, VM size, and network.
After the VM was successfully deployed, we logged into it using the public IP address and Remote Desktop Protocol (RDP) for a Windows machine or SSH for a Linux VM.
This lab demonstrated the efficiency of using Azure CLI for quick deployment and management of cloud resources.

13: Implement Azure Key Vault
Azure Key Vault is a cloud service for securely storing and accessing secrets. A secret is anything that you want to tightly control access to, such as API keys, passwords, certificates, or cryptographic keys.
Key Vault service supports two types of containers: vaults and managed HSM pools. Vaults support storing software and HSM-backed keys, secrets, and certificates. Managed HSM pools only support HSM-backed keys
In this guide, you will create an Azure Key vault and then create a password secret within that key vault, providing a securely stored, centrally managed password for use with applications.


14: Secure Network Traffic
Network traffic refers to the amount of data moving across a network at a given point of time. Network data is mostly encapsulated in network packets, which provide the load in the network.
Network traffic is the main component for network traffic measurement, network traffic control and simulation.
The proper organization of network traffic helps in ensuring the quality of service in a given network. Network traffic is also known as data traffic.

15: Manage Access with RBAC
Access management for cloud resources is a critical function for any organization that is using the cloud. Azure role-based access control (Azure RBAC) helps you manage who has access to Azure resources, what they can do with those resources, and what areas they have access to.
Azure RBAC is an authorization system built on Azure Resource Manager that provides fine-grained access management of Azure resources.
In this guide, you will assign roles and view activity logs.strong>
16: Manage Resource Locks
As an administrator, you may need to lock a subscription, resource group, or resource to prevent other users in your organization from accidentally deleting or modifying critical resources.
You can set the lock level to CanNotDelete or ReadOnly. In the portal, the locks are called Delete and Read-only respectively.
In this Lab, we will create a resource group, add a lock to resource group and test deletion, test deleting a resource in the resource group, and remove the resource lock.

17: Implement Resource Tagging
You apply tags to your Azure resources, resource groups, and subscriptions to logically organize them into a taxonomy.
Each tag consists of a name and a value pair. For example, you can apply the name “Environment” and the value “Production” to all the resources in production.
In this Lab, we will create a resource group, add a lock to the resource group and test deletion, test deleting a resource in the resource group, and remove the resource lock.

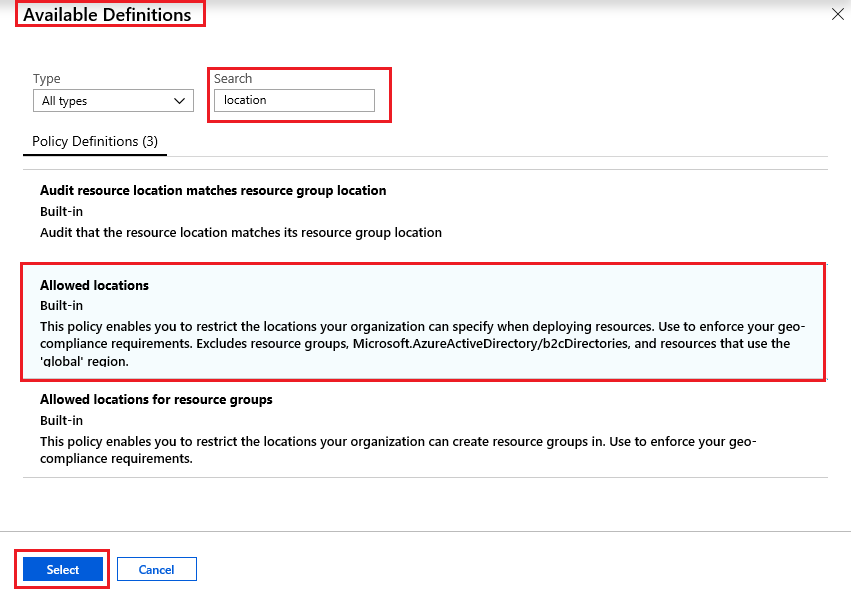
18: Create an Azure Policy
In this lab, you will focus on implementing Azure Policy to manage resources effectively. You will begin by creating an Azure Resource Group using the Azure portal, which served as a container for our resources.
Following that, you will define and assign an “Allowed Locations” policy, specifying which geographical regions resources could be deployed in.This policy helps ensure compliance with organizational standards and regulatory requirements.
After assigning the policy, you will test its functionality by attempting to create resources in both allowed and disallowed locations.
This step confirmed that the policy was correctly enforced, as attempts to deploy resources outside the permitted regions were blocked, while those within the specified locations were successful.
Overall, this lab provides valuable insights into utilizing Azure Policy for governance and compliance in cloud resource management.


19: Explore the trust Center
The Microsoft Service Trust Portal provides a variety of content, tools, and other resources about Microsoft security, privacy, and compliance practices.
In this Lab, we will access the Trust Center, Service Trust Portal (STP), and Compliance Manager.
20: Azure Pricing Calculator
The Azure Pricing Calculator is a web-based tool provided by Microsoft to help users estimate the costs of Azure services tailored to their specific needs. It offers a detailed breakdown of expenses, enabling informed budgeting and planning for cloud deployments.
This activity guide covers steps to:
- Configure the pricing calculator
- Review the pricing estimate

21: Use the Azure TCO Calculator
The Azure Total Cost of Ownership (TCO) Calculator is a tool provided by Microsoft to help organizations estimate the cost savings and benefits of migrating their on-premises workloads to Azure. By inputting details about your current infrastructure, the TCO Calculator compares the costs of running your workloads on-premises versus on Azure, offering insights into potential savings in areas such as hardware, software, facilities, and administration.
This activity guide covers steps to
- Configure the TCO calculator
- Review the results and save a copy

22: Access Azure Preview Features
Azure preview features allow users to access and test new functionalities before they become generally available. These previews enable organizations to evaluate upcoming features, provide feedback, and prepare for future integrations.
This activity guide covers steps to
- Access preview services and features
- Review the Azure Updates page

23: Create and Connect to Windows Virtual Machine
Creating a Linux virtual machine (VM) in Azure involves provisioning a cloud-based instance of a Linux operating system. Azure provides a variety of Linux images that you can use to deploy VMs, including popular distributions like Ubuntu, CentOS, and Red Hat. These images are pre-configured with the necessary software to run the operating system and applications.
When you create a Linux VM in Azure, the process typically involves selecting the desired Linux distribution, configuring the VM’s size and storage, and defining network settings. The advantage of using Azure is the ability to scale the VM based on your needs and integrate it into a larger infrastructure for cloud-based development, testing, or production environments.

24: Calculate Composite SLAs
Calculating composite SLAs (Service Level Agreements) involves combining multiple SLAs for various services or components to determine an overall SLA for a system or application. This is commonly used when an application relies on multiple services, and you need to calculate how their individual SLAs affect the overall availability or reliability.
FAQ’s
What steps are needed to create a storage account in Azure?
The steps required to create a storage account are:
1. Launching Lab Environment.
2. Understanding performance, redundancy, and access tiers.
3. Creation of a Storage Account.
4. Creation of Container.
5. Uploading Blob object.
6. Creation of File Share.
7. Uploading File.
Also Read: Our blog post on:Microsoft Azure Storage Account: A Comprehensive Guide.
What are the benefits of using the hands-on-lab for users?
Hands-on labs are a very crucial part of learning as they allow users to experiment more freely without the concern of disrupting their work environment or the software they are using, and this hassle-free exploration accelerates the learning process, helping users gain a deeper understanding of how the tools and software function.
What are different Azure Database Services?
Azure offers a comprehensive suite of database services to cater to various application needs, including relational, NoSQL, and in-memory databases. The different Azure Database Services are as follows:
1. Azure SQL Database
2. Azure SQL Managed Instance
3. Azure Database for PostgreSQL
4. Azure Database for MySQL
5. Azure Database for MariaDB
6. Azure Cosmos DB
7. Azure Managed Instance for Apache Cassandra
8. Azure Cache for Redis
9. Azure SQL Database Hyperscale
What steps are required to create a Windows VM using an ARM template?
In this Azure AZ-900 lab, you will walk through the steps to deploy an Azure Windows Virtual machine using an ARM template. While working in this lab, you need to undergo the following steps:
1. Launching Lab Environment
2. Explore the ARM template
3. Deploy the ARM template
4. Verify your deployment.
What jobs can I apply for after getting AZ-900 certified?
After completing the AZ-900 exam, you can apply for the following job roles:
1. Azure Administrator Associate.
2. Azure Developer Associate.
3. Azure Security Engineer Associate.
4. Azure Data Engineer Associate.
Which Azure Certification is considered most lucrative?
If you’re aiming to boost your career and earning potential in cloud computing, the Microsoft Certified: Azure Solutions Architect Expert certification stands out as one of the most lucrative options. This certification is well-regarded for demonstrating advanced skills in designing cloud solutions and managing Azure infrastructure.
What topics and concepts does AZ-900 cover?
The AZ-900 exam covers topics such as:
1. Describe Cloud Concepts
2. Core Solutions & Management Tools on Azure
3. Identity, Governance, Privacy & Compliance Features
4. Core Azure Services
5. General Security and Network Security Features
6. Azure Cost Management & Service Level Agreements
What skills are measured in the AZ-900 exam?
The AZ-900: Microsoft Azure Fundamentals exam evaluates a candidate’s skills in concepts including:
Core Azure services
Cloud Services
Azure core Management tools and solutions
Compliance and Privacy, Identity, and Governance
Features of General and Network Security
Cost Management of Azure and Service Level Agreements
What are the rules and processes for understanding NSG rules in Azure?
Understanding NSG (Network Security Group) rules involves deploying a virtual machine and applying NSG rules using the Azure Portal. The tasks include:
1. Launching lab environment.
2. Create a virtual machine.
3. Allow RDP traffic through NSG rules.
4. Allow HTTP traffic through NSG rules
Related/References
- [AZ-900] Microsoft Azure Certification Fundamental Exam: Everything You Must Know
- Learn how to create a Free Microsoft Azure Trial Account
- [AZ-900] Microsoft Azure Fundamentals: Topic 1.1 Overview & Benefits
- [AZ-900] Microsoft Azure Fundamentals: Topic 1.2 CapEx vs OpEx Model
- [AZ-900] Microsoft Azure Core Services: Compute, Network, Storage & Database
- [AZ-900] Azure Subscriptions
Next Task For You
Begin your journey toward Mastering Azure Cloud and landing high-paying jobs. Just click on the register now button on the below image to register for a Free Class on Mastering Azure Cloud: How to Build In-Demand Skills and Land High-Paying Jobs. This class will help you understand better, so you can choose the right career path and get a higher paying job.

![Microsoft Agentic AI Business Solutions Architect [AB-100] | K21 Academy](https://test.k21academy.com/wp-content/uploads/2025/11/Microsoft-Agentic-AI-Business-Solutions-Architect-AB-100-Exam-Overview1.png)