

![]()
Discover how AWS Load Balancer effortlessly optimizes your application’s performance and reliability, ensuring seamless scaling and robust security in a cloud environment.
Achieving the best possible performance, dependability, and scalability for online applications is crucial in the ever-changing world of cloud computing. Here’s where AWS Load Balancers become essential elements, coordinating the fault-tolerant and highly available distribution of incoming traffic among several instances.
In this Blog, we will talk about how the AWS Load Balancer works with detailed steps.

Topics we will cover:
- AWS Load Balancer
- Types of Load Balancer
- Steps To Create & Configure Load Balancer
Overview of AWS Load Balancing
The AWS Load Balancer is a critical component in maximizing the speed and availability of applications hosted on Amazon Web Services (AWS) cloud infrastructure. It acts as a traffic distributor, automatically distributing incoming requests over numerous servers or instances to avoid a single point of failure and ensure optimal resource utilization.
AWS offers a variety of load balancers, including the Network Load Balancer, Application Load Balancer, and Gateway Load Balancer, allowing it to accommodate different application designs and requirements. AWS load balancers play an important role in preserving the stability and efficiency of applications in the dynamic cloud environment, whether by improving fault tolerance, seamlessly scaling resources, or improving the overall user experience.
For more about Elastic Load Balancing, please check this
Base Scenario (Use Case)
The following diagram shows the logical architecture, such as two different EC2 instances and an Elastic load balancer attached to them to distribute the traffic to your application.

Steps To Create & Configure AWS Load Balancer
- Step 1: Create an AWS Windows EC2 Instance
- Step 2: Create Windows EC2 Instance on a Different Subnets
- Step 3: Connect to Windows EC2 Instance
- Step 4: Configure IIS Server on Windows EC2 Instances
- Step 5: Create a Web Page on the IIS Server
- Step 6: Create a Load Balancer & Access The Webpage

Step 1: Create an AWS Windows EC2 Instance
In this section, we are going to launch 2 EC2 Instances in two different availability zones
Note: If you don’t have an AWS account, check our blog on how to create an AWS Free Tier Account
1: Log in to your AWS account and go to the EC2 Dashboard, then click on Launch Instance.
2. Provide the Name of the Instance.
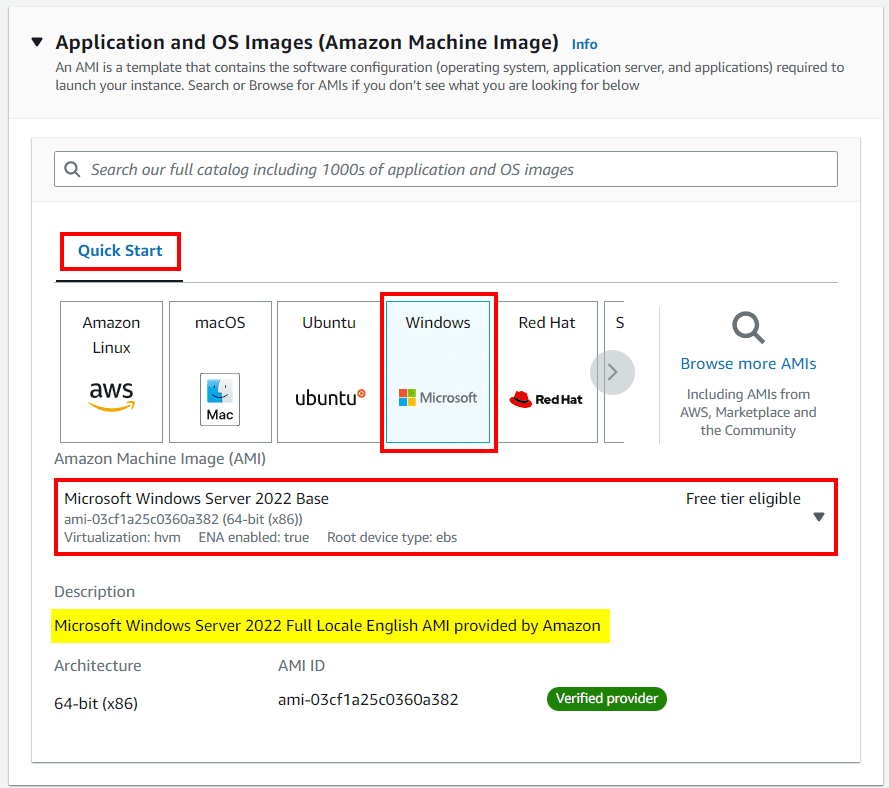
3: Select Windows Server 2022 Base AMI.
4: Select the t2.micro instance type.

5: Select an existing key pair or create a new one; we will create a new one, enter the name of the Key-pair as Windows-Key, and Create the Key Pair.

6: On the Networking Setting Details page, select VPC (Default) and one of the subnets associated with an Availability Zone. Over here, we are choosing us-east-1a as our preferred zone to launch this instance into it.

7: Now you will create a security group. To Assign a security group, click Create Security Group. Under the Security Group name, type Windows Instance SG. Click Add Rule to open a new port.

8: In the Type drop-down list, click HTTP and Source type Anywhere.

9: Now review all the things you have Configured and click on Launch Instance.

8: Here you shall see that our Instance is launched in our us-east-1a subnet.

At this step, we have successfully launched a Windows EC2 instance in our us-east-1a subnet, and in further steps, we are going to launch another duplicate instance inside another subnet.
Step 2: Create a Windows EC2 Instance in a Different Subnet
In this section, we are going to create a similar Windows EC2 Instance, but on another subnet.
1: Click on the Launch Instance button to launch a new instance.
2: Provide the Name of the Instance
3: Select Windows Server 2022 Base AMI.
4: Select the t2.micro instance type
5: Select an existing key pair (Windows-Key).

6: On the Networking Setting Details page, select VPC (Default) and one of the subnets associated with an Availability Zone. Over here, we are choosing us-east-1b as our preferred zone to launch this instance into it.

7: In the Firewall (Security Group) step, we have to select the existing security group for the instance and now click on Launch.
Note: Make sure you attach the same security group that we have created & attached earlier in our first EC2 instance.

8: Here you shall see that our Instance is launched in our us-east-1b subnet.

Thus, at this step, we have successfully created two EC2 instances in two different subnets. In further steps, we will see how to get connected to the Windows EC2 Instance.
Step 3: Connect to Windows EC2 Instance
In this section, we are going to connect with our Windows EC2 Instance.
1: Select the instance and click on Connect.

2: Click on the RDP client and then click on Get password.

3: Click on Upload Private Key File and select the key pair file that we downloaded at the time of launching the EC2 instance.
 Once you select the key pair file, click on Decrypt Password.
5: Here you shall see that your password is generated; copy the password and make it safe.
 6: Now search for the RDP on your system and open it.
7: From the EC2 Dashboard select your Instance (K21 EC2 Instance A) and copy the Public IPv4 address.

8: Now paste the pubic IPv4 address inside the RDP application and click on Connect.

9: Here you have to enter the credentials of your Instance.
Username:-> Administrator
Password –> Enter the password, which we have decrypted at step 5.
Then Click on Yes to proceed.

10: Here you shall see that you are successfully connected with your EC2 Instance.

Thus, we have successfully connected with our first EC2 instance. Similarly, you can connect with another EC2 instance by following the same steps as we did here.
Step 4: Configure IIS Server on Windows EC2 Instance
In this section, we are going to install the IIS server on our Windows EC2.
1: Once you connect with your Ec2 Instance, click on the Start button, and then click on Server Manager.

2: Click on Add roles and features.
 3: Click on Next.

4: Click on Role-based or feature-based installation, and then click on Next.
 5: Keep everything default and click on Next.

6: Scroll down a bit and click on Web Server (IIS).
 7: As you click on Web Server (IIS), a small dialogue box will open. Click on Add Features.

8: Now click on Next again.
 9: Now keep clicking on Next till you reach the Install dialogue box.
 10: The installation will start as shown below.
Note: The feature installation will take some time (approx. 5 minutes) to complete. Please be patient.
 11: The installation is complete now.
 Thus we have successfully installed IIS on our Windows Instance. similarly, you have to install the IIS server on our second EC2 instance as well.
Step 5: Create a Web Page on the IIS Server
In this section, we are going to create a webpage on the IIS server, which we are going to access in further steps.
1: Navigate to the local disk of your Windows Virtual machine. You will see a folder by the name of inetpub created on your local disk. Double-click to open it.
 2: Once you have opened it, double-click on the wwwroot folder to open it.
 3: You will find an HTML document inside by the name iisstart, This will be the home page of your web server.
 4: Right-click on this file and open Notepad. It contains HTML code as shown below.

5: Now to make our web page look a bit attractive. We will edit this HTML code by erasing everything in it by Pressing Ctrl+A and delete, write our own HTML code, and Save it.
For First Instance [K21 EC2 Instance A]:
<html>
<body bgcolor=green>
<h1>Welcome to K21 Academy </h1>
</body>
</html>
For Second Instance [K21 EC2 Instance B]:
<html>
<body bgcolor=yellow>
<h1>Welcome to K21 Academy </h1>
</body>
</html>

Thus, we have successfully created a Webpage on our first Instance. Similarly, you have to create a webpage on your second Instance, only you have to change the HTML code that we have given above for Instance 2.
Step 6: Create a AWS Load Balancer & Access The Webpage
In this section, we are going to create a load balancer, attach both the EC2 instances to our load balancer, and access the webpage through load balancer DNS.
1: Under the EC2 dashboard, scroll down from the left panel and click on Load Balancers. Now click on Create Load Balancer.

2: Here, select the Application Load Balancer.

3: Under Configure Load Balancer
- For Name, enter a name for your load balancer. For example, my-alb.
- For Scheme, click on internet-facing, as the internet-facing load balancer routes requests from clients over the internet to targets. An internal load balancer routes requests to targets using private IP addresses.
- For IP address type, choose IPv4 if your clients use IPv4 addresses to communicate with the load balancer, or choose dual-stack if your clients use both IPv4 and IPv6 addresses to communicate with the load balancer. If the load balancer is an internal load balancer, you must choose IPv4.

4: Under Availability Zone, select all the subnets in which our web servers have been launched and Scroll Down.

5: Here, under the security group, select the existing security group that we created at the time of launching the EC2 Instances.

6: Under Listeners and Routing, Click on Create Target Group
 7: Once you click, a new page will pop up. Just enter the Target Group name. Here we have given it as Windows-Instances and rest everything default and click on Next.

8: Under Register Target, select Instance A and Instance B, then click on Include as pending below, and then click on Create Target Group.

9: Now go back to the Load Balancer tab and select the Target Group that we have just created.

10: Rest everything will be the default. Scroll down and click on Create Load Balancer.

11: AWS is now creating your load balancer. It will take a couple of minutes to start up the load balancer, attach your web servers, and pass the health checks. Click on View Load Balancer.
 12: Select the load balancer you just created, click the Description tab, and copy the DNS name value to your clipboard. It will look like my-alb-725244349.us-east-1.elb.amazonaws.com. Do not copy the “(A Record)” text.
Note: Please wait for 5 minutes to get Provision.
 11: Paste the DNS in another tab of your browser and hit Enter.
 12: Here you shall be able to access a green webpage, Now try to continuously refresh your page.
13: Here you shall see that your webpage is switching between a yellow and a green webpage continuously.

Thus, we have successfully created a Load balancer attached to both of our EC2 Instances and accessed the Webpage through Load balancer DNS. Do not forget to delete the resources created.
Download the Sample Guide
Related Links/References
- AWS Free Tier Limits
- AWS Free Tier Account Details
- Overview of Amazon Web Services & Concepts
- How to create a free tier account in AWS
- Storage Options – Amazon Elastic Compute Cloud – AWS Documentation
- AWS EC2 Instance | Steps to Connect Windows EC2 Instance
- AWS Certified DevOps Engineer Professional DOP-C02
- AWS Certified Solutions Architect Associate SAA-C03
Next Task For You
Begin your journey towards an AWS Cloud by joining our FREE Informative Class on Amazon Cloud Free Class by clicking on the below image.

![Microsoft Agentic AI Business Solutions Architect [AB-100] | K21 Academy](https://test.k21academy.com/wp-content/uploads/2025/11/Microsoft-Agentic-AI-Business-Solutions-Architect-AB-100-Exam-Overview1.png)