


![]()
Pods are the smallest deployable unit of Kubernetes where we can run our applications. Scheduling in Kubernetes is a core component as it aims to schedule the pod to a correct and available node. If you want to understand why Pods are placed onto a particular Node, or if you’re planning to know types of scheduling then this blog is for you!
In this blog, I will be covering
- What is Scheduling in Kubernetes
- Kube scheduler
- Filters
- Prioritize
- Methods used for Scheduling pods
- Conclusion
What is Scheduling in Kubernetes
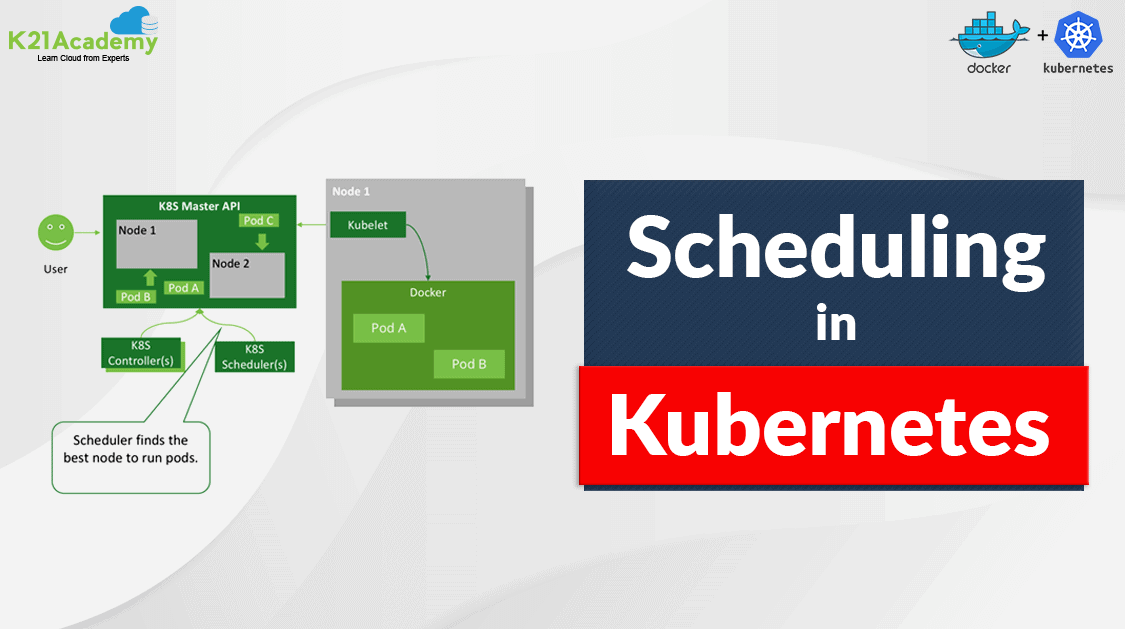
For every Pod that the scheduler discovers, it becomes responsible for finding the best Node for that Pod to run on. In Kubernetes, scheduling refers to making sure that Pods are matched to Nodes so that Kubelet can run them on the available nodes.
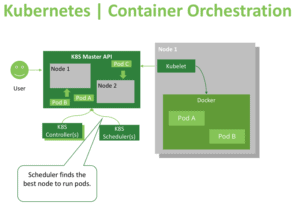
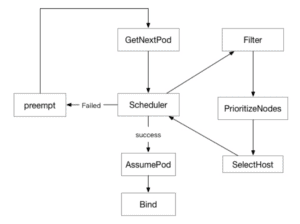
The Kubernetes scheduler’s task is to ensure that each pod is assigned to a node to run on. At a high-level K8s scheduler works in the following way:
- When new pods are created, they’re added to a queue.
- The scheduler continuously takes pods off that queue and schedules them on the nodes.
Also, read our blog post on Kubernetes Architecture
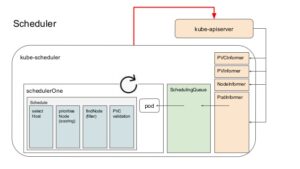
Kube scheduler
Kube scheduler is that the default scheduler for Kubernetes and runs as a part of the control plane. It is meant in order that, if you would like and wish you can write your own scheduling component and use that instead.
For every newly created pod or other unscheduled pods, Kube scheduler selects an optimal node for them to run on. However, every container in pods has different requirements for resources and each pod also has different requirements. Therefore, existing nodes got to be filtered consistently with particular scheduling requirements.
Also see: This blog covers the important part of Kubernetes which is Kubernetes Network Policy
Filters
By default, the scheduler registers a series of predicates. When we apply a filter to a pod, that pod will look for a node that meet the specified conditions. FeasibleNodes mechanism can be used to increase the performance for scheduling large-scale clusters.
For example, if the total number of nodes is 1,000 and the percentage is 30%, the scheduler only needs to find 300 matching nodes in the filtering process. When 300 matching nodes are found, the filtering process will stop. This makes it unnecessary to filter all the nodes and reduces the nodes to be prioritized. However, it comes with a flaw that pods may not be scheduled to the most appropriate node.
Also Read: Kubernetes Labels and Kubernetes Annotations are one of the main components which provide a way for adding additional metadata to our Kubernetes Objects.
Prioritize
Pod priority is a method that allows scoring nodes that meet the conditions and helps find the most appropriate node for a Pod. To provide the scoring for the pod Map and Reduce arguments are used in the PriorityConfig file.
- Map calculates the scores of individual nodes.
- Reduce processes scores of all nodes in the current PriorityConfig again.
Also Check: How to Install Kubernetes
Methods Used for Kubernetes Pod Scheduling
There are several ways available through which one can determine on what node, pods can be placed. Let’s take a look at some of them.
1. Node Selector
nodeSelector is that the simplest recommendation for scheduling a pod on a specific node. nodeSelector is a field of PodSpec. It specifies a map of key-value pairs. For the pod to be eligible to run on that specific node, the node should have each of the indicated key-value pairs labels as used for the pod. You can label the node with the following command:
kubectl label nodes <node-name> disktype=ssd
Note: Learn more about Kubernetes Pods
A Pod config file with a nodeSelector section:
apiVersion: v1
kind: Pod
metadata:
  name: nginx
  labels:
    env: test
spec:
  containers:
  - name: nginx
    image: nginx
    imagePullPolicy: IfNotPresent
  nodeSelector:
    disktype: ssd
2. Node Affinity/Anti-Affinity
Node Affinity/Anti-Affinity is a method to fix rules on which nodes are selected by the scheduler. This feature is a generalization of the nodeSelector. The rules are defined using the familiar concepts of custom labels on nodes and selectors laid out in pods, and that they are often either required or preferred, counting on how strictly you want the scheduler to enforce them.
Required rules must be met for a pod to schedule on a specific node. If no node matches the criteria, then the pod won’t be scheduled. Required rules are laid out in the required During Scheduling Ignored During Execution field of nodeAffinity.
Affinity rule is a part of PodSpec.
affinity:

  nodeAffinity:

    requiredDuringSchedulingIgnoredDuringExecution:

      nodeSelectorTerms:

        - matchExpressions:

          - key: "size"

            operator: In

            values: "large"
Ignored During Execution means that the pod continues to run the node even if the labels on the node changes or affinity rules are no longer met. required During Scheduling Required During Execution means pod will throw out from nodes as soon as they don’t satisfy the node affinity rule(s).
Read More: About the ingress controller, it is an intelligent Load Balancer and always implemented using a third-party proxy.
preferred During Scheduling Ignored During Execution means that if nodes match the rule, they will be given first priority, and if only no preferred nodes are available then non-preferred nodes will be chosen.
affinity:

  nodeAffinity:

    preferredDuringSchedulingIgnoredDuringExecution:

      nodeSelectorTerms:

        - matchExpressions:

          - key: "size"

            operator: In

            values: "large"
Node anti-affinity is the opposite of Node affinity. This feature is used when we want certain pods not to be placed on particular nodes. It can be achieved by using the NotIn operator.
affinity:

  nodeAffinity:

    requiredDuringSchedulingIgnoredDuringExecution:

      nodeSelectorTerms:

        - matchExpressions:

          - key: "size"

            operator: NotIn

            values: "large"
Check Out: Our Kubernetes training & Clear Kubernetes basics in an easy way.
3. Taints and Tolerations
A related feature is “taints and tolerations,” which allows you to mark (“taint”) a node in order that no pods can schedule onto it unless a pod explicitly “tolerates” the taint. Marking nodes rather than pods (as in node affinity/anti-affinity) is especially useful for situations where most pods within the cluster should avoid scheduling onto the node. For example, you would possibly want to mark your master node as schedulable only by Kubernetes system components.
The kubectl command allows you to set taints on nodes, for example:
kubectl taint nodes <node-name> key=value:NoSchedule
It creates a taint that marks the node as unschedulable by any pods that don’t have toleration for taint with key, value, and effect NoSchedule. (The other taint effects are Prefer No Schedule, which is the preferred version of NoSchedule, and No Execute, which suggests any pods that are running on the node when the taint is applied will be evicted unless they tolerate the taint.) The toleration you would add to a PodSpec to have the corresponding pod tolerate this taint would look like this
tolerations:

- key: "key"

  operator: "Equal"

  value: "value"

  effect: "NoSchedule"
Also Check: Kubernetes Configmap Example. Click here
4. Taints/Toleration and Node Affinity
When working in an Organization where K8s cluster is being shared among different teams. It gives rise to a condition where one team wants that their pods should be placed on particular nodes and no other pods to be placed on their nodes neither their pods to be placed on other nodes.
Since Taints and Tolerations do not guarantee that the pods will only prefer the tainted nodes, so pods can very well be placed on other nodes. Similarly, Node Affinity is used to tie up the pods on particular nodes however that does not guarantee that other pods are not placed on these nodes.
To solve this issue combination of taints/toleration and node affinity rules can be used together to completely dedicate nodes for specific pods.
Check out: Kubernetes Security For Beginner – CKS
Conclusion
Kubernetes scheduling is crucial for the performance and reliability of containerized applications. By understanding how scheduling works and using its advanced features, you can optimize your workloads for better efficiency. Whether you’re running a small cluster or a large-scale environment, mastering Kubernetes scheduling is essential for smooth operations and achieving the best results with your applications.
Read this blog about Kubernetes RBAC. It’s the way to outline which users can do what within a Kubernetes cluster.
Frequently Asked Questions
What is Kubernetes scheduling?
Kubernetes scheduling is the process of assigning pods to nodes in a cluster based on resource availability, constraints, and policies.
How does the Kubernetes scheduler work?
The scheduler evaluates newly created pods and assesses available nodes based on factors like resource requests, labels, taints, and affinity rules to make placement decisions.
What are taints and tolerations?
Taints are applied to nodes to prevent pods from being scheduled on them unless the pods have matching tolerations, allowing for more controlled scheduling.
What is affinity and anti-affinity?
Affinity rules allow you to specify which pods should be co-located on the same node, while anti-affinity rules prevent specific pods from being scheduled together, improving fault tolerance and resource allocation.
How can I monitor scheduling efficiency?
You can use tools like Prometheus and Grafana to monitor resource usage, scheduling decisions, and overall cluster health to optimize performance.
What is the role of priority and preemption in scheduling?
Priority determines the importance of a pod when scheduling, while preemption allows higher-priority pods to evict lower-priority ones if resources are scarce.
Related/References
- Visit our YouTube channel on “Docker & Kubernetes”
- Kubernetes Architecture & Components Overview For Beginner
- Network Policies In Kubernetes
- Kubernetes Networking
- Certified Kubernetes Administrator (CKA) Certification Exam
- Labels And Annotations In Kubernetes
- Create AKS Cluster: A Complete Step-by-Step Guide
- Install Docker on Windows, Ubuntu, and Mac: A Complete Step-by-Step Guide
- Docker Container Lifecycle Management: Create, Run, Pause, Stop And Delete
- Docker Compose Overview & Steps to Install Docker Compose
- CKA Certification Exam (Certified Kubernetes Administrator)
- Kubernetes Ingress Controller Examples with Best Option
Join FREE Masterclass of Kubernetes
Discover the Power of Kubernetes, Docker & DevOps – Join Our Free Masterclass. Unlock the secrets of Kubernetes, Docker, and DevOps in our exclusive, no-cost masterclass. Take the first step towards building highly sought-after skills and securing lucrative job opportunities. Click on the below image to Register Our FREE Masterclass Now!

![Microsoft Agentic AI Business Solutions Architect [AB-100] | K21 Academy](https://test.k21academy.com/wp-content/uploads/2025/11/Microsoft-Agentic-AI-Business-Solutions-Architect-AB-100-Exam-Overview1.png)