

![]()
Kubernetes has revolutionized container orchestration and provides a scalable and efficient platform for managing containerized applications. At the heart of the Kubernetes architecture lies the concept of Pods.
In this blog post, we’ll dive into the basics of Pods, what they mean, and how they work as the building blocks of Kubernetes.
- What are Pods in Kubernetes?
- Key Characteristics of Pods:
- The role of pods in the Kubernetes architecture:
- How To Create Kubernetes Pod ?
- How to Kill or Delete a Pod?
- Different Models of a Pod
- Difference between Pods and Nodes
- Difference between Pods and Containers
- Pod Best Practice
- Pod Networking
- Health Checks
- Conclusion
What are Pods in Kubernetes?
Pods are the smallest deployable units in Kubernetes. A Pod represents a single instance of a running process or a group of tightly coupled processes running together on a single node. While containers are commonly used within Pods, Pods can also include multiple containers that share resources and network connectivity.
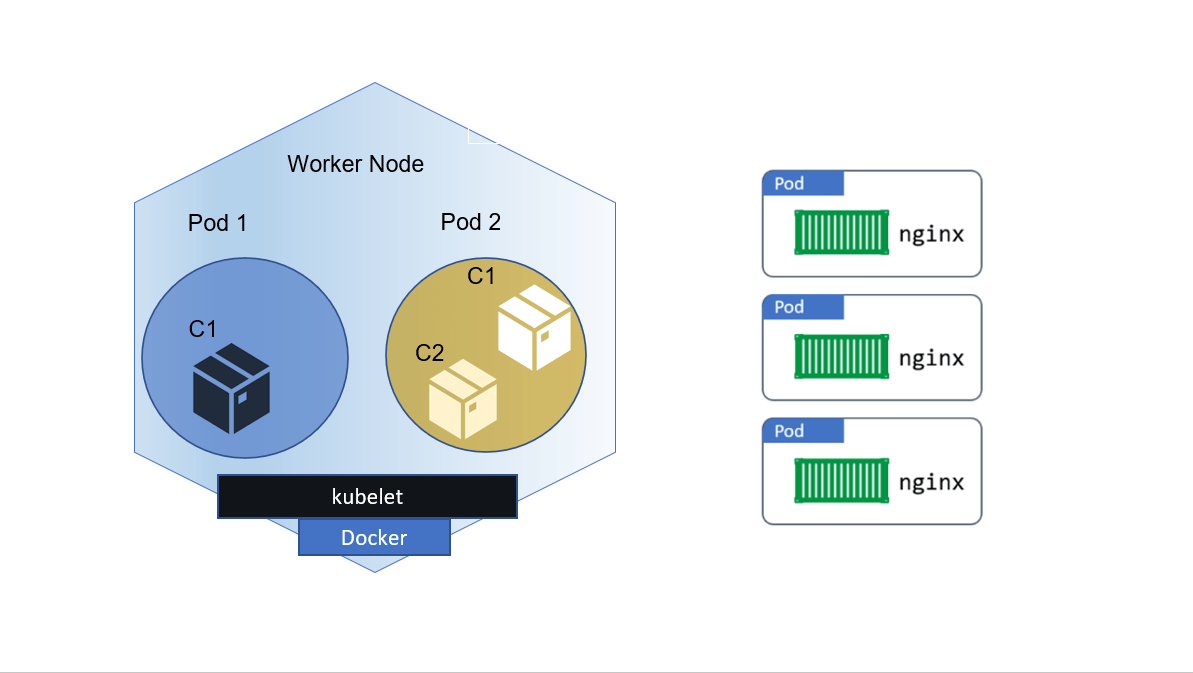
The purpose of a Pod is to provide a cohesive and isolated environment for containers to run and share resources, including storage, network, and inter-process communication. Containers within a Pod can communicate with each other via localhost, as they share the same network namespace.
Key Characteristics of Pods:
- Single or multiple containers within a Pod: Pods can contain one or more containers that are scheduled and deployed together on the same node.
- Shared network namespace: Containers in a Pod share the same network namespace, allowing them to communicate using localhost.
- Shared storage and volumes: Pods can share storage volumes, allowing data sharing and persistence between containers within the same Pod.
The role of pods in the Kubernetes architecture:
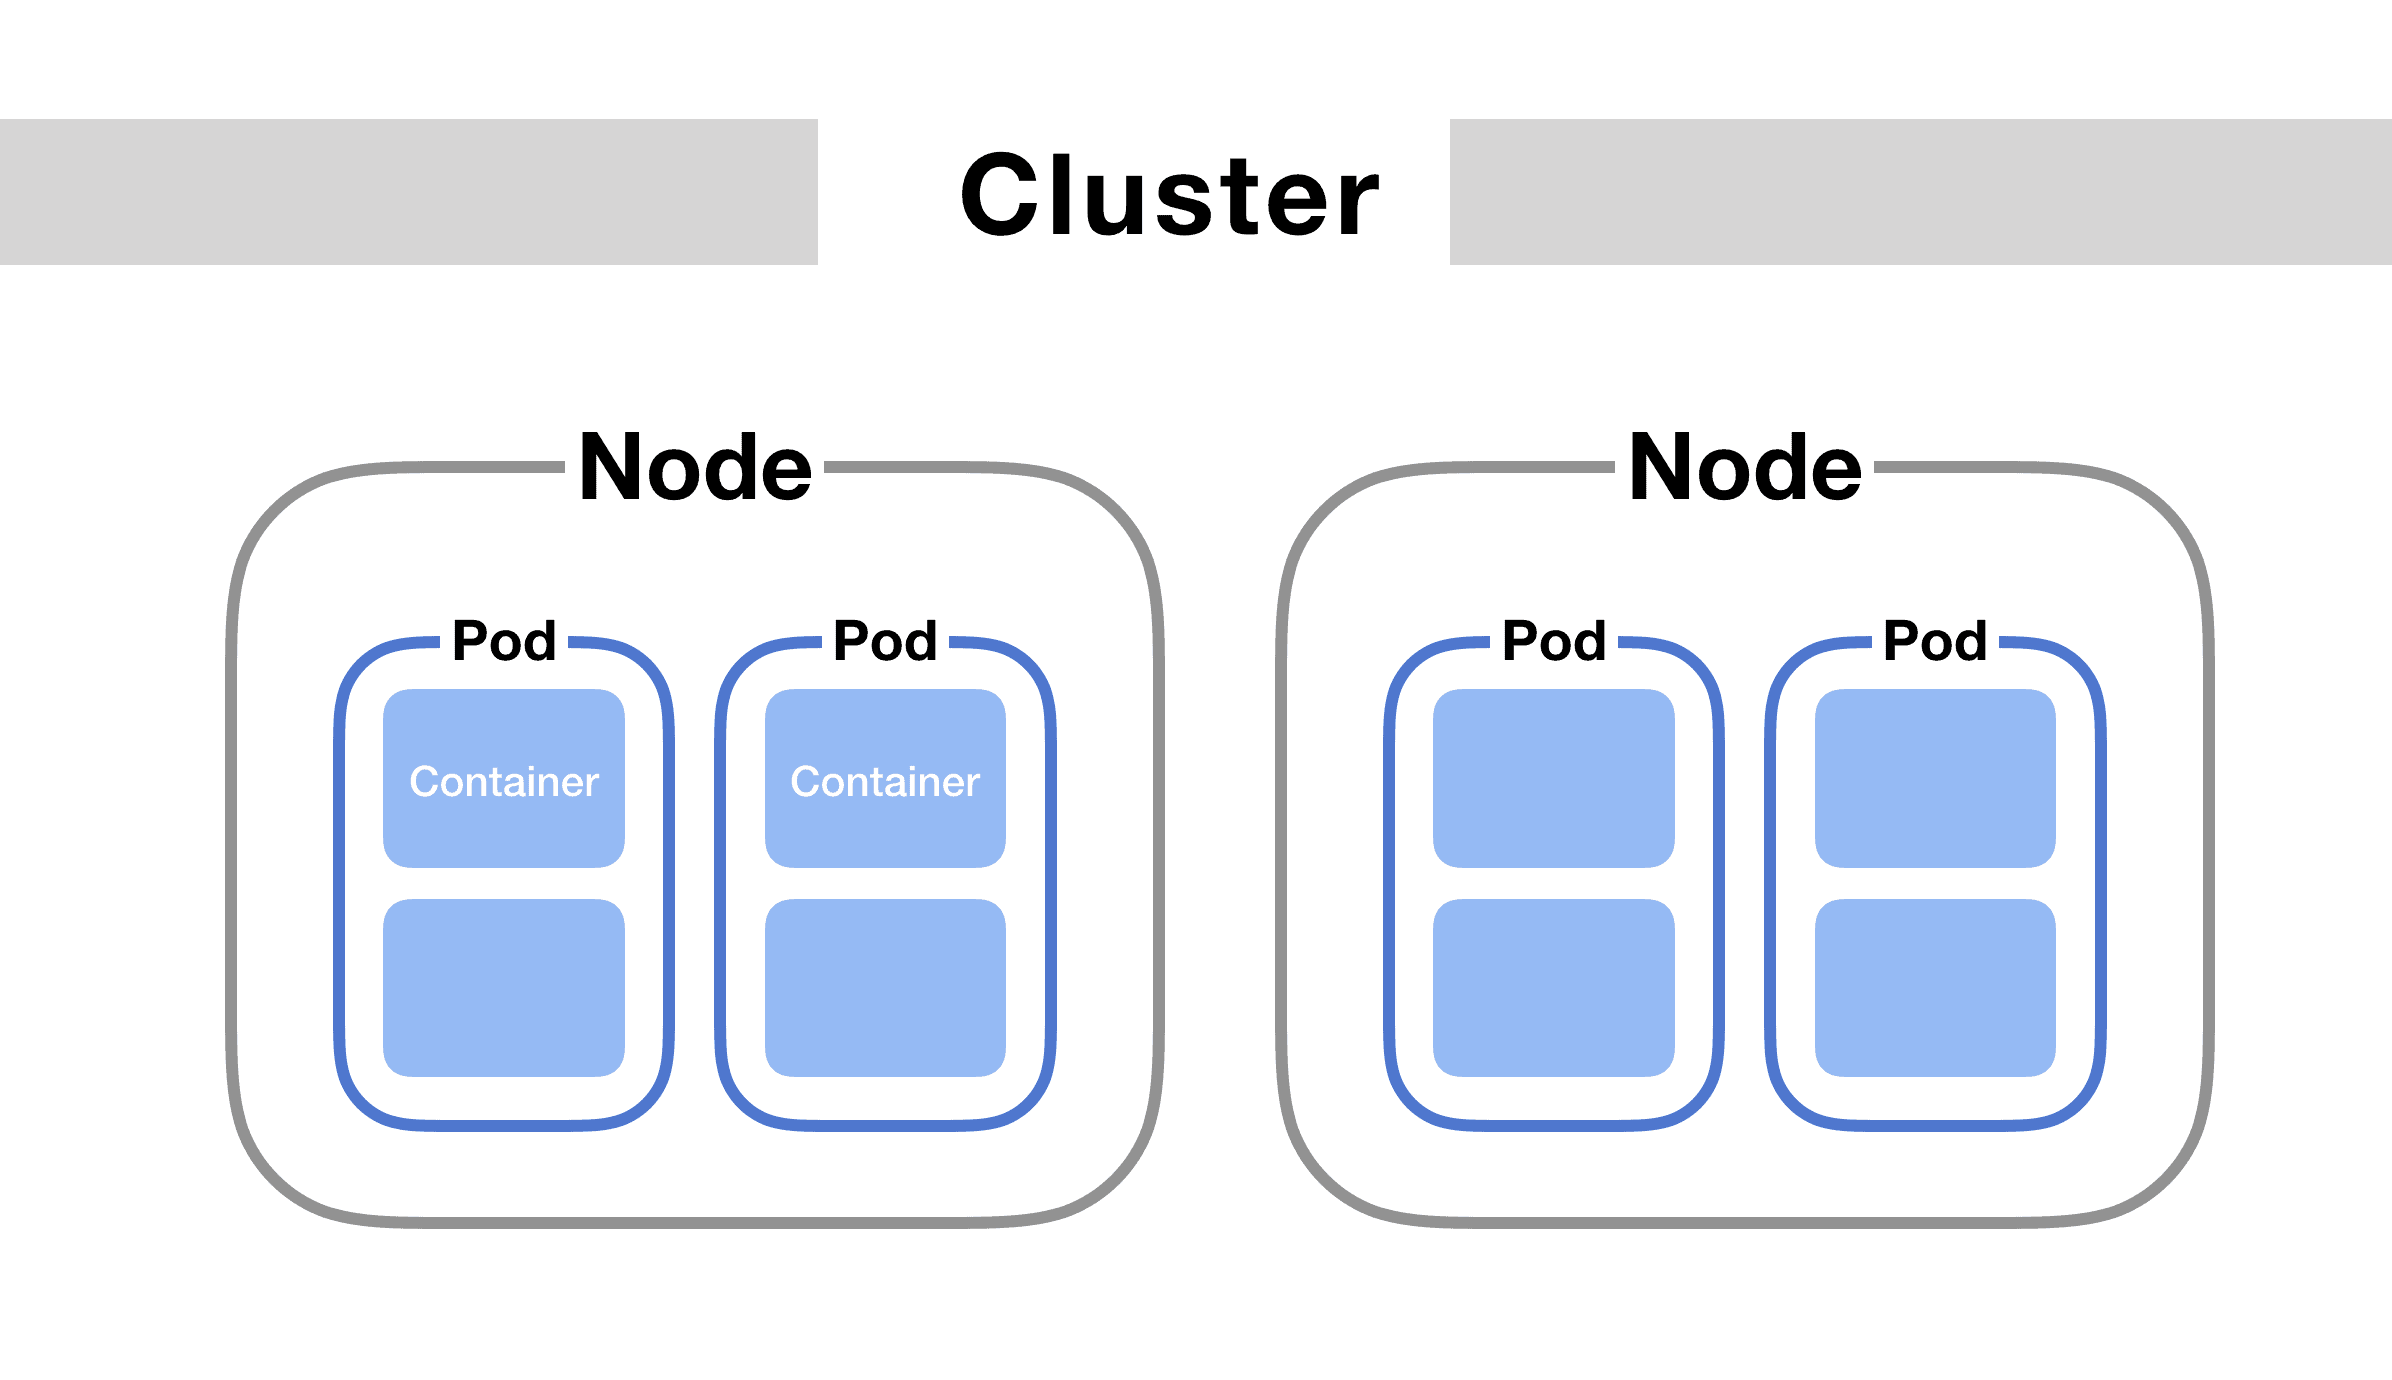
Pods act as the basic building blocks of Kubernetes. They encapsulate containers and provide a higher level of abstraction for managing and scaling applications. Pods are scheduled to individual nodes using the Kubernetes scheduler and can be distributed across multiple nodes in a cluster.
Pods serve as the unit of scaling, replication and resource allocation in Kubernetes. They enable horizontal scaling by creating multiple pod replicas to handle increased workloads.
How To Create Kubernetes Pod ?
Before you create a pod, you must have set up a 3 node Kubernetes Cluster which will be the first step of creating a basic deployable unit. Setting up a 3 node Kubernetes Cluster is nothing but Installing Kubernetes. Check out the Kubernetes Cluster setup blog which also has a step-by-step activity guide and also a video in it.
Creating Single Container Pod:
We have two ways:
1. Imperative way –
$ kubectl run <name of pod> -- image=<name of the image from registry>
2. Declarative way –
 apiVersion: v1
 kind: Pod
 metadata:
   name: <name of pod>
 spec:
   containers:
     - name: <name of the container>
       image: <name of the image from registry>
       ports:
        - containerPort: 7500
       imagePullPolicy: Always
Save this file with the name pod.yaml and run the following command to create it –
$ kubectl create –f pod.yaml
Creating Multiple containers Pod:
Using YAML file-
 apiVersion: v1
 kind: Pod
 metadata:
   name: <name of pod>
 spec:
   containers:
     - name: <name of container 1>
       image: <name of the image>
       ports:
        - containerPort: 7500
       imagePullPolicy: Always
     -name: <name of container 2>
      image: <name of the image>
      Ports:
       - containerPort: 7501
      imagePullPolicy: Always
Save this file with the name multicontainer.yaml and run the following command to create it –
$ kubectl create –f multicontainer.yaml
Know more: about Container Orchestration and Management Options
How To Kill Or Delete A Pod?
1. Using kubectl command:
$ kubectl delete pods <pod-name>
2. If pod is started via some replicaSet or deployment or anything that is creating replicas then delete that first.
Also read: Kubernetes service by Amazon EKS
Different Models Of Pod in Kubernetes
1. Single-container Pod: The “one-container-per-Pod” model is the most commonly used model in Kubernetes. In this, Pod wraps around a single container. If we want to scale our application horizontally (to provide more overall resources by running more instances), we should use single-container Pods.
2. Multi-container Pod: In this model, Pod encapsulates multiple containers and these containers share all the resources. These containers form a single cohesive unit of service.
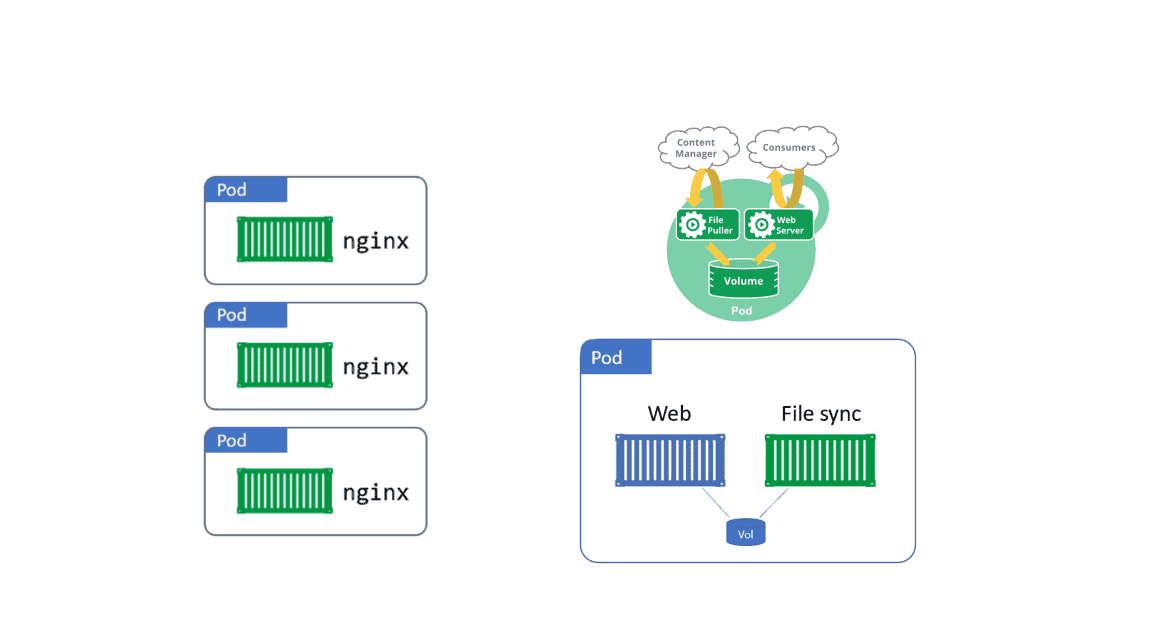 There are three types of Multi Container patterns:-
1. Sidecar Pattern
2. Ambassador Pattern
3. Shared IPC
Also check: Everything you need to know about CKA Certification
Difference Between Pods And Nodes
A node is a worker machine in Kubernetes, previously known as a minion. A node may be a VM or physical machine, depending on the cluster. A Pod always run on Node and Node can have multiple pods. Each Node is managed by the Master and the Kubernetes master automatically handles scheduling the pods across the Nodes in the cluster.
Also check: Difference between Kubernetes vs docker.
Difference Between Pods And Containers
Containers always run on Pods. Pods can contain one or more than one Container. If all containers run within a single pod then they will share the same networking interface, IP address, disk, etc. All containers within the same pod instance will live and die together.
Also Check: how Kubernetes networking policy work? Click here
Pod Best Practice
It is preferred to use “one container per pod” since running many containers as a part of a single Pod can negatively impact the performance of your Kubernetes workers.
If we are using multi-container pods then we’re likely to violate the “one process per container” principle. This is important because with multiple processes in the same container, it is harder to troubleshoot the container as logs from different processes will be mixed together, and becomes harder to manage the processes lifecycle.
For example, running both the front-end server and the backend server for your service in a single Pod with two containers would not be recommended, and instead should be run as separate Pods.

Check Out: Our blog post on Kubernetes role-based access control. Click here
Pod Networking
Each Pod creates its own network namespace. This includes; a single IP address, a single range of TCP and UDP ports, and a single routing table. If a Pod has a single container, that container has full access to the network namespace of the pod. But if it’s a multi-container pod, then all containers will share the network namespace.
Container-to-Container communication works via the Pod’s localhost adapter and port number.
For inter-pod communication, every Pod gets its own cluster IP address, so every Pod can communicate with every other Pod within the same host using CNI (Container Network Interface).
To make our Containers available to the outside world, we can expose them. If we have multiple containers in the same pod, then we can expose multiple containers on individual ports.
Also read – AKS Cluster, it is a Kubernetes cluster, which is created on the Azure Kubernetes Service (AKS) by Microsoft is one of the leading managed K8s services.
Health Checks
Any application running as a container in Kubernetes, automatically keep alive for using a process health check. The Health check ensures that our application is always running. If it isn’t, Kubernetes restarts it.
Liveness Probe – Liveness probes are defined per container which means each container inside a pod is health-checked separately.
Also Check: Our previous blog post on Kubernetes networking
Readiness Probe – Readiness probe describes whether a container is ready to serve the user request or not. Containers that fail are removed from service Load Balancers.
Conclusion
Frequently Asked Questions
What is a Pod in Kubernetes?
A Pod is the smallest and simplest unit in the Kubernetes object model. It represents a single instance of a running process in a cluster. A Pod can contain one or more containers, tightly coupled and co-located, that share resources and network namespaces.
Can a Pod have multiple containers?
Yes, a Pod can have multiple containers. All containers within a Pod share the same network namespace, which means they can communicate with each other over localhost. They also share the same storage volumes, making it easy to share files between containers within the same Pod.
Can I run multiple copies of the same Pod in a cluster?
You can scale the number of Pods by adjusting the replica count in a Deployment, ReplicaSet, or other controller. Kubernetes will automatically create or terminate Pods to match the desired replica count. Scaling can be done manually or automatically based on predefined rules or metrics.
How are Pods scheduled onto nodes?
Kubernetes uses a scheduling algorithm to assign Pods to available nodes based on various factors such as resource requirements, node affinity, and anti-affinity rules. The scheduler determines the optimal node for each Pod based on these considerations.
What happens if a Pod fails or gets terminated?
If a Pod fails or gets terminated, Kubernetes automatically creates a new Pod to maintain the desired state. This is achieved through the use of ReplicaSets, Deployments, or other controllers that manage the lifecycle of Pods. Kubernetes ensures that the desired number of replicas is always running.
Can I specify resource limits and requests for Pods?
Yes, you can specify resource limits and requests for Pods. Resource limits define the maximum amount of CPU and memory a container can use, while resource requests specify the minimum amount of CPU and memory required. These settings help Kubernetes allocate resources efficiently and manage workload performance.
Related Post
- Kubernetes Architecture | An Introduction to Kubernetes Components
- Kubernetes for Beginners
- Visit our YouTube channel on “Docker & Kubernetes”
- Certified Kubernetes Administrator (CKA) Certification Exam: Everything You Must Know
- Certified Kubernetes Administrator (CKA) Certification: Step By Step Activity Guides/Hands-On Lab Exercise
Join FREE Masterclass of Kubernetes
Discover the Power of Kubernetes, Docker & DevOps – Join Our Free Masterclass. Unlock the secrets of Kubernetes, Docker, and DevOps in our exclusive, no-cost masterclass. Take the first step towards building highly sought-after skills and securing lucrative job opportunities. Click on the below image to Register Our FREE Masterclass Now!

![Microsoft Agentic AI Business Solutions Architect [AB-100] | K21 Academy](https://test.k21academy.com/wp-content/uploads/2025/11/Microsoft-Agentic-AI-Business-Solutions-Architect-AB-100-Exam-Overview1.png)