

![]()
In this blog, we’ll walk you through the process of creating and connecting to an Ubuntu Virtual Machine (VM) in Microsoft Azure. Whether you’re a developer, system administrator, or cloud enthusiast, this guide provides clear, step-by-step instructions to get your Ubuntu VM up and running in the Azure cloud.
The following sections have been covered in this blog:
- What is Azure Virtual Machine?
- Prerequisites
- Creating An Ubuntu Virtual Machine
- Connecting To Ubuntu Virtual Machine
This blog talks about technologies that are part of the Azure Cloud Administration. If it’s something in which you have an interest or you want to learn it then you can visit our previous blog to know more about the [AZ-104] Microsoft Azure Administrator certification.
What is Azure Virtual Machine?
Azure Virtual Machines (VM) is one of several types of on-demand, scalable computing resources that Azure offers. Typically, you choose a VM when you need more control over the computing environment than the other choices offer. This article gives you information about what you should consider before you create a VM, how you create it, and how to connect to it.
An Azure VM gives you the flexibility of virtualization without having to buy and maintain the physical hardware that runs it. However, you still need to maintain the VM by performing tasks, such as configuring, scale-up/down the machine, and installing the software that runs on it.
Azure virtual machines can be used in various ways. Some examples are:
- Development and test – Azure VMs offer a quick and easy way to create a computer with specific configurations required to code and test an application.
- Applications in the cloud – Because demand for your application can fluctuate, it might make economic sense to run it on a VM in Azure. You pay for extra VMs when you need them and shut them down when you don’t.
- Extended datacentre – Virtual machines in an Azure virtual network can easily be connected to your organization’s network.
The number of VMs that your application uses can scale up and out to whatever is required to meet your needs.
To download the complete AZ-104 Azure Admin Sample Questions guide click here.
Prerequisites
- An Azure Cloud Account ( you can learn how to create one from our previous blog here.)
- Access to an SSH client: for this tutorial, we will be using Putty and Putty Key Generator installed on our Windows computer for accessing our Ubuntu Virtual Machine.
How to Create an Ubuntu Virtual Machine in Microsoft Azure
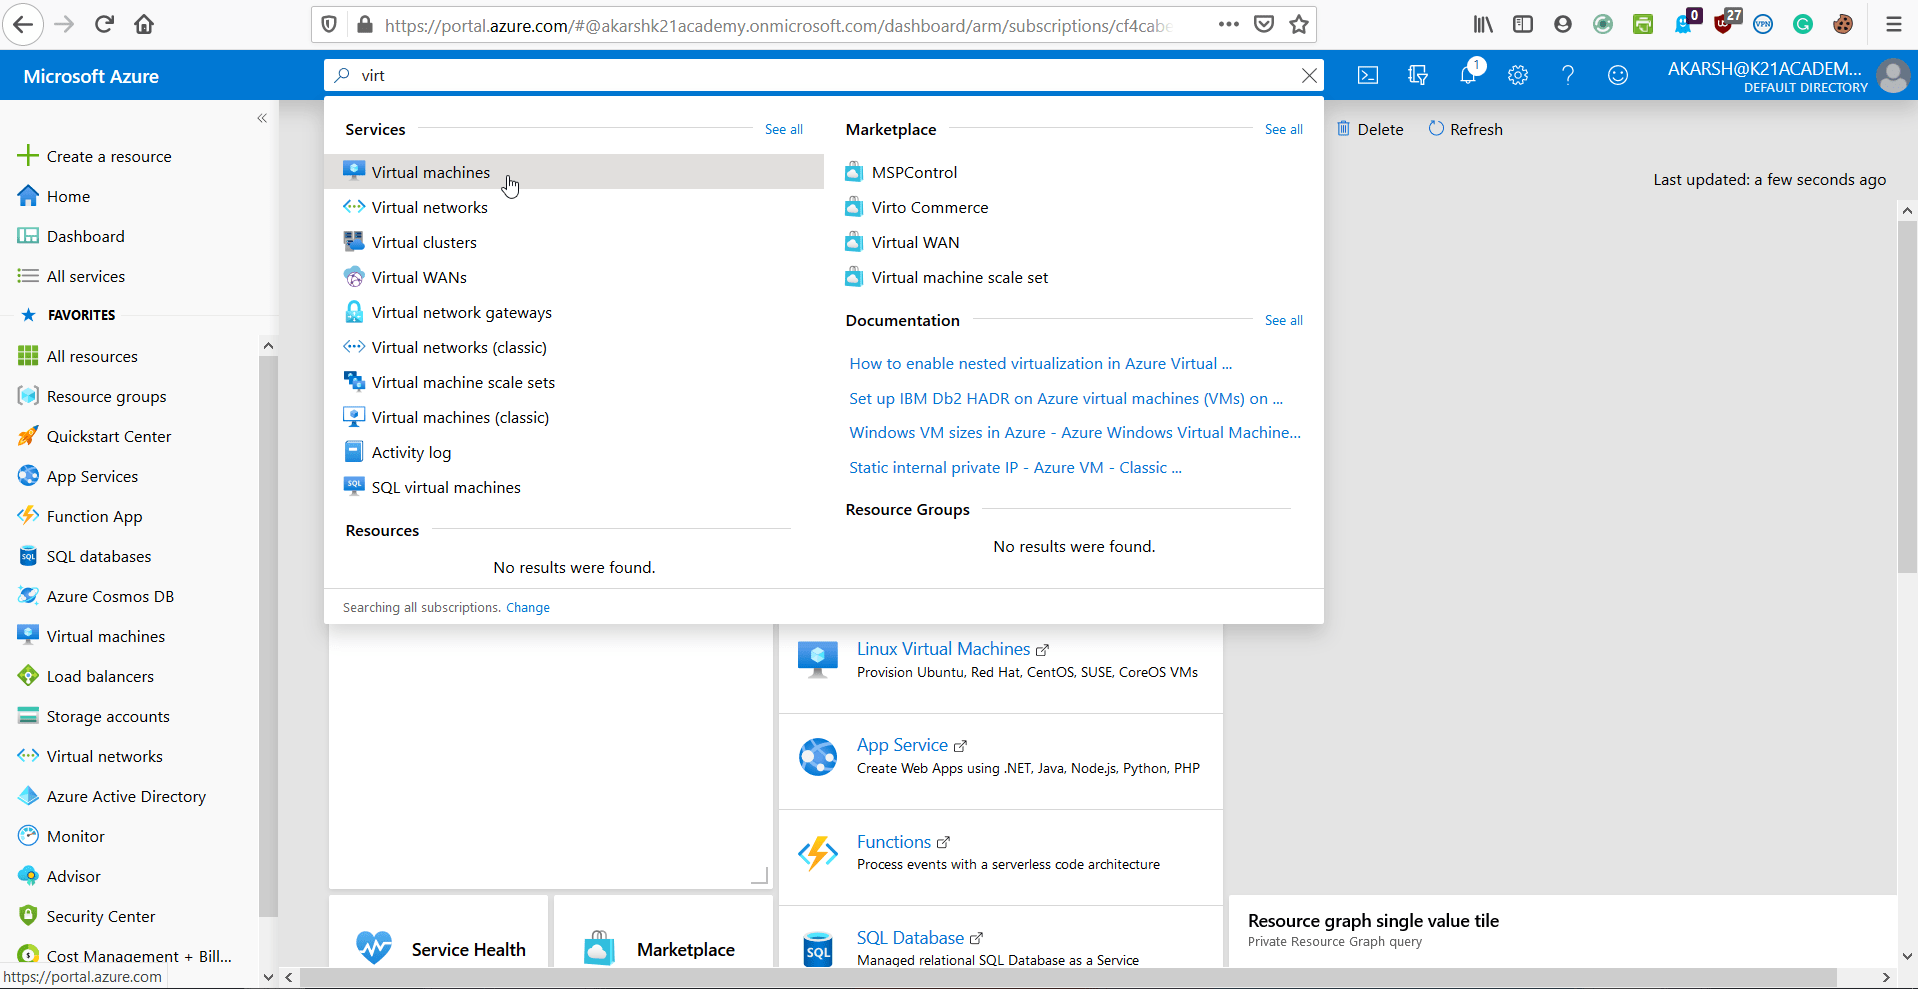
Step 1: In the Azure portal, search for Virtual Machine and select Virtual Machine.
Note: Please make sure you have a subscription before doing all this. If you created a free account for the first time, you’ll already have a FREE TRIAL subscription for 1 month.
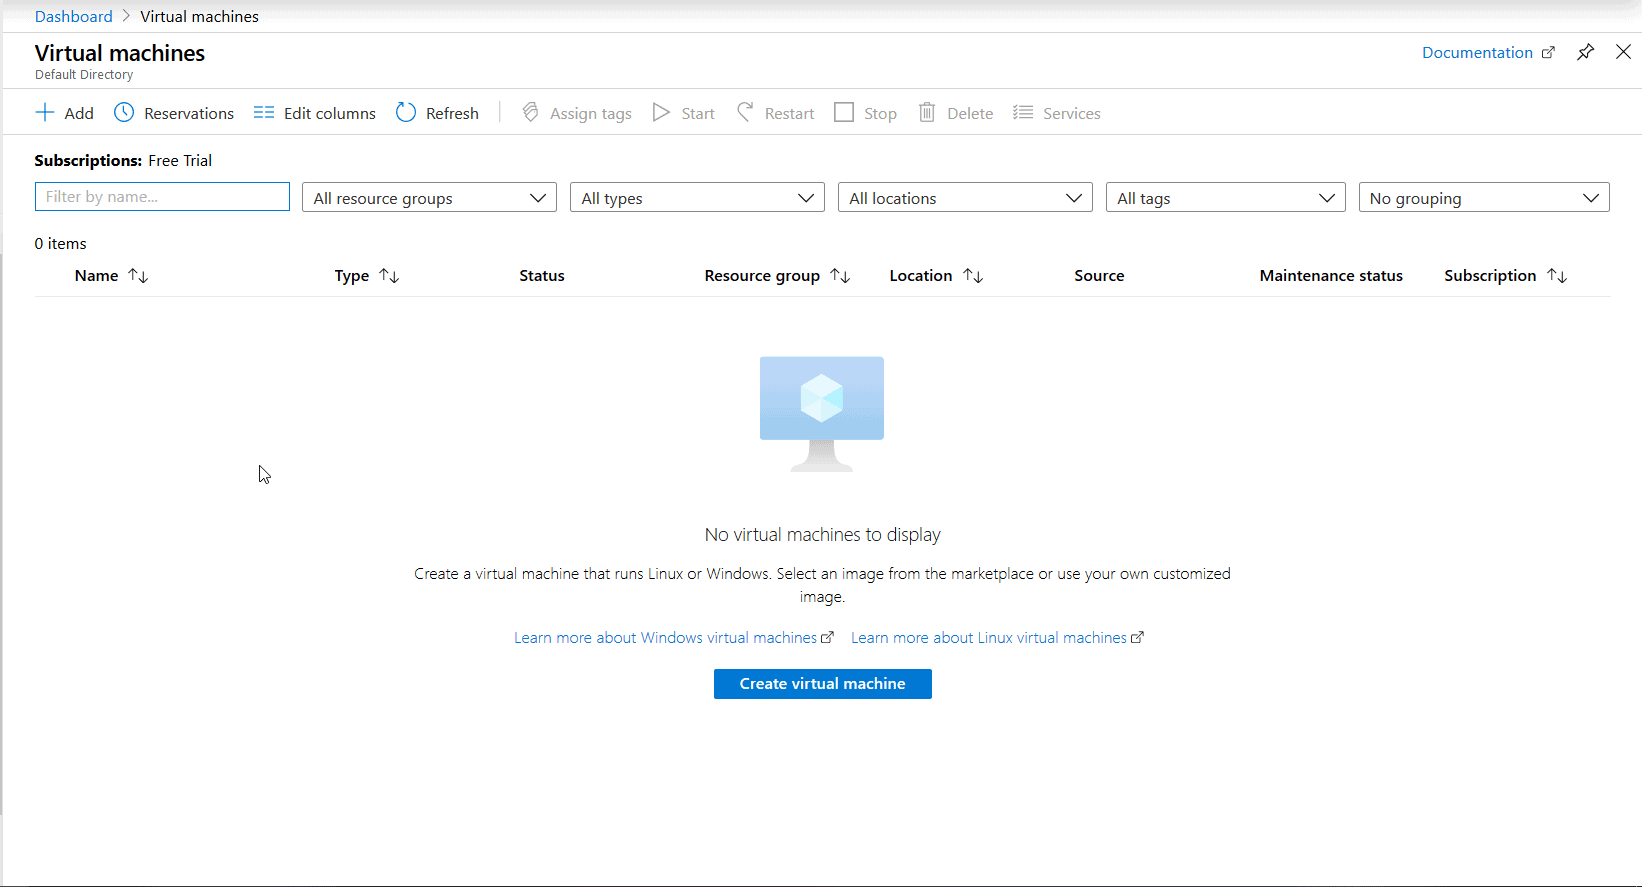
Step 2: Select Add.
Also Check: Our blog post on Azure Blob Storage. Click here
Step 3: Enter the following values:
- Subscription: Select your Azure subscription.
- Resource group: Enter a new resource group name.
- Virtual Machine name: It should be a unique name throughout the Azure network.
- Region: Select an Azure location, such as Western India, Central US, etc.
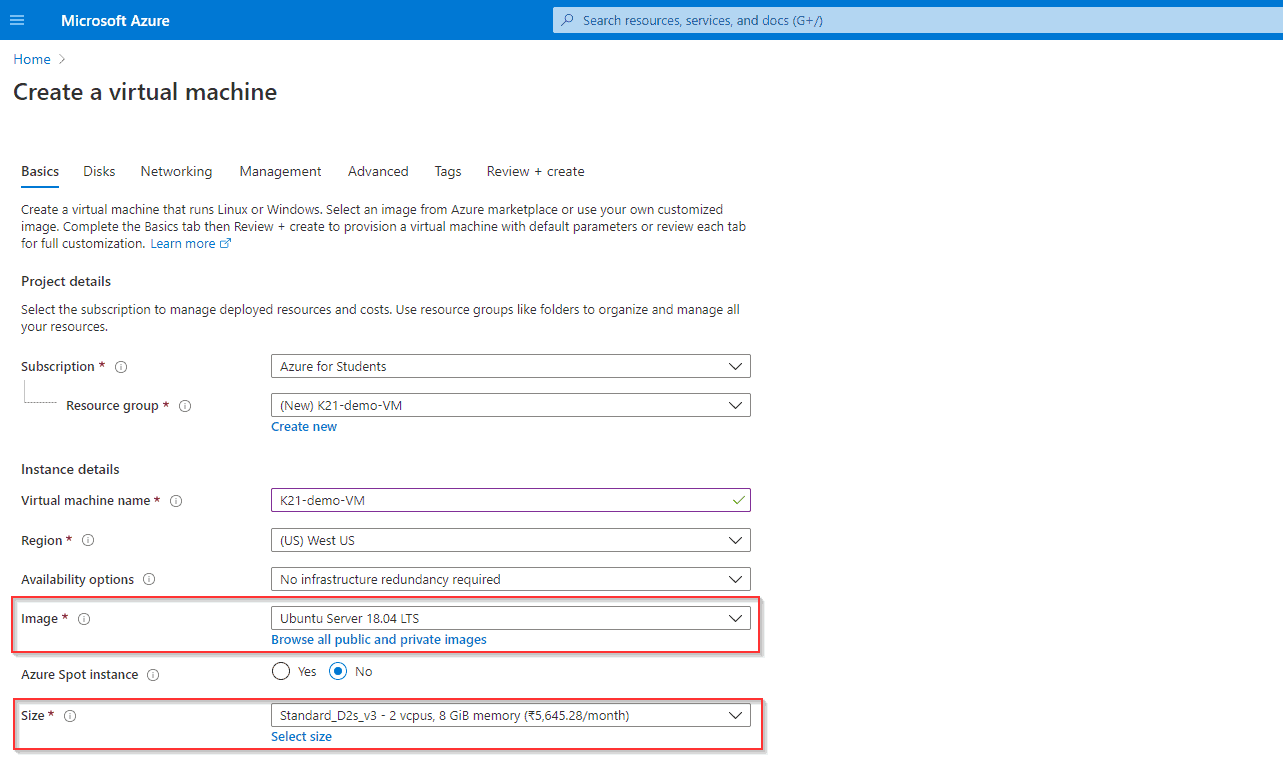
- Authentication Type: SSH Public Key
- SSH Public Key Source: Generate new key pair
- Select Inbound Ports: SSH (22), this is the port that we will be using to connect to our Virtual Ubuntu Machine.
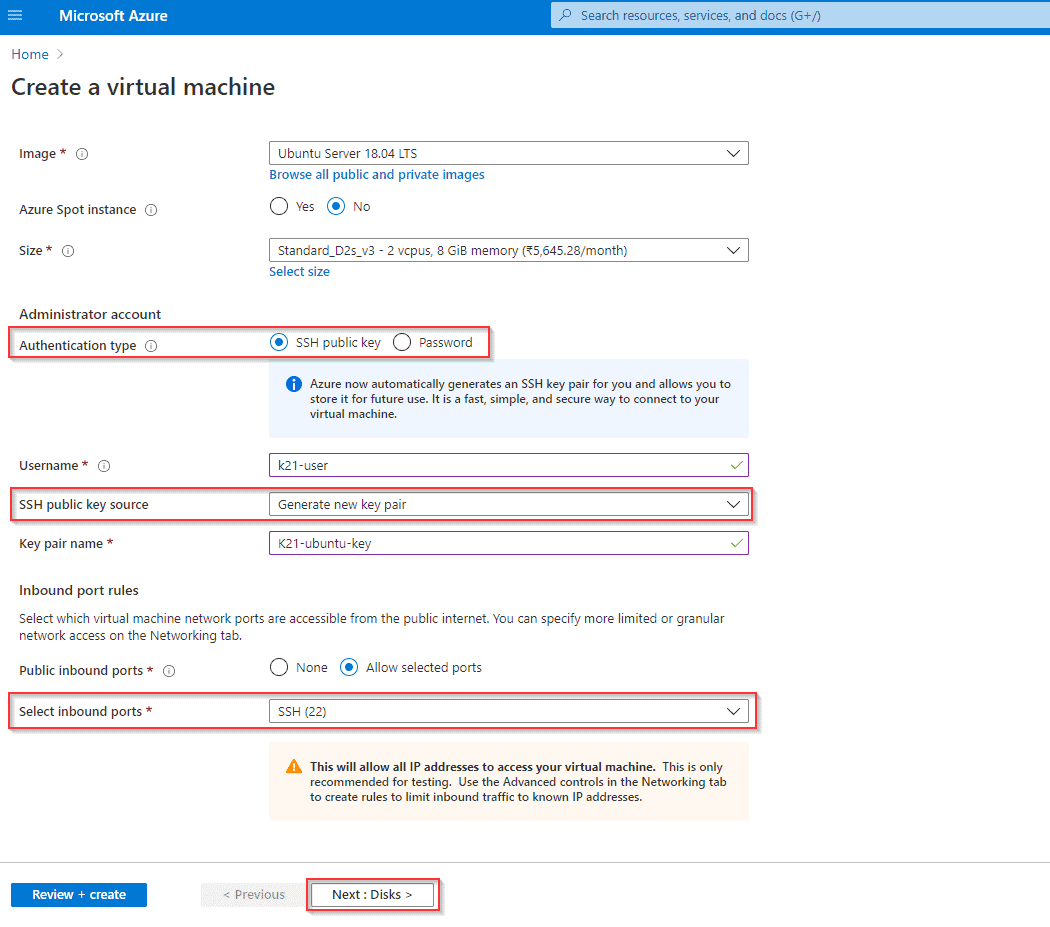
- Select the Username and Key name as required and note them down as we will need them later.
- Once done, click on Next: Disks >
Also Check: Step by Step Instructions to install Azure Powershell Module. Click here
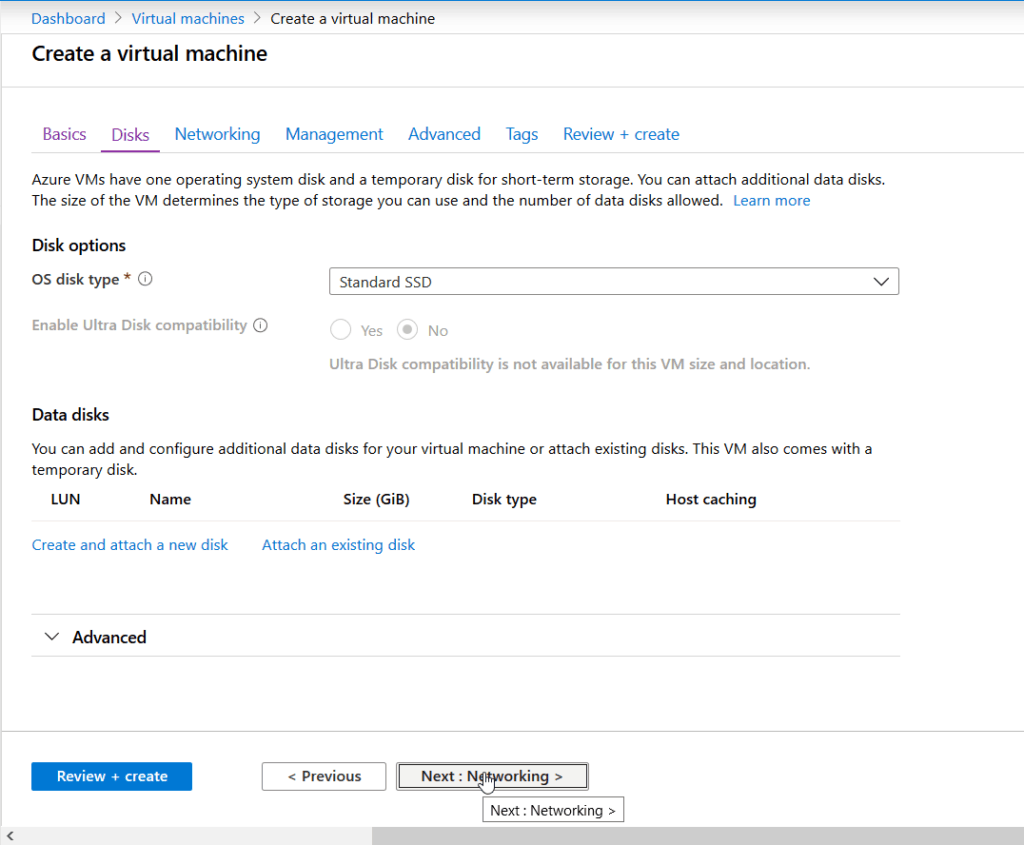
Step 4: Select the type of disk you want to use. Click Next.
Check Out: What is Azure Availability Zone? Click here
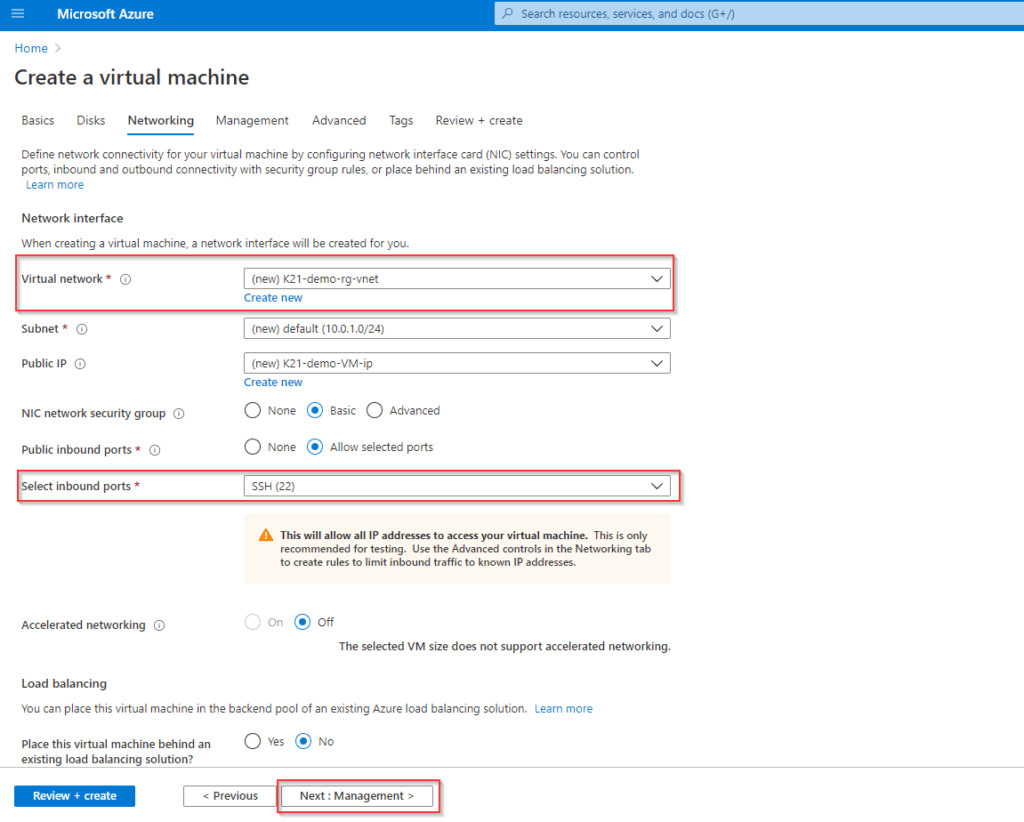
Step 5: Configure Networking
- Virtual Network: Create a new one or use your existing Network.
- Select Inbound Ports: SSH(22), This allows Port 22 to be opened in your Virtual Network for incoming traffic and will enable us to connect to our Virtual Machine inside our Virtual Network.
- Leave everything else as default and click next to go to the Management Section.
Also Read: Our previous blog post on Azure Kubernetes Service. Click here
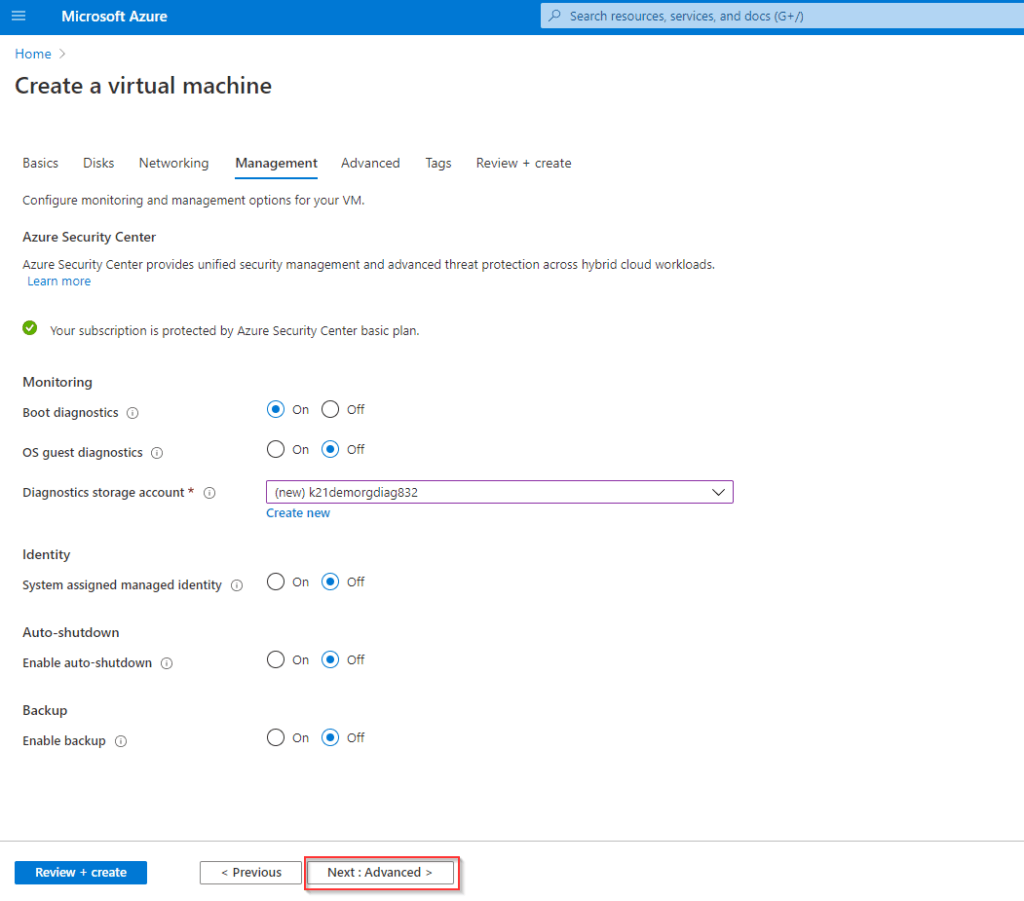
Step 6: Management
Leave all options as default and click on next to go to the Advanced Section.
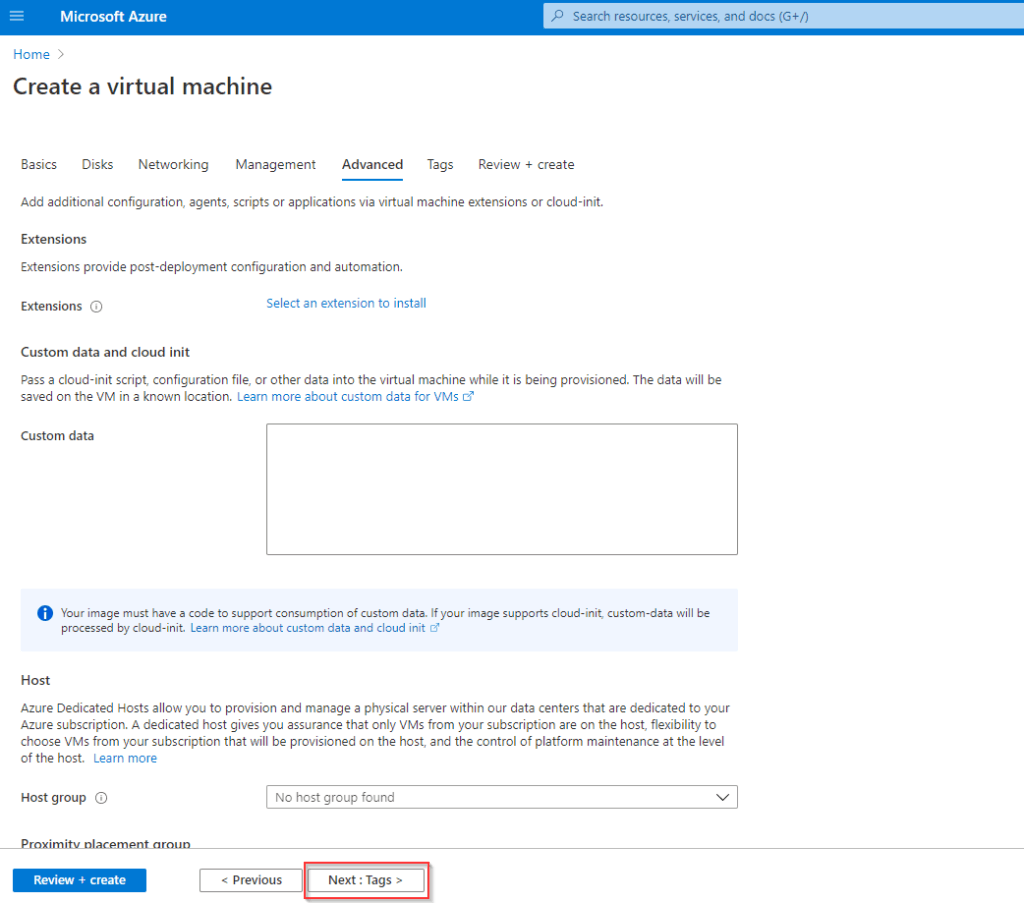
Step 7: Advanced Configuration
Add any custom data you want to run when the VM is being created or leave all options as default and click on next to go to the Tags Section.
Also Read: Our previous blog post on VM Scale Set Azure. Click here
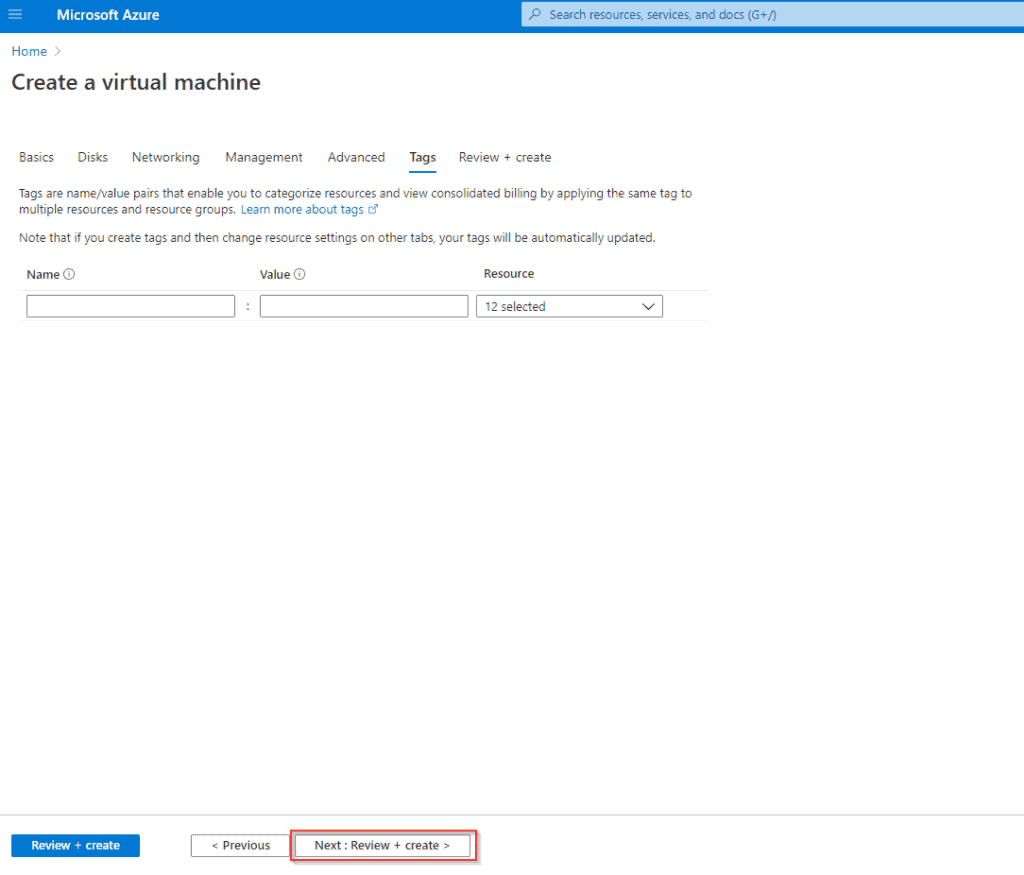
Step 8: Tags Configuration
Add any descriptive tags you would like to put to identify your VM at a later stage or leave Options at default and click on next to review and create your Virtual Machine.
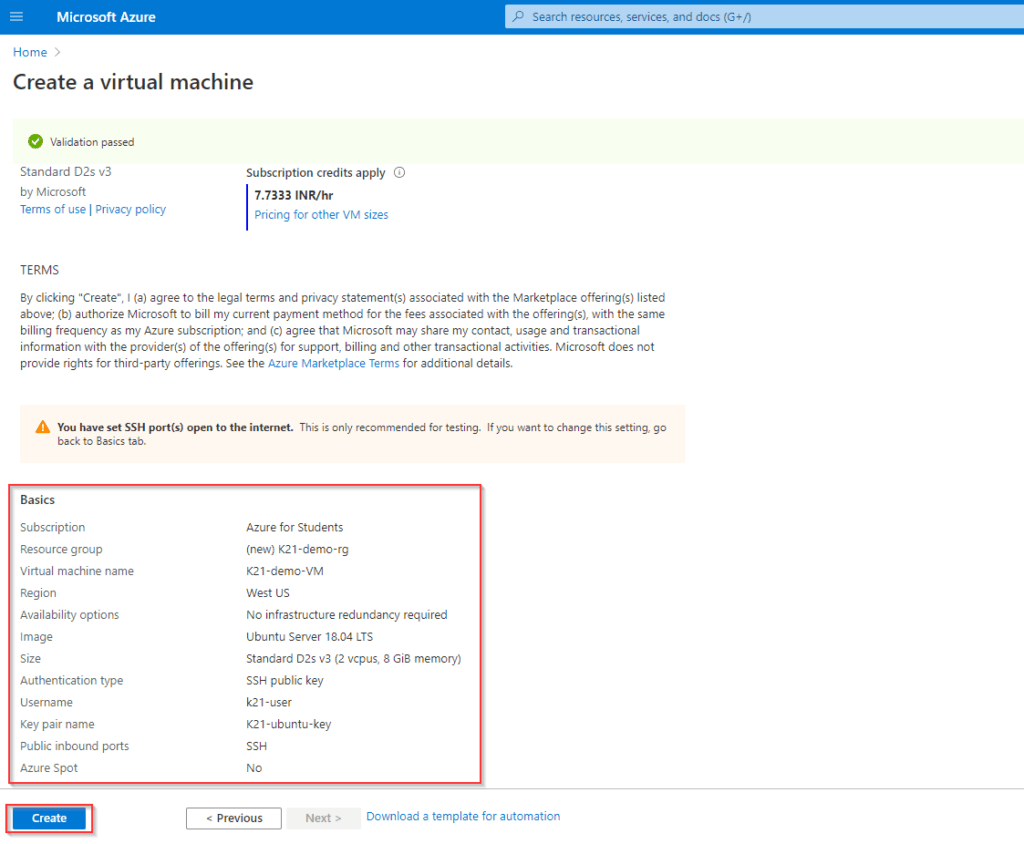
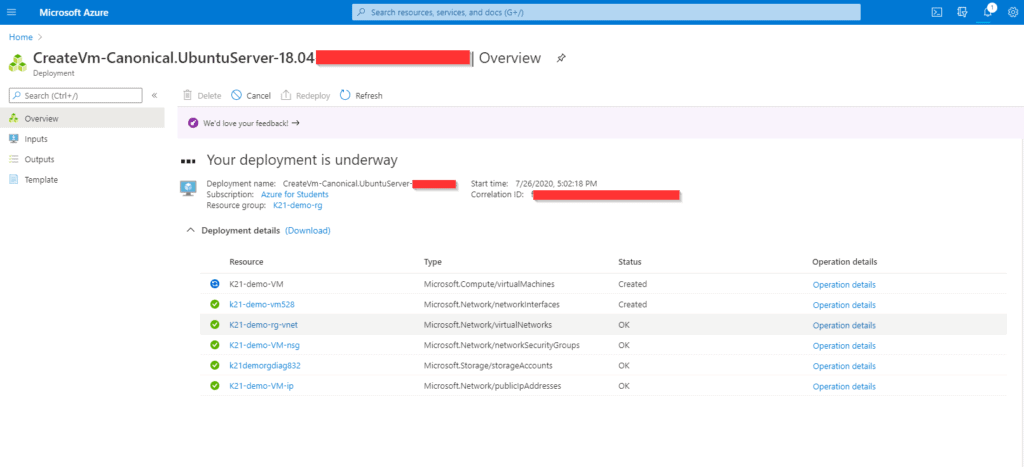
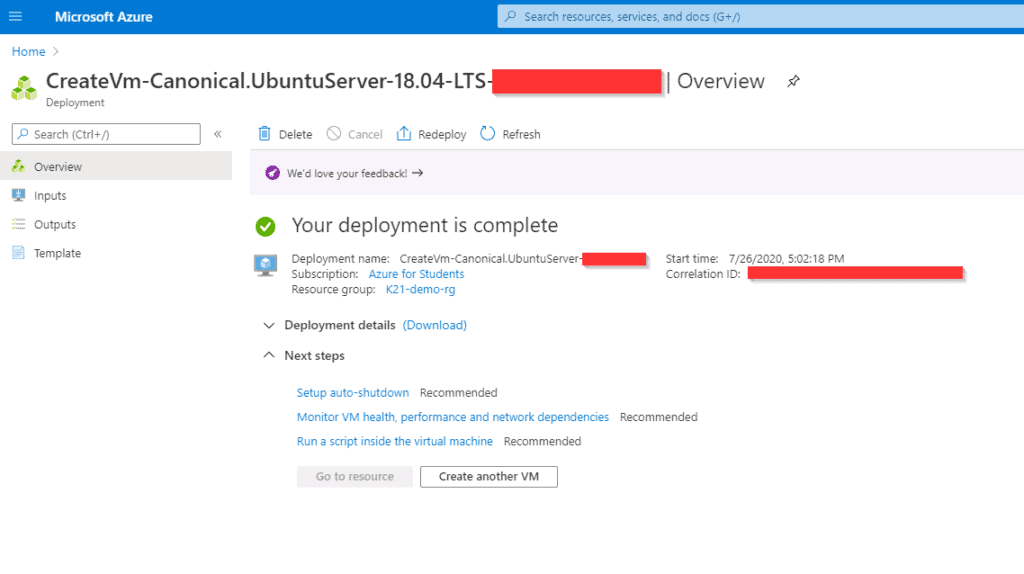
Step 9: Review your settings and make any changes if required and select Create. It takes a few seconds to create a VM.
Also Read: Azure Application Gateway vs Front Door
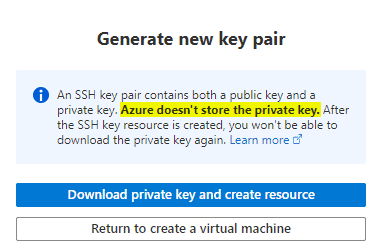
Step 10: SSH Keys
- After you click on Create Azure will create an SSH Key Pair that we will be using to connect to our VM later. Make sure to download the private key and keep it somewhere safe.
- Azure does not store your private key and this is the only instance when you will be able to access your private key from Azure.
Related Readings: How to create and connect Windows Virtual Machine in Azure
Connecting to Ubuntu Virtual Machine
Connecting to your Ubuntu Virtual Machine (VM) on Microsoft Azure is a crucial step to start managing and using your cloud server. In this section, we’ll guide you through the simple and secure process of accessing your Ubuntu VM using SSH (Secure Shell).
Whether you’re using Windows, macOS, or Linux, these steps will help you establish a reliable connection to your VM so you can begin configuring and running your applications.
Step 1: Check whether the SSH key pair is downloaded on your system as a PEM file.

Also Check: Az 104 Microsoft Azure Administrator
Step 2: Open the Terminal or Windows PowerShell (Windows Laptop) and enter the following command
$ cd <location-of-SSH-file>
$ ssh -i <keypair_name> username@pubicIPAddress

Related Readings: V-Net peering
Reference/Related
- [AZ-900] Microsoft Azure: Resource Group, Resource Manager & ARM Template
- Azure Proximity Placement Groups | When To Use And What To Expect
- [AZ-104] Microsoft Azure Administrator Certification Exam: Everything You Need To Know
Next Task For You
Begin your journey toward Mastering Azure Cloud and landing high-paying jobs. Just click on the register now button on the below image to register for a Free Class on Mastering Azure Cloud: How to Build In-Demand Skills and Land High-Paying Jobs. This class will help you understand better, so you can choose the right career path and get a higher paying job.

![Microsoft Agentic AI Business Solutions Architect [AB-100] | K21 Academy](https://test.k21academy.com/wp-content/uploads/2025/11/Microsoft-Agentic-AI-Business-Solutions-Architect-AB-100-Exam-Overview1.png)


