

![]()
If you’re aiming to achieve Kubernetes certification, whether as a Certified Kubernetes Administrator (CKA) or Certified Kubernetes Application Developer (CKAD), the key to success is having a structured plan. This blog will guide you through a focused 21-day plan to prepare for these certifications.
Why CKA and CKAD Certifications Matter
The Kubernetes ecosystem is booming, and certifications like CKA and CKAD are globally recognized benchmarks for validating your skills in managing Kubernetes clusters and developing cloud-native applications. These certifications demonstrate your expertise and make you stand out in the competitive job market.
21-Day Plan for CKA / CKAD Certification
The Certified Kubernetes Administrator (CKA) and Certified Kubernetes Application Developer (CKAD) are highly regarded certifications offered by the Cloud Native Computing Foundation (CNCF). Here are the details:
Certified Kubernetes Administrator (CKA)
Purpose:
The CKA exam is designed to validate the skills, knowledge, and proficiency of Kubernetes administrators in managing and deploying Kubernetes clusters.
Exam Format:
- Type: Performance-based, hands-on exam.
- Duration: 2 hours.
- Passing Score: 66%.
- Number of Questions: Typically 15–20 tasks.
- Proctoring: Online, remotely proctored.
- Languages: English, Chinese, Japanese only.
Certified Kubernetes Application Developer (CKAD)
Purpose:
The CKAD exam is aimed at developers who deploy and manage applications in Kubernetes environments.
Exam Format:
- Type: Performance-based, hands-on exam.
- Duration: 2 hours.
- Passing Score: 66%.
- Number of Questions: Typically 15–20 tasks.
- Proctoring: Online, remotely proctored.
- Languages: English, Chinese, Japanese only.
14-Day Plan for CKA (Common for CKA/CKAD)
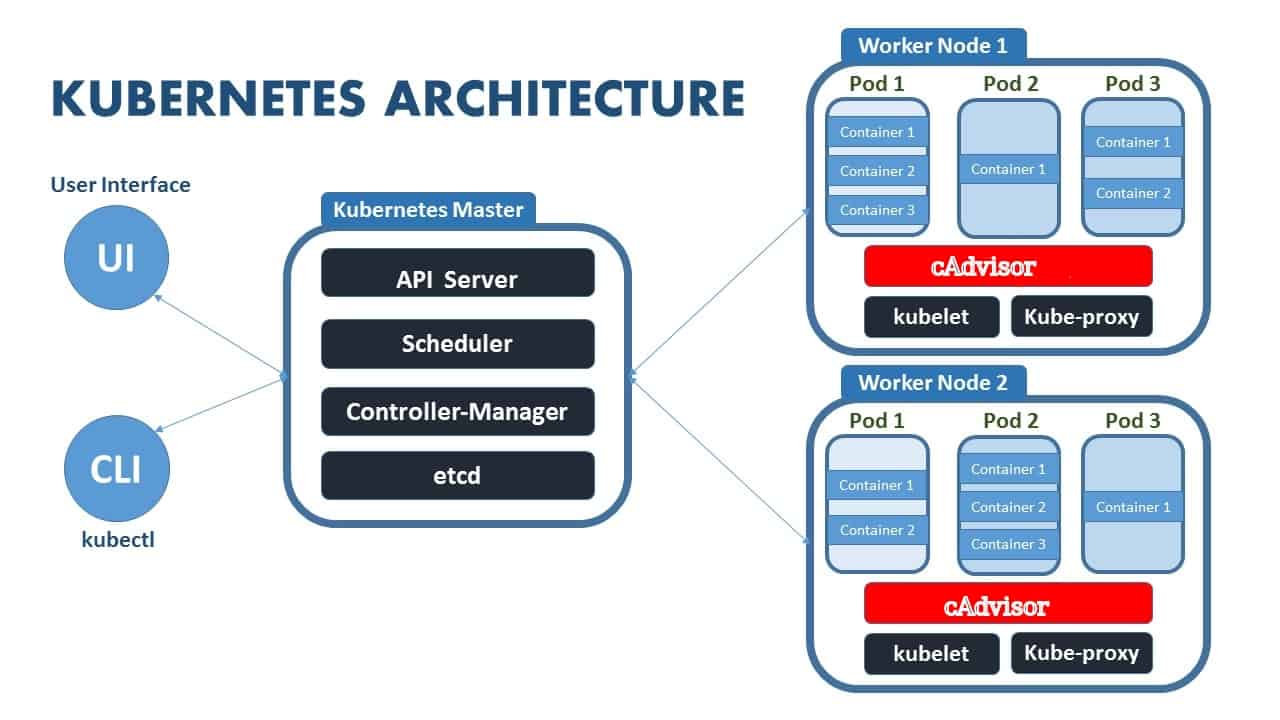
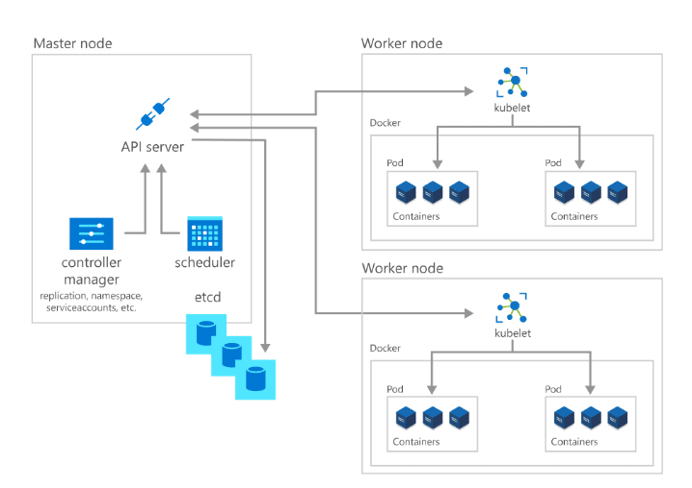
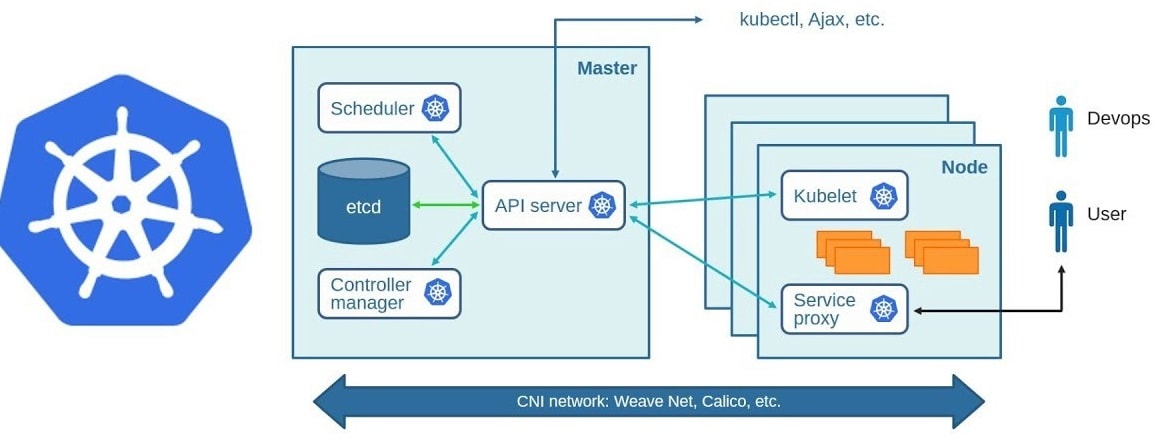
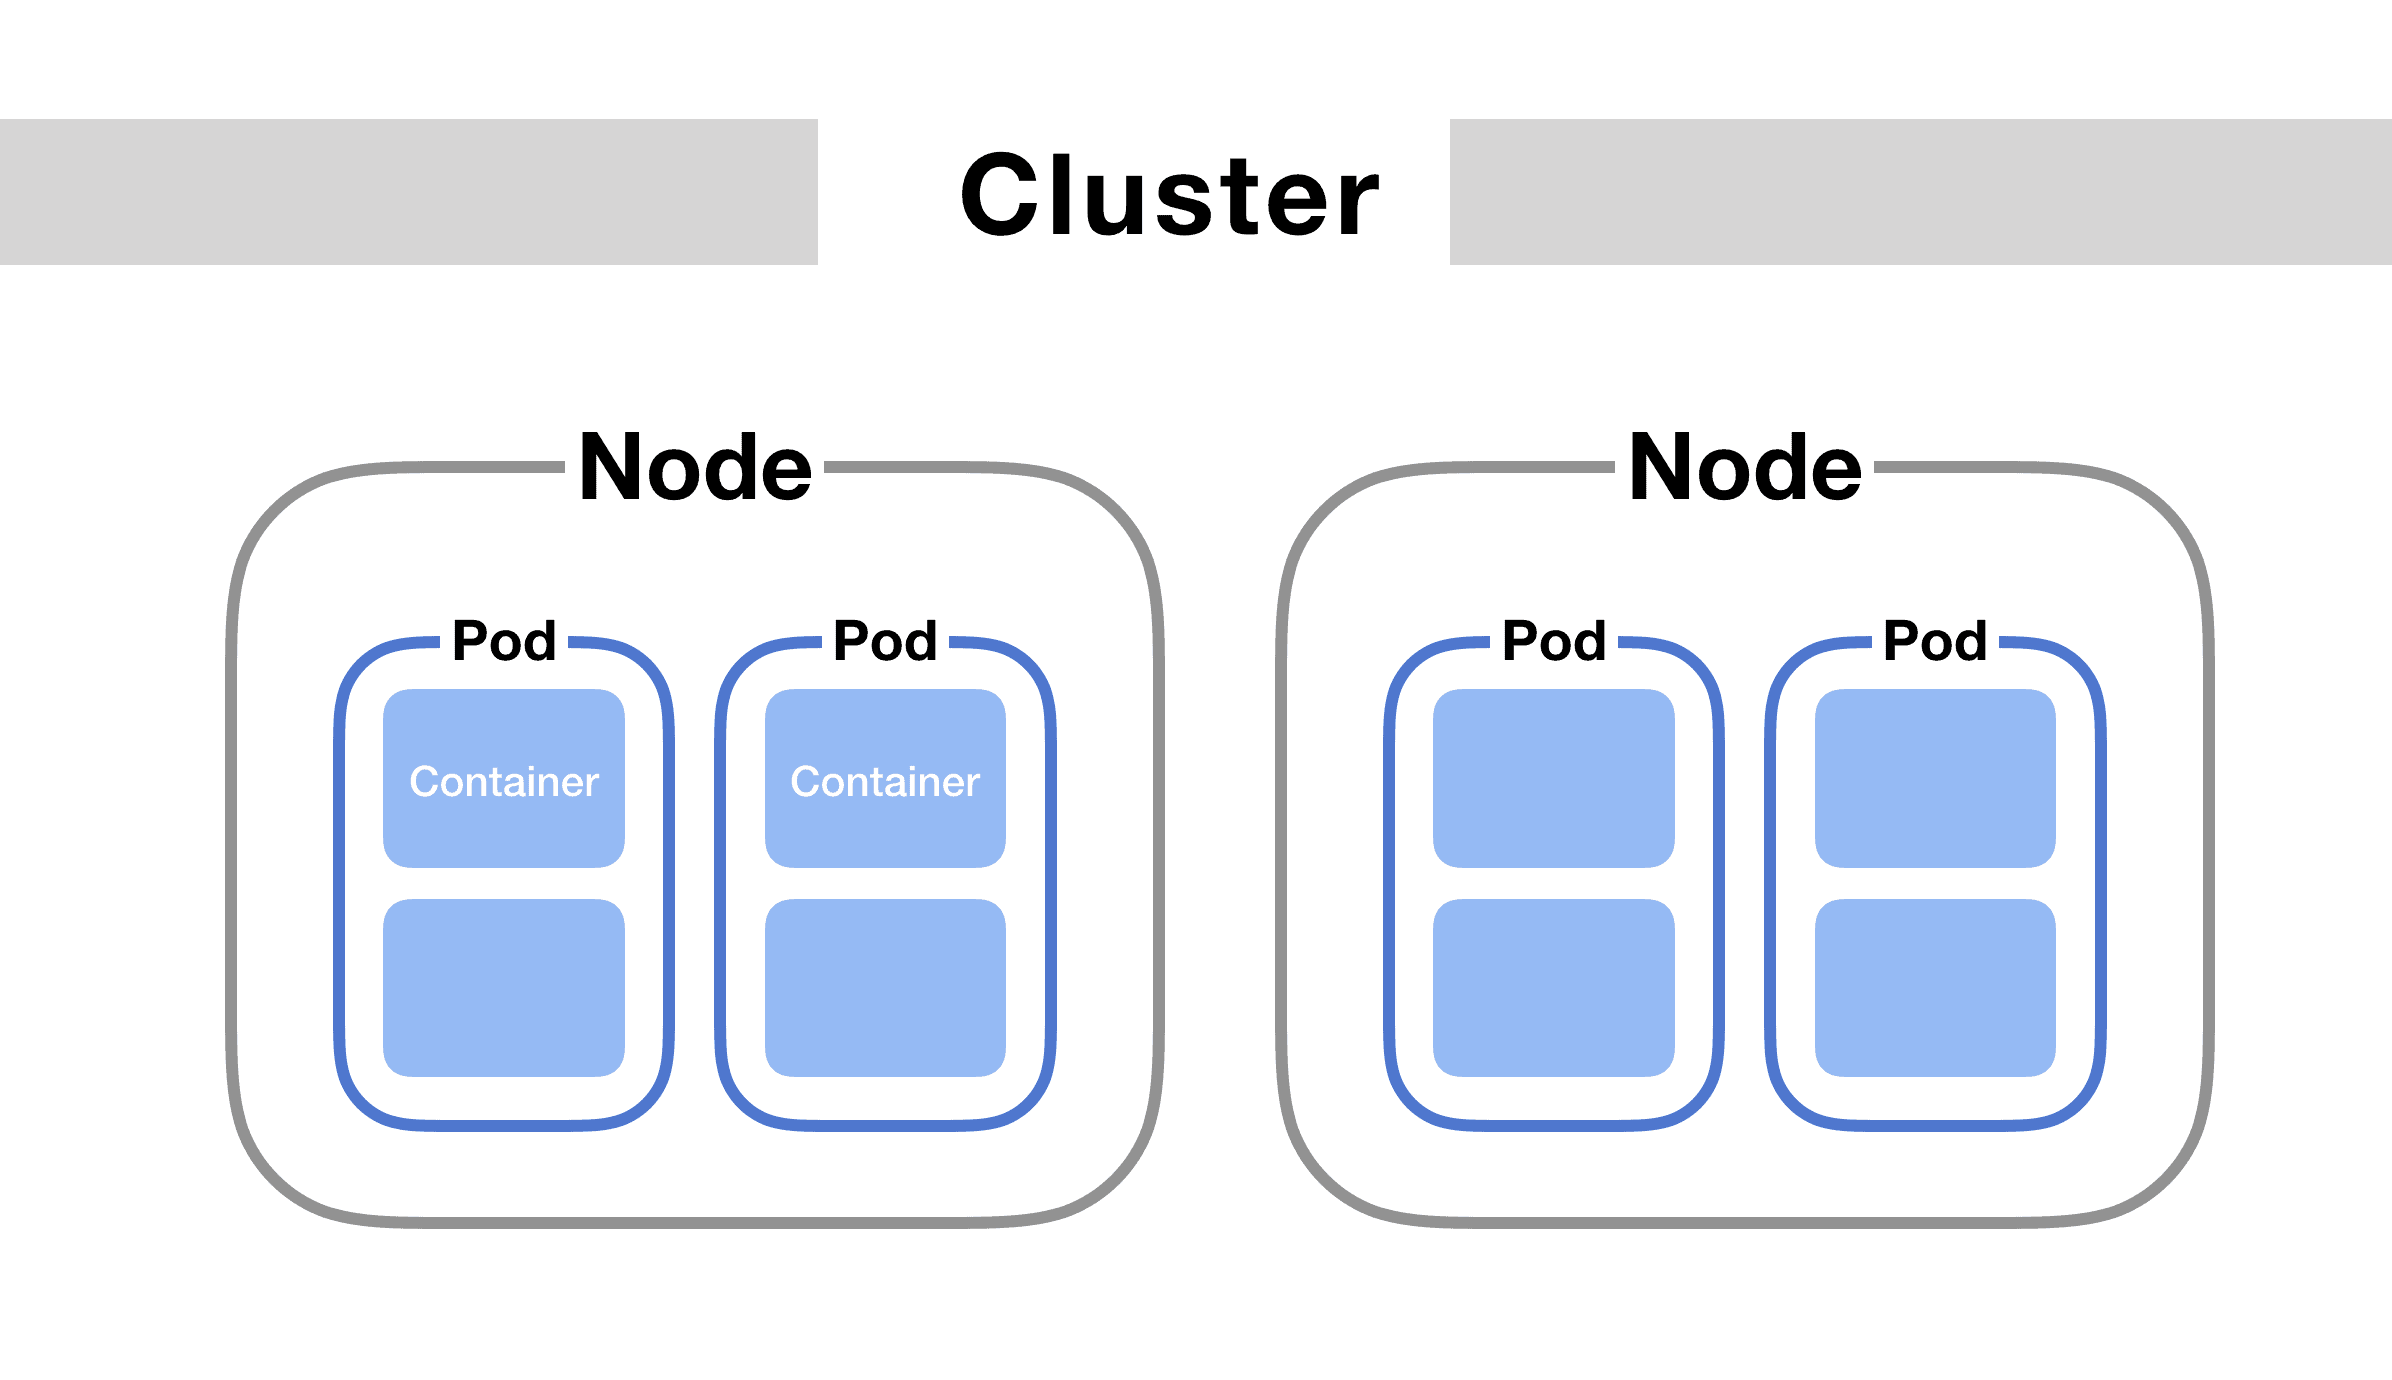
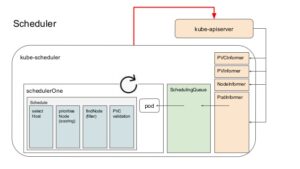
Day 1: Introduction to Kubernetes, Kubernetes Architecture, Kubernetes Installation
Objective: Learn about Kubernetes fundamentals, its architecture, and how to install it.
Action Plan:
- Study what Kubernetes is and why it’s essential.
- Learn the components of Kubernetes architecture (Control Plane and Worker Nodes).
- Install Kubernetes using Minikube or Kind.
What to Focus On:
- Kubernetes Overview: Container orchestration, scaling, and high availability.
- Architecture: Master Node (API Server, Scheduler, Controller Manager, etcd) and Worker Nodes (Kubelet, Kube-Proxy).
- Installation: Follow the guides for installing Kubernetes locally for practice.
Resources:
- Blog: Kubernetes Fundamentals
Additional Resources (Not Part of Certification):
Knowledge Base Questions:
1. Which component in Kubernetes acts as the front end for the cluster?
A) Scheduler
B) API Server
C) Controller Manager
D) etcd
Answer: B) API Server
Explanation: The API Server serves as the cluster’s front-end, handling all RESTful API requests from clients and workers.
2. What is the purpose of etcd in Kubernetes?
A) Storing logs for debugging.
B) Monitoring container health.
C) Storing cluster state and configuration data.
D) Scaling pods.
Answer: C) Storing cluster state and configuration data.
Explanation: etcd is a distributed key-value store that holds all cluster configuration data and metadata.
3. Which Kubernetes component is responsible for scheduling Pods on nodes?
A) Kubelet
B) Controller Manager
C) Scheduler
D) API Server
Answer: C) Scheduler
Explanation: The Scheduler assigns Pods to nodes based on resource requirements and constraints.
4. What command is used to check the version of kubectl installed?
A) kubectl get version
B) kubectl –version
C) kubectl check version
D) kubectl show version
Answer: B) kubectl –version
Explanation: The kubectl –version command displays the installed version of kubectl.
5. Which tool can be used to create a local Kubernetes cluster for practice?
A) Docker Compose
B) Minikube
C) Ansible
D) Terraform
Answer: B) Minikube
Explanation: Minikube is a tool that sets up a local Kubernetes cluster for development and testing.
Sample Exam Question:
- Install a Kubernetes cluster using kubeadm on multiple nodes.
- Ensure the control plane is running and operational after a restart.
- Initialize the control plane and join worker nodes to the cluster.
Day 2: Understanding Pods and YAML Basics
Objective: Learn about Pods as the smallest deployable unit in Kubernetes and YAML syntax for defining Kubernetes objects.
Action Plan:
- Understand the concept of Pods in Kubernetes.
- Study how Pods encapsulate one or more containers.
- Learn the basics of YAML syntax, including key-value pairs, arrays, and indentation.
What to Focus On:
- Pods: Single or multi-container units, lifecycle, and usage.
- YAML Basics: Structure, syntax, and writing Kubernetes configurations.
Resources:
Knowledge Base Questions:
1.What is the smallest deployable unit in Kubernetes?
A) Node
B) Pod
C) Deployment
D) Container
Answer: B) Pod
Explanation: A Pod is the smallest deployable unit in Kubernetes, encapsulating one or more containers.
2. What is the purpose of YAML files in Kubernetes?
A) To store logs.
B) To define Kubernetes objects.
C) To monitor cluster health.
D) To create namespaces.
Answer: B) To define Kubernetes objects.
Explanation: YAML files describe configurations for Kubernetes objects like Pods, Deployments, and Services.
3. How do you check if a Pod is running in Kubernetes?
A) kubectl get pods
B) kubectl describe pods
C) kubectl list pods
D) kubectl check pods
Answer: A) kubectl get pods
Explanation: The kubectl get pods command displays the status of Pods in the cluster.
4. In YAML, what does a key-value pair represent?
A) A conditional statement.
B) A resource definition.
C) A mapping of a property and its value.
D) A loop.
Answer: C) A mapping of a property and its value.
Explanation: Key-value pairs define properties and their values in YAML syntax.
5. What is the proper indentation for YAML?
A) Spaces (2 or more), no tabs allowed.
B) Tabs only.
C) Combination of spaces and tabs.
D) No specific indentation is required.
Answer: A) Spaces (2 or more), no tabs allowed.
Explanation: YAML requires consistent spaces for indentation and does not allow tabs.
Sample Exam Question:
- Create a Pod named mypod with a single container running the nginx image.
- How can two containers in the same Pod share data?
- Write a YAML definition for a Pod named testpod with a container running the busybox image and executing the command sleep 3600.
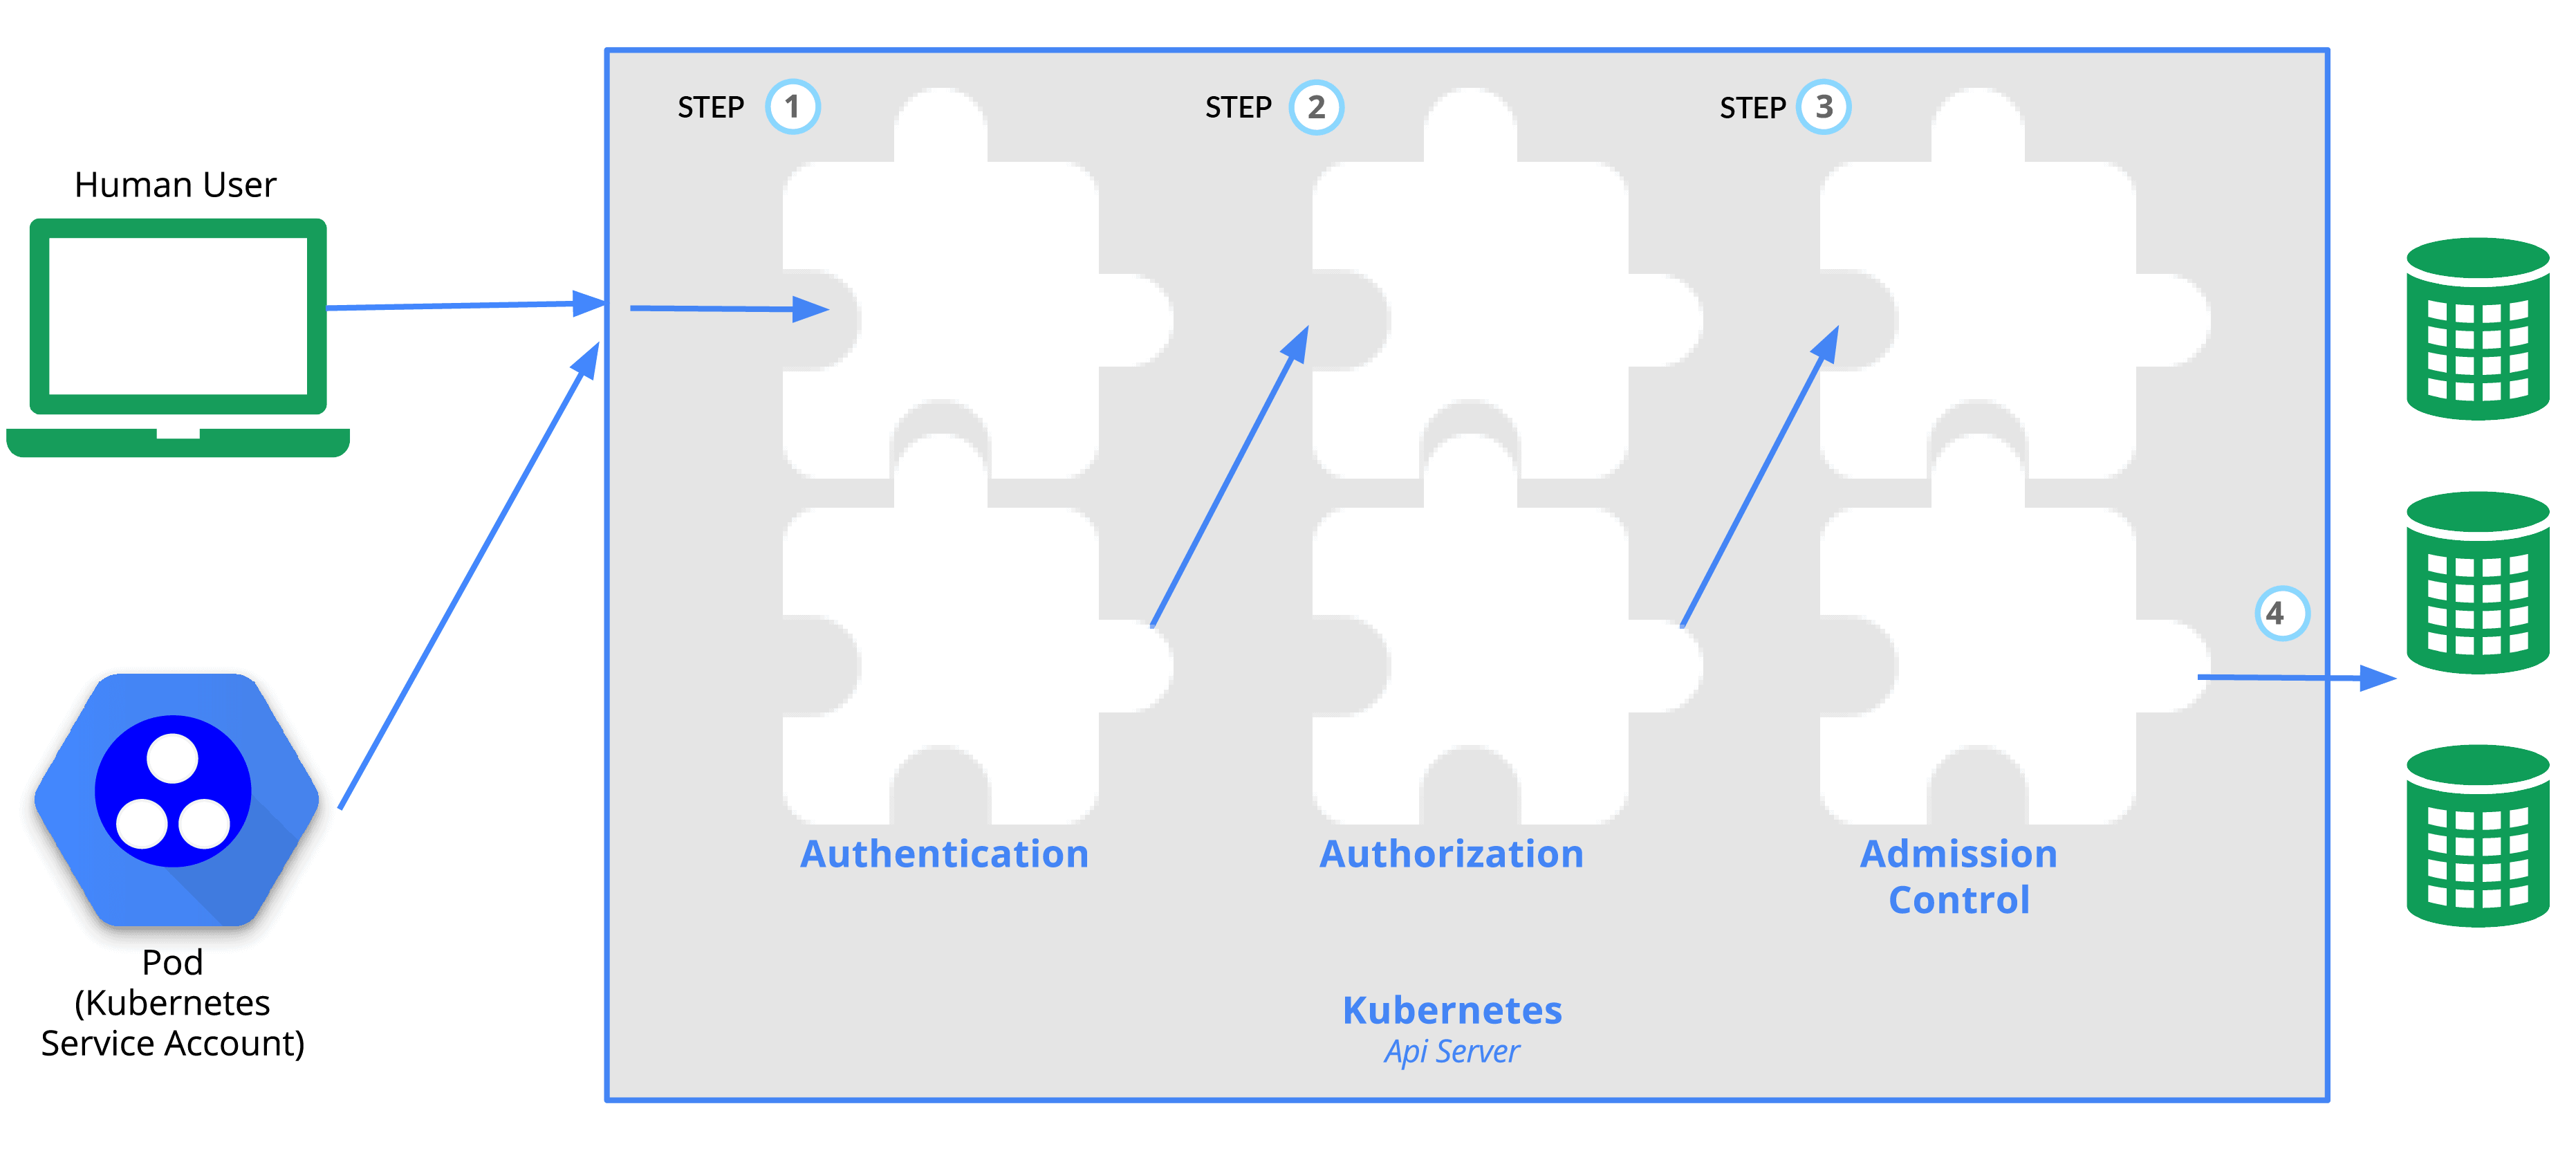
Day 3: Role-Based Access Control (RBAC)
Objective: Study Role-Based Access Control (RBAC) in Kubernetes and how it manages access to resources.
Action Plan:
- Understand the components of RBAC: Roles, RoleBindings, ClusterRoles, and ClusterRoleBindings.
- Learn how RBAC manages permissions in Kubernetes.
- Practice creating Roles and RoleBindings in YAML.
What to Focus On:
- Roles and RoleBindings: Scoped to a namespace.
- ClusterRoles and ClusterRoleBindings: Apply to the entire cluster.
- Hands-On: Write YAML files for RBAC objects.
Resources:
Knowledge Base Questions:
1. What does RBAC stand for in Kubernetes?
A) Role-Based Access Control
B) Resource-Based Access Control
C) Role-Binding Access Control
D) Resource-Binding Access Control
Answer: A) Role-Based Access Control
Explanation: RBAC defines permissions based on user roles, managing access to resources.
2. What is the purpose of a ClusterRole in Kubernetes?
A) To manage permissions for resources in a specific namespace.
B) To define permissions cluster-wide.
C) To create namespaces.
D) To manage Pods.
Answer: B) To define permissions cluster-wide.
Explanation: ClusterRoles define permissions that apply to all namespaces in the cluster.
3. Which command lists all Roles in a namespace?
A) kubectl list roles
B) kubectl get roles
C) kubectl describe roles
D) kubectl get rolebindings
Answer: B) kubectl get roles
Explanation: The kubectl get roles command lists all Roles in the current namespace.
4. What is the difference between a Role and a ClusterRole?
A) Roles apply to Pods, while ClusterRoles apply to nodes.
B) Roles are namespace-scoped, while ClusterRoles are cluster-wide.
C) Roles define resource quotas, while ClusterRoles define storage classes.
D) Roles and ClusterRoles are identical.
Answer: B) Roles are namespace-scoped, while ClusterRoles are cluster-wide.
Explanation: Roles apply within a namespace, whereas ClusterRoles apply across the cluster.
5. How do you bind a Role to a user or group?
A) Using a RoleBinding.
B) Using a ClusterRoleBinding.
C) Using a RolePolicy.
D) Using a namespace selector.
Answer: A) Using a RoleBinding.
Explanation: RoleBindings connect Roles to users, groups, or service accounts within a namespace.
Sample Exam Question:
- Create a Role named pod-reader in the dev namespace that allows listing and getting Pods.
- Create a ClusterRoleBinding that grants cluster-wide read access to nodes for a group named admins.
- Create a ServiceAccount named app-sa in the prod namespace and bind it to a Role that can access Secrets
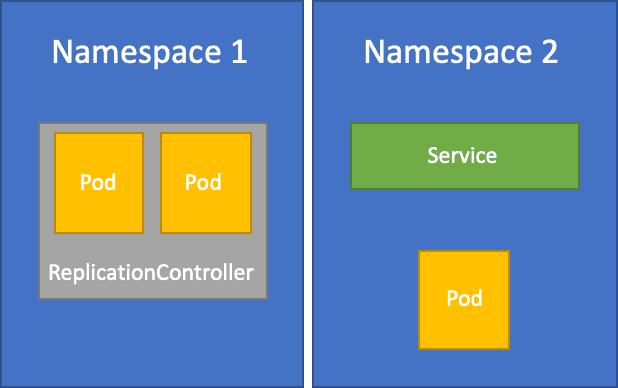
Day 4: Labels and Namespaces
Objective: Learn about Labels for organizing Kubernetes objects and Namespaces for logical resource partitions.
Action Plan:
- Understand how Labels identify and group Kubernetes objects.
- Study Namespaces for logically dividing resources within a cluster.
- Practice creating Labels and organizing resources with Namespaces.
What to Focus On:
- Labels: Key-value pairs for identifying and grouping objects.
- Namespaces: Logical partitions for resource management.
- Hands-On: Assign Labels and create Namespaces using YAML.
Resources:
Knowledge Base Questions:
1. What is the purpose of Labels in Kubernetes?
A) To provide metadata for organizing resources.
B) To control access to resources.
C) To configure networking policies.
D) To manage storage volumes.
Answer: A) To provide metadata for organizing resources.
Explanation: Labels are key-value pairs used to identify and group Kubernetes objects.
2. How are resources grouped within a Namespace?
A) By their name.
B) By their Labels.
C) By their role.
D) By their logical partition.
Answer: D) By their logical partition.
Explanation: Namespaces logically partition resources within a cluster for better organization.
3. Which command lists all namespaces in a Kubernetes cluster?
A) kubectl get namespaces
B) kubectl describe namespaces
C) kubectl list namespaces
D) kubectl get ns
Answer: A) kubectl get namespaces
Explanation: The kubectl get namespaces command lists all namespaces in the cluster.
4. How do you select resources based on a Label?
A) kubectl get <resource> –labels key=value
B) kubectl get <resource> -l key=value
C) kubectl list <resource> -l key=value
D) kubectl describe <resource> –labels key=value
Answer: B) kubectl get <resource> -l key=value
Explanation: The -l flag in kubectl get selects resources based on specified Labels.
5. What is the purpose of the default namespace in Kubernetes?
A) To store system-critical resources.
B) To provide a namespace for resources without an explicitly defined namespace.
C) To define network policies.
D) To manage storage resources.
Answer: B) To provide a namespace for resources without an explicitly defined namespace.
Explanation: The default namespace is used when no namespace is specified for a resource.
Sample Exam Question:
- Create a Namespace named testing and deploy a Pod in it.
- Create a Service in the staging namespace that selects Pods labeled tier=frontend.
- Create a YAML file to define a Namespace project-x and a Pod within it labeled team=engineering.
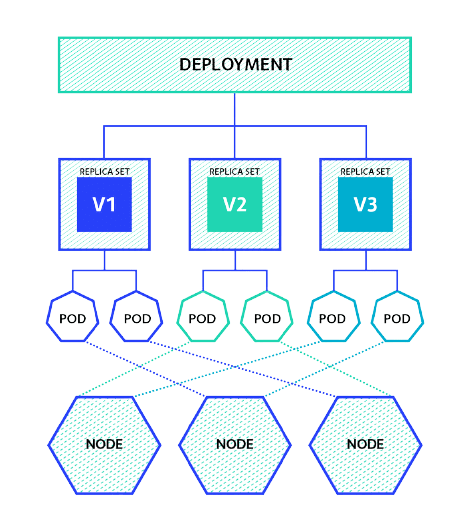
Day 5: Controllers (Replication Controller, ReplicaSets, DaemonSet)
Objective: Learn about Kubernetes controllers like Replication Controller, ReplicaSets, and DaemonSets.
Action Plan:
- Understand the role of controllers in managing the state of resources.
- Study Replication Controllers and how they ensure a specific number of replicas are running.
- Learn ReplicaSets and their role in deployments.
- Explore DaemonSets and their use cases.
What to Focus On:
- Replication Controller: Ensures a specified number of replicas are running.
- ReplicaSets: Advanced version of Replication Controller supporting Label Selectors.
- DaemonSets: Ensures one pod per node for specific tasks like logging and monitoring.
Resources:
Knowledge Base Questions:
- What is the primary purpose of a Replication Controller?
A) To expose a Pod to external traffic.
B) To ensure a specified number of pod replicas are running.
C) To provide storage for Pods.
D) To manage namespaces.
Answer: B) To ensure a specified number of pod replicas are running.
Explanation: The Replication Controller monitors and maintains the desired number of replicas.
2. How does a ReplicaSet differ from a Replication Controller?
A) ReplicaSet supports dynamic scaling using Label Selectors.
B) ReplicaSet manages multiple namespaces.
C) ReplicaSet ensures high availability.
D) ReplicaSet is used for networking.
Answer: A) ReplicaSet supports dynamic scaling using Label Selectors.
Explanation: ReplicaSet provides more flexible scaling options compared to Replication Controllers.
3. What is the use case for a DaemonSet?
A) Running one Pod on all nodes for tasks like logging or monitoring.
B) Managing container storage.
C) Deploying multiple replicas of an application.
D) Defining networking policies.
Answer: A) Running one Pod on all nodes for tasks like logging or monitoring.
Explanation: DaemonSets ensure that specific tasks like logging agents are deployed on every node.
4. Which command lists all DaemonSets in a namespace?
A) kubectl get ds
B) kubectl list daemonsets
C) kubectl get daemonset
D) kubectl list ds
Answer: A) kubectl get ds
Explanation: The kubectl get ds command lists all DaemonSets in the specified namespace.
5. How do ReplicaSets determine which pods to manage?
A) By their resource requests.
B) By their node location.
C) By their Labels.
D) By their YAML configuration.
Answer: C) By their Labels.
Explanation: ReplicaSets use Label Selectors to identify and manage Pods.
Sample Exam Question:
- Create a ReplicaSet named backend-rs with 2 replicas of the redis image.
- Create a DaemonSet named log-agent that runs the fluentd image on every node.
- Create a DaemonSet that ensures every node runs a monitoring container using the prometheus image.
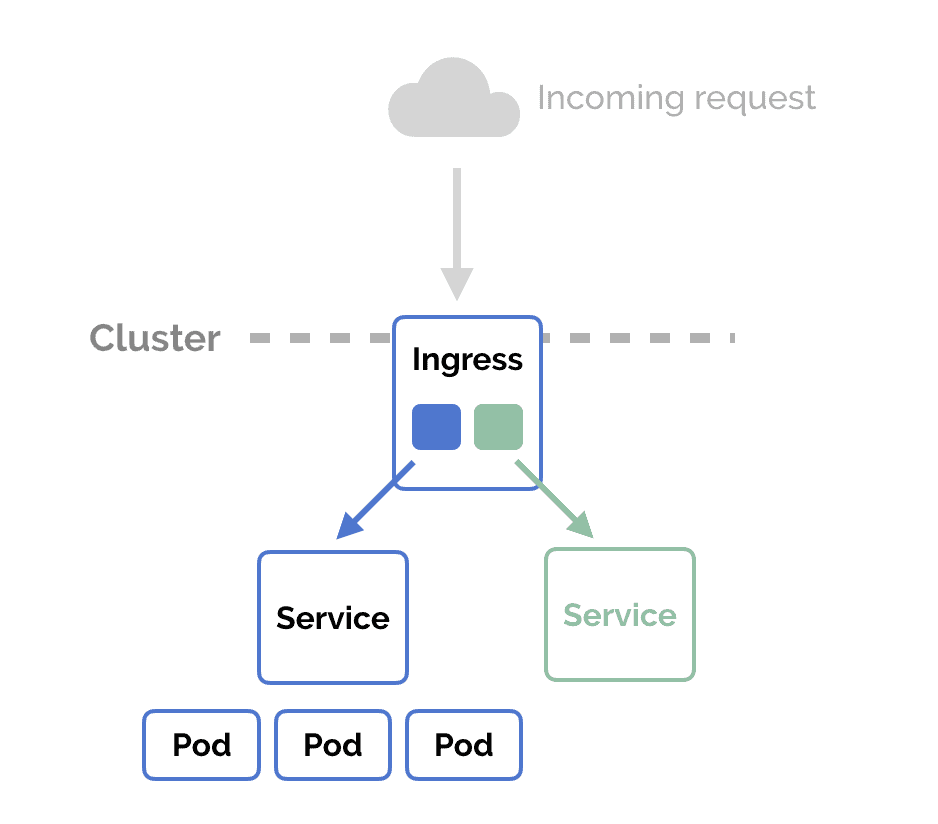
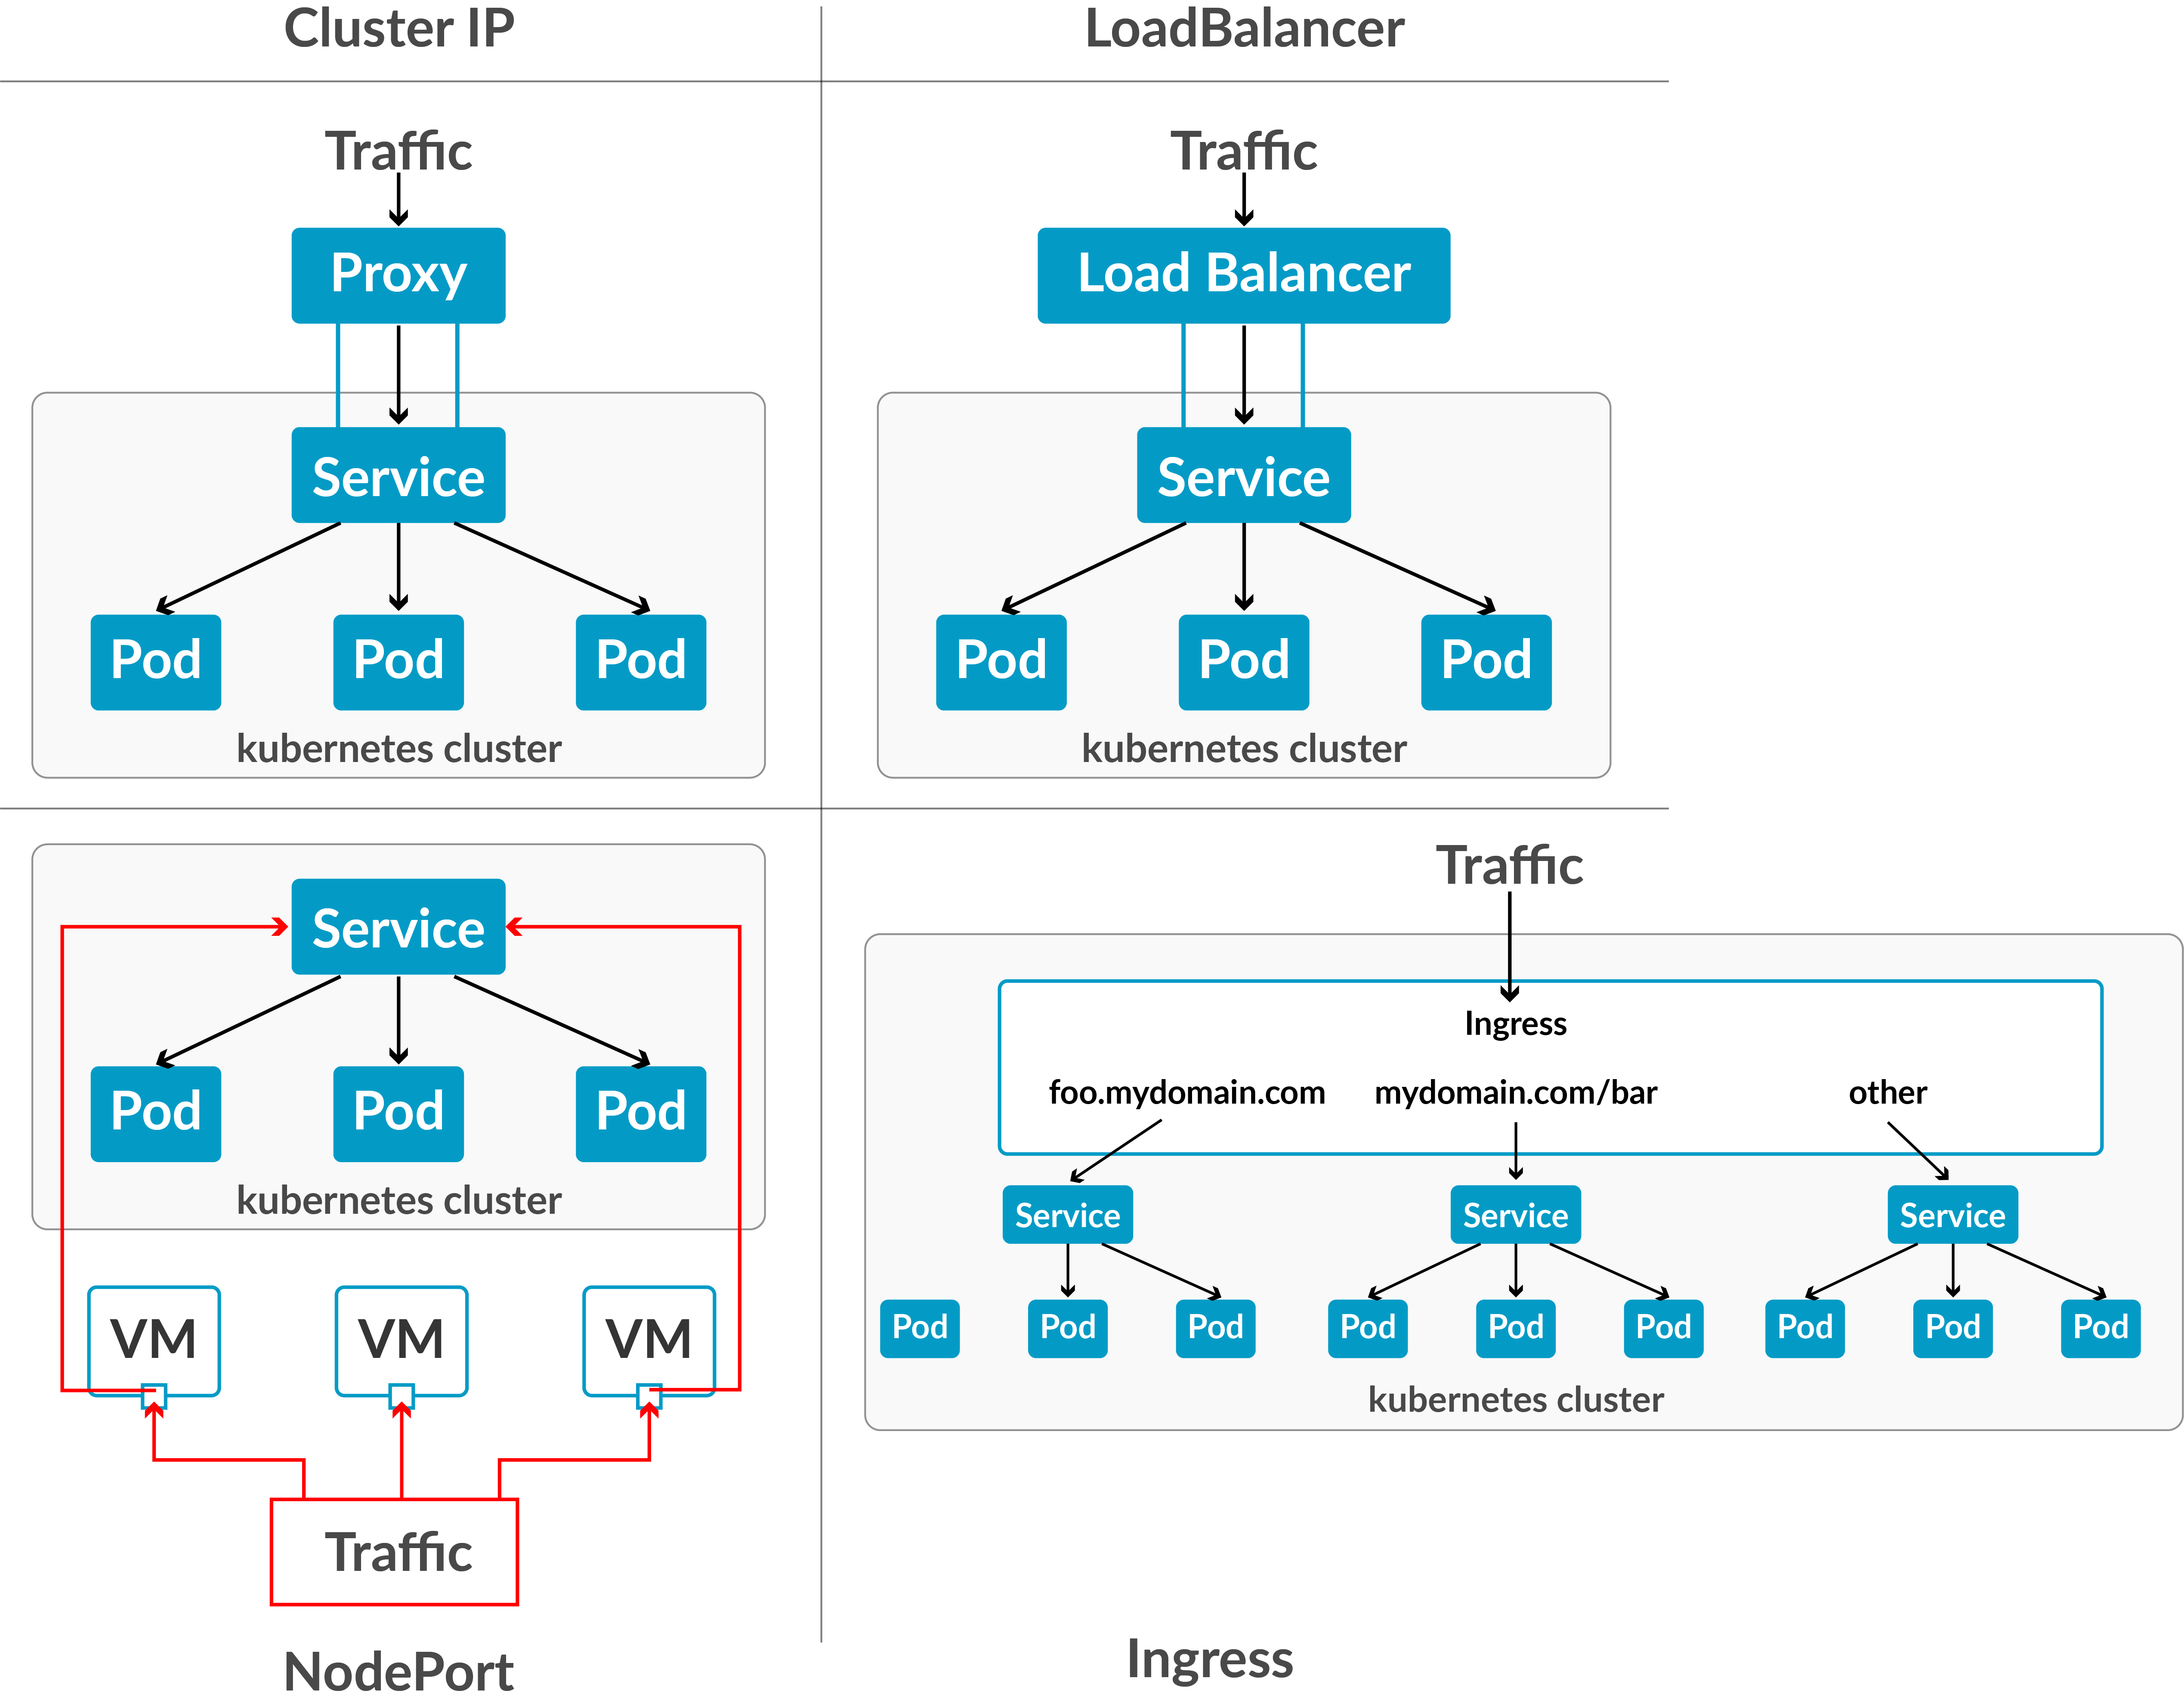
Day 6: Kubernetes Services (ClusterIP, NodePort, LoadBalancer)
Objective: Understand the types of Kubernetes services and their roles in networking Pods within and outside the cluster.
Action Plan:
- Study the default service type, ClusterIP, and its role in internal networking.
- Learn about NodePort for exposing Pods externally via host node ports.
- Explore LoadBalancer for external access with dynamic IP allocation.
What to Focus On:
- ClusterIP: Internal cluster networking.
- NodePort: Fixed external ports on host nodes.
- LoadBalancer: External IP allocation for seamless traffic routing.
Resources:
Knowledge Base Questions:
1. What is the default type of service in Kubernetes?
A) NodePort
B) ClusterIP
C) LoadBalancer
D) ExternalName
Answer: B) ClusterIP
Explanation: ClusterIP is the default service type, providing internal cluster networking.
2. Which service type allows external Pod access via a fixed port on each node?
A) ClusterIP
B) NodePort
C) LoadBalancer
D) ExternalName
Answer: B) NodePort
Explanation: NodePort exposes Pods to external traffic through a fixed port on the host node.
3. Which service type creates an external IP to route traffic to Pods?
A) ClusterIP
B) NodePort
C) LoadBalancer
D) ExternalName
Answer: C) LoadBalancer
Explanation: LoadBalancer allocates an external IP and forwards traffic to the Pods.
4. How do you list all services in a namespace?
A) kubectl get services
B) kubectl describe services
C) kubectl list services
D) kubectl show services
Answer: A) kubectl get services
Explanation: The kubectl get services command lists all services in the current namespace.
5. What is the purpose of an ExternalName service?
A) To provide DNS resolution to an external service.
B) To expose Pods externally with dynamic IPs.
C) To manage storage for Pods.
D) To redirect traffic to a ClusterIP service.
Answer: A) To provide DNS resolution to an external service.
Explanation: ExternalName maps an internal service name to an external DNS address.
Sample Exam Question:
- Create a ClusterIP Service named backend-service that targets Pods labeled app=backend on port 8080.
- Create a NodePort Service named frontend-service that exposes Pods labeled app=frontend on port 30080.
- Create a LoadBalancer Service named public-service for Pods labeled app=nginx and verify the external IP allocation.
Day 7: Deployments and Application Updates
Objective: Learn about Kubernetes Deployments and their role in managing application updates and rollbacks.
Action Plan:
- Understand how Deployments provide declarative updates to applications.
- Learn about rolling updates, rollbacks, and scaling Deployments.
- Practice creating and managing Deployments using YAML.
What to Focus On:
- Deployments: Declarative updates and rollbacks.
- Rolling Updates: Gradual updates to Pods without downtime.
- Scaling: Adjusting replicas for application demand.
Resources:
Knowledge Base Questions:
1. Which Kubernetes object ensures the application remains available during updates?
A) Pod
B) ReplicaSet
C) Deployment
D) Service
Answer: C) Deployment
Explanation: Deployments manage rolling updates and rollbacks to ensure high availability.
2. What command creates a Deployment in Kubernetes?
A) kubectl create deployment
B) kubectl apply deployment
C) kubectl rollout deployment
D) kubectl set deployment
Answer: A) kubectl create deployment
Explanation: The kubectl create deployment command creates a new Deployment object.
3. Which command scales a Deployment to 5 replicas?
A) kubectl scale replicas=5 deployment <name>
B) kubectl scale –replicas=5 deployment <name>
C) kubectl resize deployment <name> –replicas=5
D) kubectl set deployment <name> replicas=5
Answer: B) kubectl scale –replicas=5 deployment <name>
Explanation: The kubectl scale command adjusts the number of replicas in a Deployment.
4. How do you rollback a Deployment to a previous revision?
A) kubectl undo deployment <name>
B) kubectl revert deployment <name>
C) kubectl rollout undo deployment <name>
D) kubectl reset deployment <name>
Answer: C) kubectl rollout undo deployment <name>
Explanation: The kubectl rollout undo command rolls back a Deployment to its previous revision.
5. What is the purpose of a rolling update?
A) To restart all Pods simultaneously.
B) To gradually update Pods without downtime.
C) To delete and recreate all Pods.
D) To scale down a Deployment.
Answer: B) To gradually update Pods without downtime.
Explanation: Rolling updates replace old Pods with new ones incrementally, ensuring zero downtime.
Sample Exam Question:
- Create a Deployment named web-deployment with 3 replicas of an nginx container running the nginx:latest image.
- Update the image of the web-deployment Deployment from nginx:latest to nginx:1.21 using kubectl.
- Update the environment variable APP_MODE=production for all Pods managed by the app-deployment Deployment and verify the change.
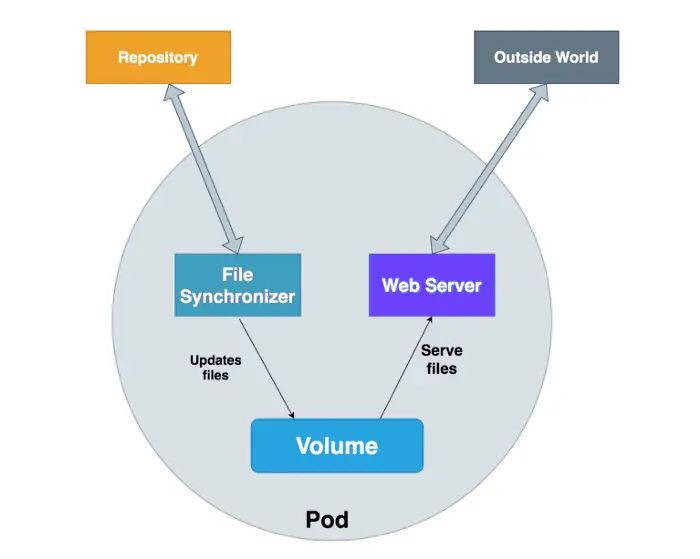
Day 8: Ephemeral Storage (emptyDir and HostPath)
Objective: Learn about ephemeral storage types in Kubernetes, including emptyDir and HostPath, and their use cases.
Action Plan:
- Understand the concept of ephemeral storage in Kubernetes.
- Study the behavior and lifecycle of emptyDir volumes.
- Explore HostPath volumes for accessing node-specific storage.
- Practice creating Pods using emptyDir and HostPath volumes.
What to Focus On:
- emptyDir: Temporary storage tied to the Pod lifecycle.
- HostPath: Accessing files and directories on the host node.
Resources:
Knowledge Base Questions:
1. What is the lifespan of data stored in an emptyDir volume?
A) As long as the Pod is running.
B) Until the node restarts.
C) Until the container restarts.
D) Persistent across Pod restarts.
Answer: A) As long as the Pod is running.
Explanation: Data in an emptyDir volume is erased when the Pod is deleted.
2. What is the purpose of a HostPath volume?
A) To provide dynamic storage allocation.
B) To allow Pods to access the host node’s filesystem.
C) To create a shared storage pool for Pods.
D) To define persistent storage across nodes.
Answer: B) To allow Pods to access the host node’s filesystem.
Explanation: HostPath volumes provide access to specific paths on the host node.
3. Which command lists all volumes used by a Pod?
A) kubectl get volumes
B) kubectl describe pod <pod-name>
C) kubectl get pv
D) kubectl list volumes
Answer: B) kubectl describe pod <pod-name>
Explanation: The kubectl describe pod command displays detailed information about volumes used by the Pod.
4. How is an emptyDir volume created?
A) Using a PersistentVolume definition.
B) Automatically when specified in the Pod spec.
C) By mounting a StorageClass.
D) By provisioning with dynamic allocation.
Answer: B) Automatically when specified in the Pod spec.
Explanation: emptyDir volumes are created automatically as defined in the Pod spec.
5. What is a major limitation of HostPath volumes?
A) They cannot store sensitive data.
B) They are tied to a specific node and cannot migrate with Pods.
C) They are read-only by default.
D) They require a StorageClass.
Answer: B) They are tied to a specific node and cannot migrate with Pods.
Explanation: HostPath volumes are node-specific and cannot be used if the Pod is rescheduled on another node.
Sample Exam Question:
- Create a Pod with an emptyDir volume mounted at /data and verify the mount.
- Create a Pod with a HostPath volume that mounts /tmp on the node to /mnt/host in the container.
- Modify a running Pod to use an emptyDir volume for temporary data storage.
- Troubleshoot why a Pod using a HostPath volume is not starting.
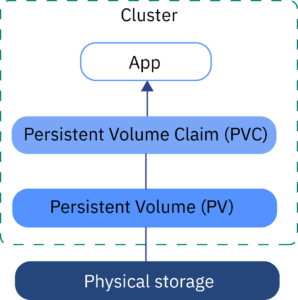
Day 9: Persistent Volumes (PV) and Persistent Volume Claims (PVC)
Objective: Learn about Persistent Volumes (PV) and Persistent Volume Claims (PVC) in Kubernetes and how they enable abstracted storage management.
Action Plan:
- Study the purpose of Persistent Volumes (PV) as abstracted storage resources.
- Understand how Persistent Volume Claims (PVC) request storage.
- Practice creating and binding PVs and PVCs in YAML.
What to Focus On:
- Persistent Volumes (PV): Pre-provisioned or dynamically allocated storage resources.
- Persistent Volume Claims (PVC): Pod requests for specific storage requirements.
Resources:
Knowledge Base Questions:
1. What is a Persistent Volume Claim (PVC)?
A) A type of ephemeral storage.
B) A request for storage by a Pod.
C) A policy for scaling Pods.
D) A method for connecting services.
Answer: B) A request for storage by a Pod.
Explanation: PVC allows Pods to request specific storage resources.
2. How are Persistent Volumes (PV) different from ephemeral storage?
A) PVs are tied to a Pod’s lifecycle.
B) PVs are independent of Pod lifecycles and provide persistent storage.
C) PVs cannot be used with multiple Pods.
D) PVs are deleted when the Pod restarts.
Answer: B) PVs are independent of Pod lifecycles and provide persistent storage.
Explanation: PVs persist beyond the lifecycle of a Pod, enabling long-term data storage.
3. What happens if a PVC requests more storage than a PV provides?
A) The Pod fails to start.
B) The PVC is bound to the PV with the closest capacity.
C) The PVC remains unbound.
D) The PV expands automatically.
Answer: C) The PVC remains unbound.
Explanation: PVCs must match the storage capacity defined by the PV to be successfully bound.
4. Which command lists all Persistent Volumes in the cluster?
A) kubectl get volumes
B) kubectl get pv
C) kubectl describe pvc
D) kubectl list pv
Answer: B) kubectl get pv
Explanation: The kubectl get pv command lists all Persistent Volumes in the cluster.
5. What is the purpose of the ReclaimPolicy in a Persistent Volume?
A) To automatically delete the PV when the PVC is deleted.
B) To define whether the PV is shared or exclusive.
C) To determine what happens to the PV after it is released.
D) To bind the PV to multiple Pods.
Answer: C) To determine what happens to the PV after it is released.
Explanation: The ReclaimPolicy determines if the PV is retained, deleted, or recycled after release.
Sample Exam Question:
- Create a Persistent Volume with 5Gi of storage and a Retain reclaim policy.
- Bind a PVC to an existing PV with a matching size of 1Gi.
- Expand the size of a Persistent Volume Claim from 2Gi to 5Gi.
- Identify and delete all unused Persistent Volumes in the test namespace.
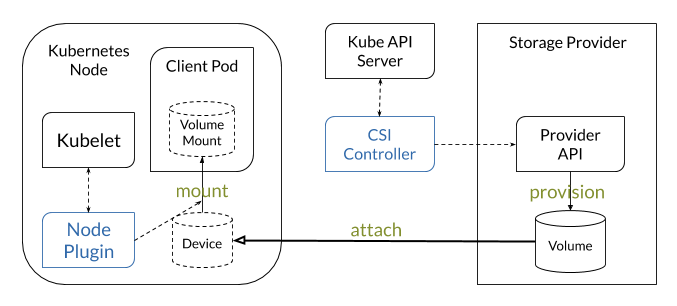
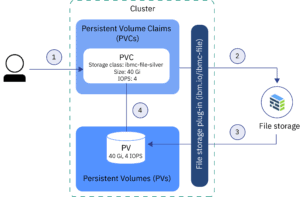
Day 10: Dynamic Volume Provisioning with NFS and Storage Classes
Objective: Learn how to provision storage using NFS and Storage Classes in Kubernetes dynamically.
Action Plan:
- Study the concept of dynamic volume provisioning and its benefits.
- Learn how Storage Classes define policies for dynamic storage allocation.
- Practice creating Storage Classes and dynamically provisioned Persistent Volumes with NFS.
What to Focus On:
- Dynamic Provisioning: Automating storage allocation based on PVC requests.
- Storage Classes: Configurations that specify provisioner, reclaim policy, and parameters.
Resources:
Knowledge Base Questions:
1. What is the role of a StorageClass in Kubernetes?
A) It manages container lifecycle.
B) It defines policies for dynamic storage provisioning.
C) It scales Pods dynamically.
D) It provides networking services.
Answer: B) It defines policies for dynamic storage provisioning.
Explanation: StorageClass enables dynamic allocation of Persistent Volumes.
2. Which field in a PVC specifies the desired StorageClass?
A) spec.storageClassName
B) metadata.storageClass
C) spec.className
D) storage.classType
Answer: A) spec.storageClassName
Explanation: The spec.storageClassName field in a PVC defines the StorageClass to use for dynamic provisioning.
3. How does dynamic provisioning simplify storage management?
A) It binds PVCs to multiple PVs.
B) It automates PV creation based on PVC requests.
C) It reclaims unused storage automatically.
D) It pre-provisions PVs in advance.
Answer: B) It automates PV creation based on PVC requests.
Explanation: Dynamic provisioning automatically creates PVs to match PVC requirements without pre-allocating resources.
4. Which provisioner is used for NFS-based dynamic storage?
A) nfs-provisioner
B) csi-driver
C) hostpath-provisioner
D) pv-provisioner
Answer: A) nfs-provisioner
Explanation: The nfs-provisioner allows dynamic storage allocation using NFS.
5. What happens if a PVC specifies a StorageClass that does not exist?
A) The PVC remains in a Pending state.
B) The PVC automatically creates a StorageClass.
C) The PVC binds to the default StorageClass.
D) The Pod is deleted.
Answer: A) The PVC remains in a Pending state.
Explanation: If a specified StorageClass is unavailable, the PVC cannot be bound, and it remains pending.
Sample Exam Question:
- Create a StorageClass with nfs-provisioner and use it to provision a Persistent Volume dynamically.
- Write a YAML manifest for a PVC requesting dynamic provisioning of 10Gi storage using a specific StorageClass.
- Troubleshoot why a PVC requesting a specific StorageClass is stuck in a Pending state.
Day 11: HPA and Autoscaling, Cluster Resource Limit (Resource Quota)
Objective: Learn to configure Horizontal Pod Autoscaling (HPA), Resource Quotas, and Limits in Kubernetes.
Action Plan:
- Understand the concept of HPA and metrics used for autoscaling.
- Configure HPA using the Metrics Server.
- Study Resource Quotas and how they limit resource consumption in namespaces.
What to Focus On:
- HPA: Scaling Pods based on CPU and memory utilization.
- Resource Quota: Setting limits for CPU, memory, and other resources in a namespace.
- Hands-On: Practice autoscaling with a sample application.
Resources:

Knowledge Base Questions:
1. What does the Horizontal Pod Autoscaler (HPA) scale?
A) Cluster Nodes
B) Pods in a Deployment or ReplicaSet
C) Resource Quotas
D) Persistent Volumes
Answer: B) Pods in a Deployment or ReplicaSet
Explanation: HPA adjusts the number of Pods in a Deployment or ReplicaSet based on resource utilization.
2. What is required to enable HPA in Kubernetes?
A) Metrics Server
B) NodePort Service
C) StorageClass
D) Resource Quota
Answer: A) Metrics Server
Explanation: Metrics Server provides the CPU and memory usage data needed for HPA.
3. What is the purpose of a Resource Quota?
A) To restrict resource consumption within a namespace.
B) To limit the number of Pods in a cluster.
C) To allocate storage to specific users.
D) To manage networking policies.
Answer: A) To restrict resource consumption within a namespace.
Explanation: Resource Quotas ensure fair resource allocation among namespaces.
4. Which command creates an HPA object?
A) kubectl apply hpa
B) kubectl autoscale deployment
C) kubectl scale hpa
D) kubectl set autoscale
Answer: B) kubectl autoscale deployment
Explanation: The kubectl autoscale deployment command creates an HPA object for a Deployment.
5. What metrics does HPA use by default?
A) Disk I/O and network bandwidth
B) CPU and memory utilization
C) Number of nodes and Pods
D) Storage and network latency
Answer: B) CPU and memory utilization
Explanation: By default, HPA uses CPU and memory utilization to scale Pods.
Sample Exam Question:
- Create an HPA for a Deployment named web-deployment to scale between 2 and 10 replicas based on CPU usage.
- Troubleshoot why an HPA is not scaling Pods, even though the CPU utilization exceeds the target threshold.
- Write a YAML manifest to define a ResourceQuota named compute-quota in the dev namespace with the following limits:
- Maximum Pods: 10
- Total memory: 2Gi
- Total CPU: 2 cores
Day 12: Kubernetes Scheduling (Node Selector, Node Affinity, Taints & Tolerations), Security (RBAC, Service Accounts, Kubeconfig)
Objective: Learn Kubernetes scheduling techniques and security configurations.
Action Plan:
- Study advanced scheduling techniques: Node Selector, Node Affinity, Anti-Affinity, and Taints & Tolerations.
- Learn Kubernetes security concepts like RBAC, Service Accounts, and kubeconfig.
- Practice creating custom scheduling rules and secure configurations.
What to Focus On:
- Scheduling: Control Pod placement using Node Selector, Affinity/Anti-Affinity, Taints, and Tolerations.
- RBAC: Create Roles, RoleBindings, and Service Accounts.
- Kubeconfig: Understand its structure and use for cluster access.
Resources:
- Blog: Kubernetes Scheduling
Knowledge Base Questions:
1. What does Node Affinity control in Kubernetes?
A) Pod scaling.
B) Pod placement on specific nodes.
C) Network policies.
D) Pod security settings.
Answer: B) Pod placement on specific nodes.
Explanation: Node Affinity allows Pods to specify preferences for nodes based on labels.
2. What are Taints and Tolerations used for in Kubernetes?
A) To define resource quotas.
B) To prevent Pods from being scheduled on certain nodes.
C) To manage Pod security.
D) To prioritize Pods for scheduling.
Answer: B) To prevent Pods from being scheduled on certain nodes.
Explanation: Taints and Tolerations work together to control Pod placement and node usage.
3. What is the purpose of a Service Account in Kubernetes?
A) To manage external services.
B) To provide identity for Pods to interact with the API server.
C) To restrict node usage.
D) To configure storage for Pods.
Answer: B) To provide identity for Pods to interact with the API server.
Explanation: Service Accounts grant Pods access to the Kubernetes API.
4. What does kubeconfig file contain?
A) Networking policies for Pods.
B) Cluster details, user credentials, and contexts.
C) Scheduling rules for nodes.
D) Security configurations for RBAC.
Answer: B) Cluster details, user credentials, and contexts.
Explanation: kubeconfig files store configuration details for accessing Kubernetes clusters.
5. Which command lists all Roles in a namespace?
A) kubectl get roles
B) kubectl describe rolebinding
C) kubectl list roles
D) kubectl get rolebinding
Answer: A) kubectl get roles
Explanation: The kubectl get roles command lists all Roles in the specified namespace.
Sample Exam Question:
- Create a Pod using nodeAffinity to prefer scheduling on nodes labeled region=us-west.
- Write a YAML file for a Pod that tolerates a taint key=env, value=test, effect=NoSchedule.
- Add a taint to a node named worker-1 that prevents all Pods except those that tolerate it.
- Create a Role named pod-manager in the dev namespace that allows get, list, and delete operations on Pods.
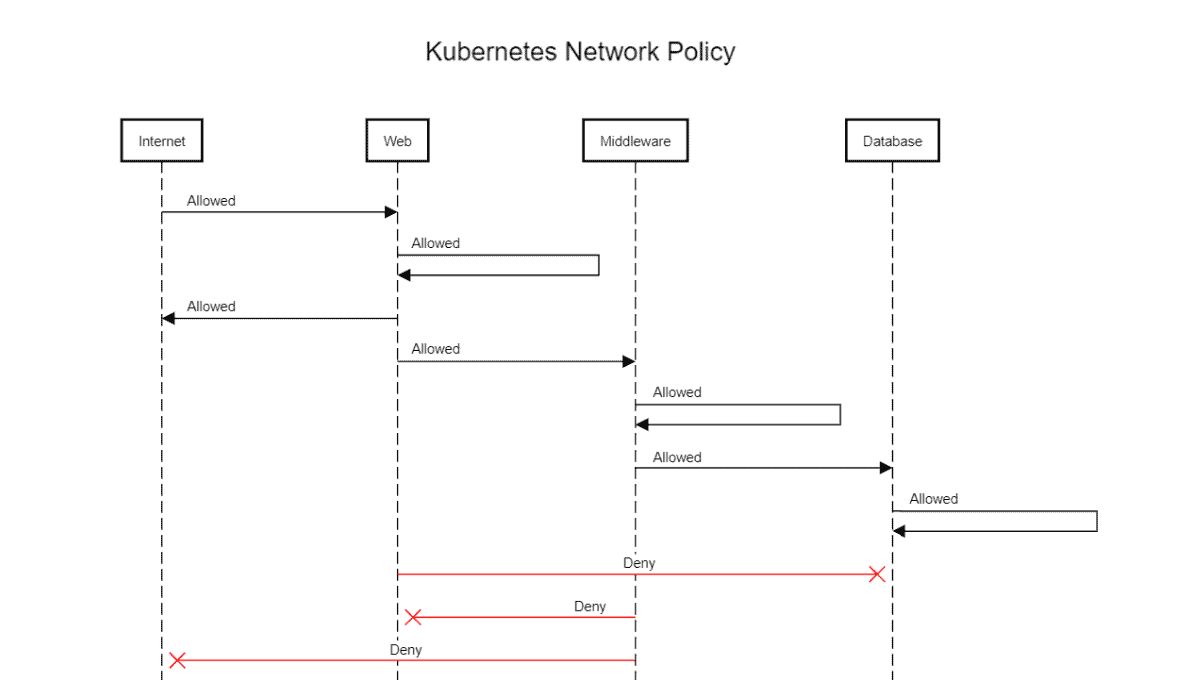
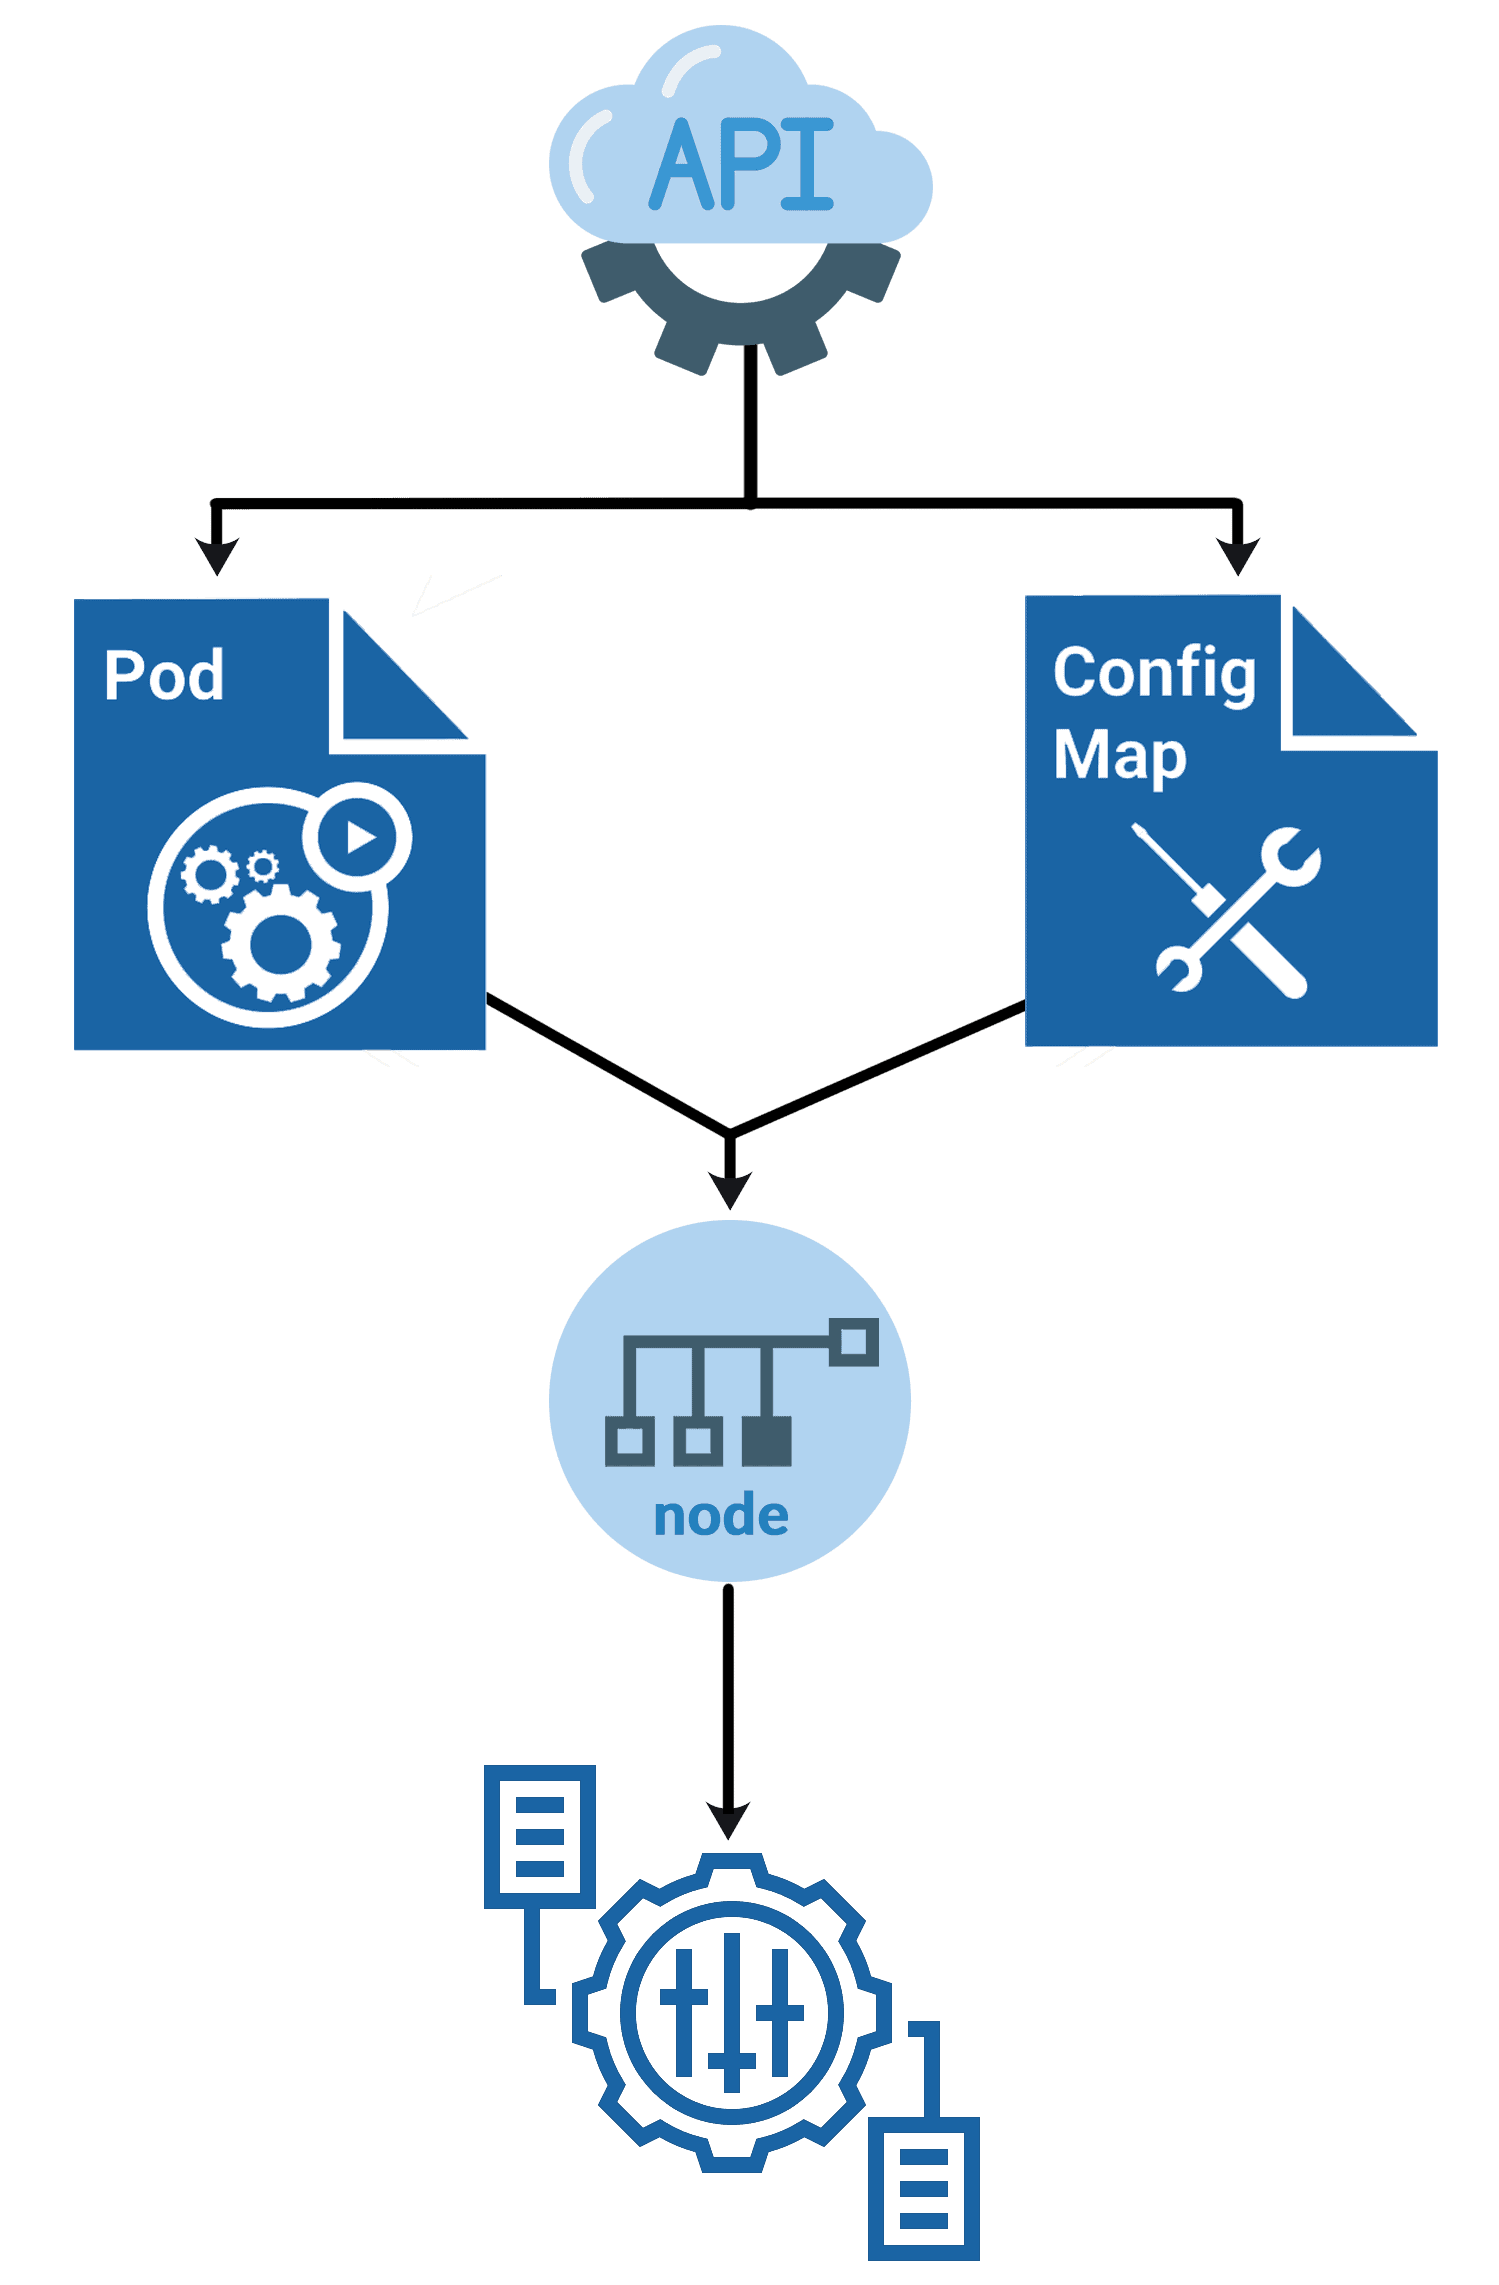
Day 13: Network Policies, Security Context, ConfigMap, Secrets, StatefulSet, Sidecar Pattern
Objective: Learn about networking policies, secrets, and patterns for managing stateful applications.
Action Plan:
- Study Kubernetes Network Policies for restricting traffic.
- Learn Security Context for setting permissions and privileges.
- Understand ConfigMaps and Secrets for configuration management.
- Explore StatefulSets for stateful applications and Sidecar patterns.
What to Focus On:
- Network Policies: Control inbound and outbound traffic for Pods.
- Secrets & ConfigMaps: Store sensitive data and configuration separately.
- StatefulSet: Manage stateful applications like databases.
- Sidecar Pattern: Add auxiliary functionality to primary containers.
Resources:
Knowledge Base Questions:
1. What is the primary purpose of Network Policies in Kubernetes?
A) To manage Pod replication.
B) To restrict traffic to and from Pods.
C) To configure storage.
D) To manage secrets.
Answer: B) To restrict traffic to and from Pods.
Explanation: Network Policies define rules for allowing or blocking traffic to Pods.
2. What is a Security Context in Kubernetes?
A) A configuration for Node Affinity.
B) A Pod-level security setting.
C) A network policy for external traffic.
D) A monitoring policy for resources.
Answer: B) A Pod-level security setting.
Explanation: Security Context allows you to define security-related settings like privileges and capabilities for Pods or containers.
3. What is the difference between ConfigMaps and Secrets?
A) ConfigMaps are encrypted, Secrets are not.
B) Secrets store sensitive data, ConfigMaps store configuration data.
C) Secrets are used for storage, ConfigMaps are not.
D) Both serve the same purpose.
Answer: B) Secrets store sensitive data, ConfigMaps store configuration data.
Explanation: Secrets are encrypted for sensitive data like passwords, while ConfigMaps store non-sensitive configuration data.
4. What is the purpose of a StatefulSet in Kubernetes?
A) To scale stateless applications.
B) To manage stateful applications like databases.
C) To secure Pod configurations.
D) To replicate Pods across multiple nodes.
Answer: B) To manage stateful applications like databases.
Explanation: StatefulSets manage the deployment and scaling of Pods with persistent identifiers and storage.
5. What does the Sidecar pattern in Kubernetes enable?
A) Multi-container communication within a Pod.
B) Network traffic restrictions.
C) Dynamic storage allocation.
D) Autoscaling Pods.
Answer: A) Multi-container communication within a Pod.
Explanation: The Sidecar pattern is used to add auxiliary functionality (e.g., logging, proxy) to a primary container.
Sample Exam Question:
- Create a NetworkPolicy that allows egress traffic only to Pods labeled app=redis on port 6379.
- Configure a Pod with a Security Context that prevents privilege escalation. Verify its configuration.
- Deploy a Pod with a ConfigMap-mounted volume at /etc/config and verify the files inside the volume.
- Create a Deployment with a sidecar container that acts as a reverse proxy for the main application.
Day 14: Maintenance, Troubleshooting, Highly Available Clusters, ETCD Backup/Restore, Cluster Upgrades
Objective: Understand Kubernetes maintenance, troubleshoot clusters, and manage upgrades.
Action Plan:
- Study troubleshooting techniques for Pods, Nodes, and clusters.
- Learn how to create and restore etcd backups.
- Explore best practices for highly available clusters.
- Understand the process for upgrading a Kubernetes cluster.
What to Focus On:
- Troubleshooting Tools: kubectl logs, kubectl describe, kubectl exec.
- etcd Backup/Restore: Commands for creating and restoring etcd backups.
- Cluster Upgrades: Rolling updates and compatibility checks.
Resources:

Knowledge Base Questions:
1. What command retrieves logs for a Pod?
A) kubectl logs pod-name
B) kubectl get logs pod-name
C) kubectl describe logs pod-name
D) kubectl log pod-name
Answer: A) kubectl logs pod-name
Explanation: The kubectl logs command fetches logs for the specified Pod.
2. What is a key consideration when upgrading a Kubernetes cluster?
A) Deleting all Persistent Volumes.
B) Ensuring version compatibility.
C) Disabling RBAC.
D) Deleting all Services.
Answer: B) Ensuring version compatibility.
Explanation: Ensuring API and component compatibility is crucial for successful upgrades.
3. How do you check for unresponsive nodes?
A) kubectl get nodes
B) kubectl describe nodes
C) kubectl get pods
D) kubectl list nodes
Answer: A) kubectl get nodes
Explanation: The kubectl get nodes command displays node statuses, highlighting any issues.
4. What is the purpose of an etcd backup?
A) To scale Pods dynamically.
B) To restore cluster state during failures.
C) To upgrade Kubernetes versions.
D) To manage network policies.
Answer: B) To restore cluster state during failures.
Explanation: etcd backups store cluster configuration and state data for disaster recovery.
5. Which command checks the status of a Deployment?
A) kubectl describe deployment
B) kubectl get deployment
C) kubectl logs deployment
D) kubectl status deployment
Answer: B) kubectl get deployment
Explanation: The kubectl get deployment command lists the status of Deployments in the cluster.
Sample Exam Question:
- Write the kubectl command to drain a node named worker-1 for maintenance.
- Display the logs of a Pod named nginx-pod in the default namespace and save them to a file.
- List all keys in the etcd database using the etcdctl command.
- Retrieve the YAML definition of a Service named backend-service and verify its endpoints.
- Display the cluster version and component statuses using kubectl.
7-Day Plan for CKAD and Exam Preparation
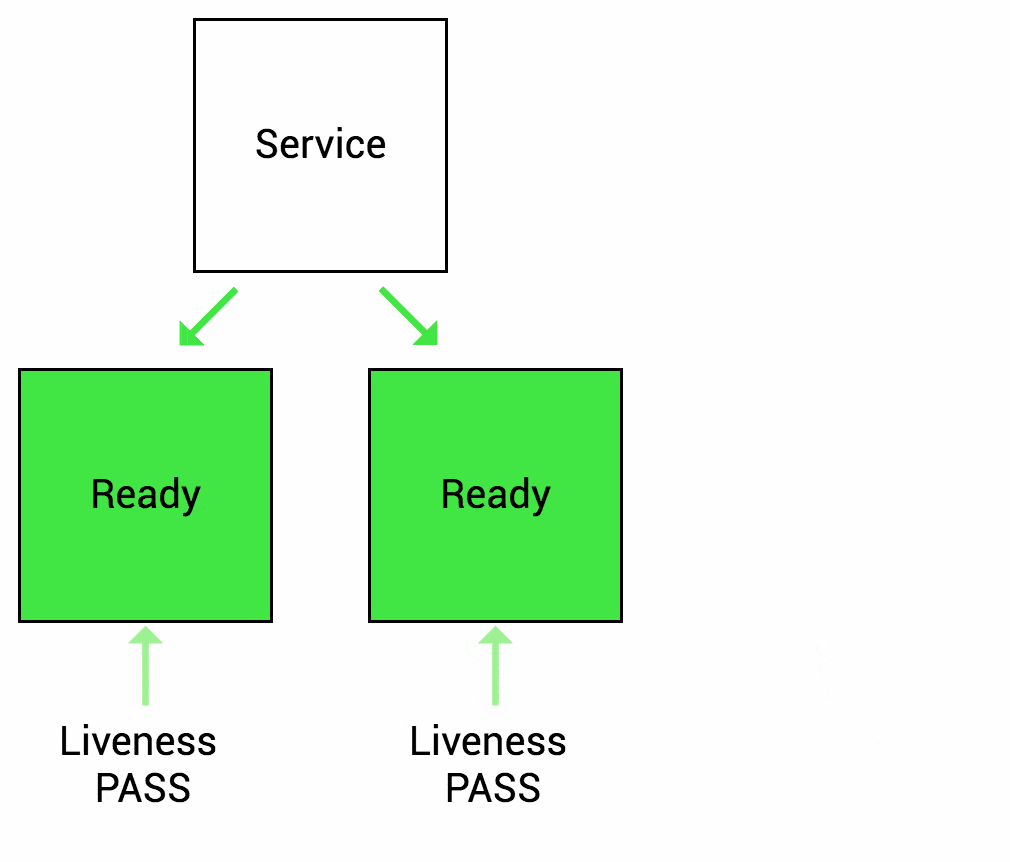
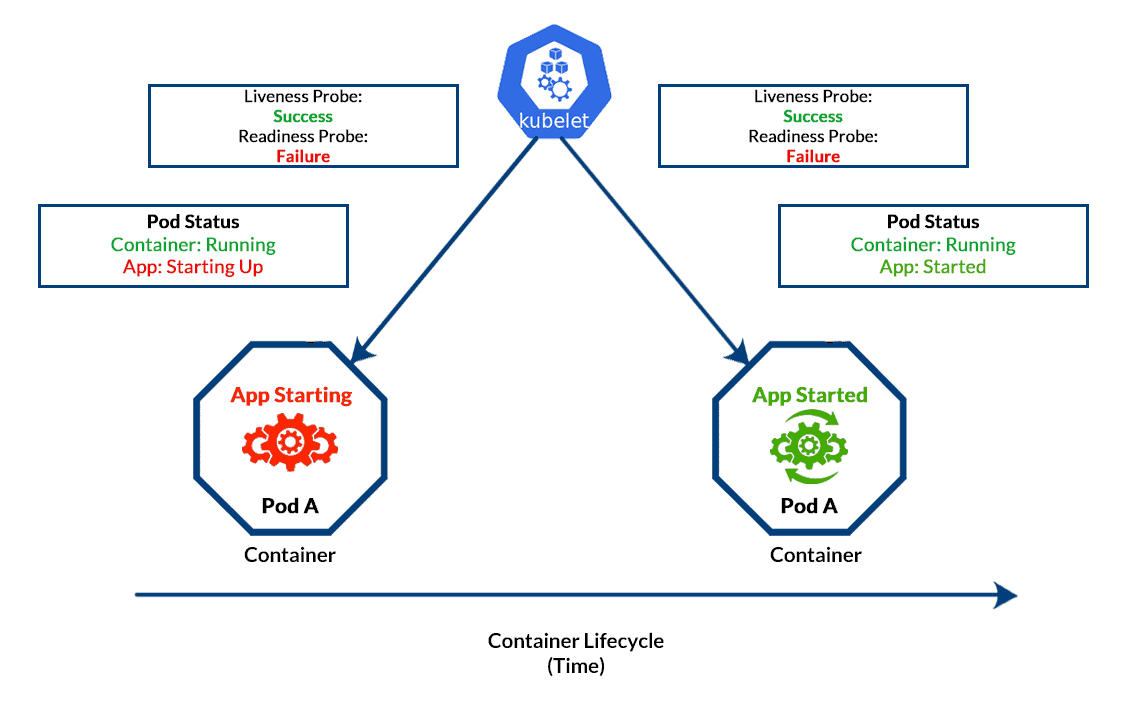
Day 15: Health Checks, Multi-Container Patterns, Jobs, and CRDs
Objective: Learn about Kubernetes health checks, multi-container patterns, Jobs, and Custom Resource Definitions (CRDs).
Action Plan:
- Study Liveness and Readiness Probes for application health monitoring.
- Learn about multi-container patterns like Sidecar, Ambassador, and Adapter.
- Understand how to configure Jobs and CronJobs for batch processing.
- Explore Custom Resource Definitions (CRDs) to extend Kubernetes APIs.
What to Focus On:
- Health Checks: Liveness vs Readiness Probes.
- Multi-Container Patterns: Use cases for Sidecar, Ambassador, and Adapter containers.
- Jobs and CronJobs: One-time and scheduled task execution.
- CRDs: Extending Kubernetes with custom APIs.
Resources:
Knowledge Base Questions:
1. What is the purpose of a Liveness Probe?
A) To check if the application is ready to accept traffic.
B) To check if the application is running and healthy.
C) To scale Pods based on resource usage.
D) To configure network policies.
Answer: B) To check if the application is running and healthy.
Explanation: Liveness Probes determine if the application is running as expected.
2. What Kubernetes object schedules tasks to run at specific intervals?
A) Deployment
B) CronJob
C) StatefulSet
D) ReplicaSet
Answer: B) CronJob
Explanation: CronJobs schedule tasks to run periodically, similar to cron in Linux.
3. Which multi-container pattern is used to enhance Pod functionality with additional services?
A) Sidecar Pattern
B) Adapter Pattern
C) Ambassador Pattern
D) Replication Pattern
Answer: A) Sidecar Pattern
Explanation: The Sidecar Pattern is used to add auxiliary functionality like logging or monitoring to Pods.
4. What is a CRD in Kubernetes?
A) Custom Resource Deployment
B) Custom Resource Definition
C) Cluster Resource Definition
D) Container Resource Deployment
Answer: B) Custom Resource Definition
Explanation: CRDs extend Kubernetes APIs to define and manage custom resources.
5. What command is used to view all Jobs in a namespace?
A) kubectl get jobs
B) kubectl list jobs
C) kubectl describe jobs
D) kubectl show jobs
Answer: A) kubectl get jobs
Explanation: The kubectl get jobs command lists all Jobs in the specified namespace.
Sample Exam Question:
- Write a YAML manifest for a Pod with a livenessProbe that checks the /healthz endpoint every 10 seconds.
- Deploy a Pod using a multi-container pattern where one container fetches data and another container processes it.
- Write a YAML manifest for a Job that runs a busybox container to execute the command echo “Hello Kubernetes!”.
- Write a YAML manifest to define a CRD named example in the API group demo.example.com with a version v1.
Day 16: Multi-Container Patterns (Sidecar, Ambassador, Adapter, Init Containers)
Objective: Understand multi-container patterns and their use cases, including Sidecar, Ambassador, Adapter, and Init Containers.
Action Plan:
- Study Sidecar, Ambassador, and Adapter patterns for extending application functionality.
- Learn the role of Init Containers for setup tasks.
- Practice deploying a Pod with multiple containers.
What to Focus On:
- Sidecar Pattern: Adding complementary functionality (e.g., logging, proxying).
- Ambassador Pattern: Handling network communication with external systems.
- Init Containers: Pre-initialization tasks before the main container starts.
Resources:
Knowledge Base Questions:
1. What is the purpose of a Sidecar container?
A) To handle external communication for the main container.
B) To perform pre-initialization tasks before the main container starts.
C) To add additional functionality like logging or monitoring.
D) To manage storage for the main container.
Answer: C) To add additional functionality like logging or monitoring.
Explanation: Sidecar containers extend the functionality of the main container by providing auxiliary features.
2. What is the role of an Init Container?
A) To scale Pods dynamically.
B) To perform initialization tasks before the main container runs.
C) To handle traffic between Pods.
D) To monitor the health of a Pod.
Answer: B) To perform initialization tasks before the main container runs.
Explanation: Init Containers are executed sequentially before the main container starts.
3. Which pattern is used to offload complex network configurations from the main container?
A) Sidecar
B) Ambassador
C) Adapter
D) Init Container
Answer: B) Ambassador
Explanation: The Ambassador pattern handles complex network communication for the main container.
4. What happens if an Init Container fails?
A) The main container starts regardless.
B) The Pod restarts and retries the Init Container.
C) The Pod is deleted automatically.
D) The Pod moves to the Running state.
Answer: B) The Pod restarts and retries the Init Container.
Explanation: Kubernetes ensures all Init Containers complete successfully before starting the main container.
5. Which pattern is commonly used for injecting configuration into an application at runtime?
A) Adapter
B) Ambassador
C) Sidecar
D) Init Container
Answer: A) Adapter
Explanation: The Adapter pattern modifies or injects configuration into the main application container.
Sample Exam Question:
- Deploy a Pod using the Sidecar pattern where the sidecar container monitors the logs of the main container.
- Deploy a multi-container Pod using the Ambassador pattern to proxy traffic for the main application.
- Write a YAML manifest for a Pod with an Init container that downloads configuration files before the main container starts.
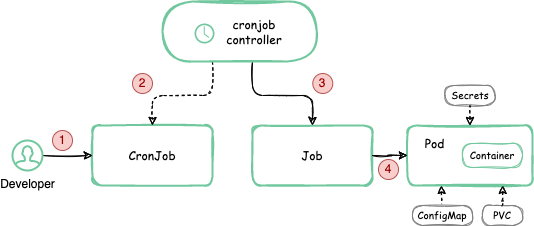
Day 17: Jobs and CronJobs
Objective: Learn to create and manage Jobs and CronJobs for batch and scheduled tasks in Kubernetes.
Action Plan:
- Understand the difference between Jobs and CronJobs.
- Create Jobs for one-time batch processing.
- Configure CronJobs for recurring tasks.
What to Focus On:
- Jobs: Ensure Pods run tasks to completion.
- CronJobs: Schedule tasks using Cron-like syntax.
- Hands-On: Practice creating and scheduling batch tasks.
Resources:
Knowledge Base Questions:
1.What is the purpose of a Job in Kubernetes?
A) To schedule recurring tasks.
B) To create persistent storage volumes.
C) To run tasks to completion.
D) To scale applications dynamically.
Answer: C) To run tasks to completion.
Explanation: Jobs run tasks to completion, ensuring that all required Pods finish their tasks.
2. What is the key feature of a CronJob?
A) It scales Pods automatically.
B) It runs recurring tasks at specified times.
C) It manages application rollouts.
D) It ensures application availability.
Answer: B) It runs recurring tasks at specified times.
Explanation: CronJobs use Cron-like syntax to schedule recurring tasks.
3. How do you define a CronJob schedule in Kubernetes?
A) Using a Pod definition.
B) Using a Job specification.
C) Using a schedule field in CronJob YAML.
D) Using a cron annotation.
Answer: C) Using a schedule field in CronJob YAML.
Explanation: The schedule field in the CronJob YAML specifies the timing for recurring tasks.
4. What happens if a CronJob fails?
A) The Pod retries until successful.
B) The Job is deleted automatically.
C) The failure is logged, and the next schedule is attempted.
D) The CronJob is paused.
Answer: C) The failure is logged, and the next schedule is attempted.
Explanation: CronJobs proceed with the next scheduled run regardless of previous failures.
5. Which command lists all Jobs in the cluster?
A) kubectl list jobs
B) kubectl get jobs
C) kubectl describe jobs
D) kubectl get cronjobs
Answer: B) kubectl get jobs
Explanation: The kubectl get jobs command lists all Jobs in the cluster.
Sample Exam Question:
- Write a YAML manifest for a Job named data-cleanup that runs a busybox container to delete temporary files.
- Deploy a CronJob that triggers a health check on an application every 5 minutes and logs the status.
- Verify the status of all Jobs triggered by a CronJob named backup-cron.
- Simulate a failure in a Job and verify how Kubernetes handles retries and failures.
- Use kubectl to delete a CronJob named old-backups and confirm its removal.
Day 18: API Deprecation and Migration
Objective: Learn about deprecated Kubernetes APIs and how to migrate to supported versions.
Action Plan:
- Understand Kubernetes API deprecation policies.
- Identify deprecated APIs in your manifests.
- Learn tools like kubectl deprecations to update API versions.
What to Focus On:
- Deprecation: Reasons for API removal and replacement.
- Migration: Update manifests to supported API versions.
Resources:
Knowledge Base Questions:
1. What does API deprecation in Kubernetes mean?
A) The API is immediately removed.
B) The API is marked for removal in future releases.
C) The API cannot be used in any cluster.
D) The API is disabled by default.
Answer: B) The API is marked for removal in future releases.
Explanation: Deprecated APIs are supported until their removal in a future Kubernetes release.
2. Which command identifies deprecated APIs in your manifests?
A) kubectl api-versions
B) kubectl api-resources
C) kubectl deprecations
D) kubectl version-check
Answer: C) kubectl deprecations
Explanation: Tools like kubectl deprecations highlight deprecated APIs in manifests.
3. What must you do before upgrading a cluster with deprecated APIs?
A) Delete the cluster.
B) Update all resources using deprecated APIs.
C) Migrate all resources to the default namespace.
D) Scale down all Deployments.
Answer: B) Update all resources using deprecated APIs.
Explanation: Resources using deprecated APIs must be updated to supported versions before upgrading the cluster.
4. Which resource version is replacing extensions/v1beta1 for Ingress?
A) networking.k8s.io/v1
B) core/v1
C) apps/v1
D) api/v1beta2
Answer: A) networking.k8s.io/v1
Explanation: Ingress moved from extensions/v1beta1 to networking.k8s.io/v1.
5. How do you verify the Kubernetes API server version?
A) kubectl get apis
B) kubectl version
C) kubectl describe api-server
D) kubectl api-versions
Answer: B) kubectl version
Explanation: The kubectl version command shows the Kubernetes server and client versions.
Sample Exam Question:
- Write a YAML manifest for a resource using the deprecated extensions/v1beta1 API and describe the migration steps to networking.k8s.io/v1.
- Migrate an Ingress resource from extensions/v1beta1 to networking.k8s.io/v1. Include the YAML changes required.
- Simulate a scenario where a CronJob fails after upgrading the cluster due to an API deprecation. Migrate it from batch/v1beta1 to batch/v1.
Day 19: Custom Resource Definitions (CRDs)
Objective: Learn about Custom Resource Definitions (CRDs) in Kubernetes and how to extend Kubernetes functionality using CRDs.
Action Plan:
- Understand what CRDs are and their purpose in Kubernetes.
- Study how CRDs allow users to define custom resources and APIs.
- Practice creating a CRD and using it in a cluster.
What to Focus On:
- CRDs Overview: Extend Kubernetes APIs for custom functionality.
- YAML Configuration: Defining and managing CRDs.
- Hands-On: Create a CRD for a custom resource and interact with it.
Resources:

Knowledge Base Questions:
1. What is the primary purpose of a CRD in Kubernetes?
A) To create custom resource types.
B) To scale applications automatically.
C) To manage Pods and Services.
D) To expose Pods to external traffic.
Answer: A) To create custom resource types.
Explanation: CRDs allow users to define and manage custom resources and extend Kubernetes functionality.
2. Which command lists all CRDs in a cluster?
A) kubectl list crds
B) kubectl get crds
C) kubectl describe crds
D) kubectl get customresources
Answer: B) kubectl get crds
Explanation: The kubectl get crds command lists all defined Custom Resource Definitions in the cluster.
3. What is required before you can use a custom resource in Kubernetes?
A) Create a Deployment for it.
B) Define a Custom Resource Definition (CRD) for it.
C) Expose it as a Service.
D) Scale it using a ReplicaSet.
Answer: B) Define a Custom Resource Definition (CRD) for it.
Explanation: CRDs define the schema and behavior of custom resources.
4. How do you delete a CRD from a cluster?
A) kubectl remove crd <name>
B) kubectl delete crd <name>
C) kubectl erase crd <name>
D) kubectl terminate crd <name>
Answer: B) kubectl delete crd <name>
Explanation: The kubectl delete crd command removes the specified CRD from the cluster.
5. What happens if a CRD is deleted while custom resources exist?
A) The resources are deleted automatically.
B) The resources remain but become unusable.
C) The cluster restarts.
D) The resources convert to standard Kubernetes resources.
Answer: B) The resources remain but become unusable.
Explanation: Custom resources persist but lose functionality without their corresponding CRD.
Sample Exam Question:
- Write a YAML manifest to define a CRD named example in the API group demo.example.com with the version v1.
- Delete a Custom Resource named example-instance without deleting its corresponding CRD.
- Explain the role of openAPIV3Schema in CRD validation.
- Write a YAML manifest to define a versioned CRD with two versions (v1 and v2) and demonstrate how to migrate from v1 to v2.
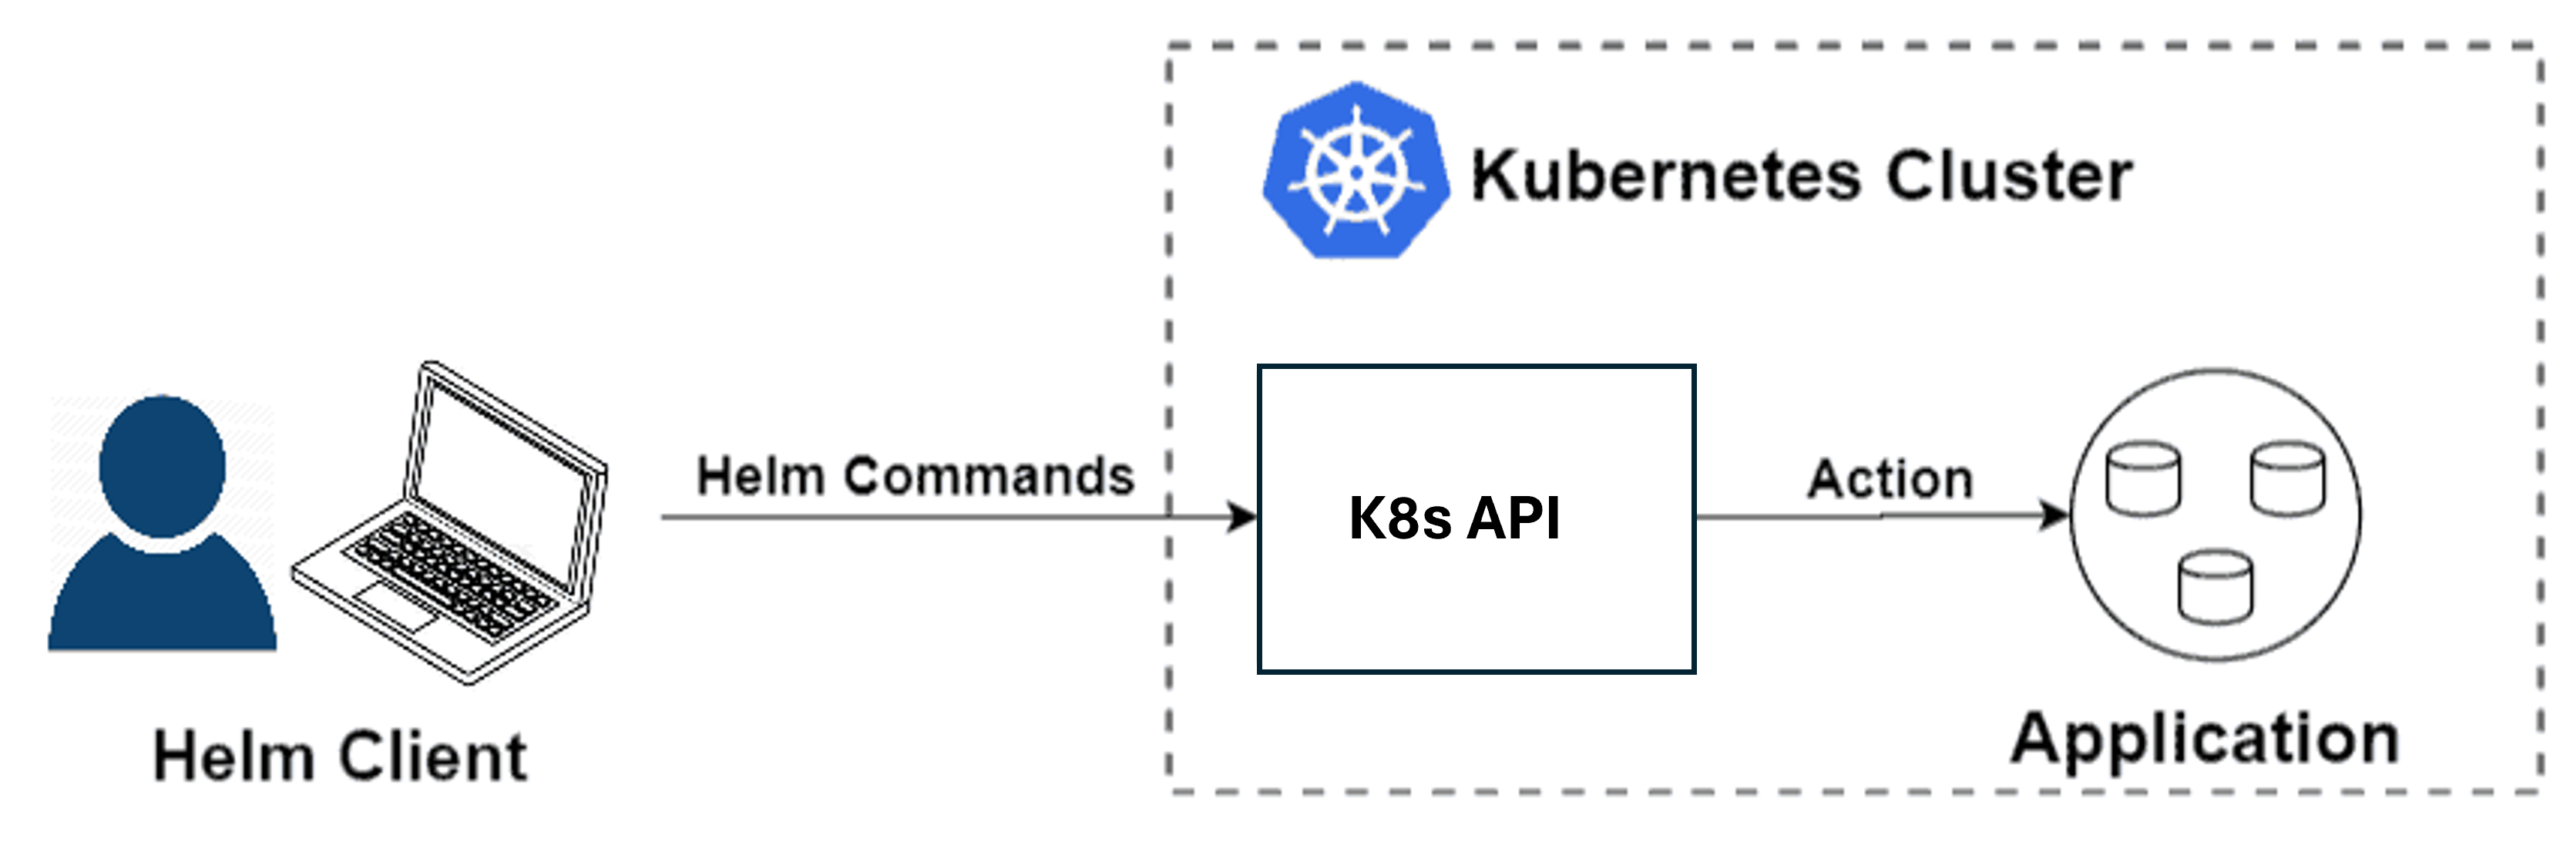
Day 20: Service Mesh (Istio) & Helm
Objective: Learn about service meshes with Istio and managing Kubernetes applications with Helm.
Action Plan:
- Study the purpose of a service mesh and how Istio simplifies service-to-service communication.
- Learn Helm basics, including charts, releases, and repositories.
- Deploy a sample application using Helm and Istio.
What to Focus On:
- Istio Overview: Traffic management, security, and observability.
- Helm Basics: Managing Kubernetes applications with reusable charts.
- Hands-On: Install Istio and Helm, then deploy a sample application.
Resources:

- Blog: Helm
Knowledge Base Questions:
1. What is the primary purpose of a service mesh like Istio?
A) To manage cluster storage.
B) To simplify service-to-service communication.
C) To deploy applications.
D) To scale applications dynamically.
Answer: B) To simplify service-to-service communication.
Explanation: Istio manages traffic, enhances security, and provides observability for service communication.
2. Which command installs Istio in a Kubernetes cluster?
A) istioctl install
B) kubectl apply -f istio.yaml
C) helm install istio
D) istio deploy
Answer: A) istioctl install
Explanation: The istioctl install command installs Istio components in a cluster.
3. What is Helm used for in Kubernetes?
A) Managing network policies.
B) Scaling Pods automatically.
C) Managing applications with reusable templates.
D) Monitoring application health.
Answer: C) Managing applications with reusable templates.
Explanation: Helm simplifies application deployment and management using pre-configured charts.
4. What is a Helm chart?
A) A pre-configured Kubernetes object.
B) A package of Kubernetes resources.
C) A service-to-service communication policy.
D) A resource quota definition.
Answer: B) A package of Kubernetes resources.
Explanation: A Helm chart is a collection of YAML templates for deploying Kubernetes applications.
5. How do you list all Helm releases in a cluster?
A) helm list
B) helm releases
C) kubectl get releases
D) kubectl list helm
Answer: A) helm list
Explanation: The helm list command shows all Helm releases in the cluster.
Sample Exam Question:
- Write a YAML manifest for a VirtualService that routes 80% of the traffic to v1 and 20% to v2 of a Deployment named reviews.
- Deploy an Istio Policy to apply a rate limit of 100 requests per minute to a specific service.
- Use Helm to deploy a chart for nginx with custom values for replica count and image tag.
- Verify the resources created by a Helm release named app-release.
Day 21: Exam and Interview Preparation
Objective: Consolidate your learning, practice with mock exams, and prepare for interview questions.
Action Plan:
- Review all key Kubernetes concepts (CKA and CKAD).
- Take at least two full-length mock exams.
- Prepare for common Kubernetes interview questions.
What to Focus On:
- Mock Exams: Practice under timed conditions to simulate the real test.
- Key Areas: Scheduling, storage, networking, security, and troubleshooting.
- Interview Prep: Be ready to answer practical and scenario-based Kubernetes questions.
Resources:
- Mock Exam: CKA & CKAD Practice Test
- Blog: Top Kubernetes Interview Questions
Knowledge Base Questions:
1. What command would you use to troubleshoot a failing Pod?
A) kubectl logs pod-name
B) kubectl get pods
C) kubectl delete pod pod-name
D) kubectl list pods
Answer: A) kubectl logs pod-name
Explanation: The kubectl logs command retrieves logs from a container to debug issues.
2. How do you ensure a Deployment maintains a minimum number of available Pods during an update?
A) Configure replicaCount.
B) Set minAvailable in the PodDisruptionBudget.
C) Use maxUnavailable in the Deployment spec.
D) Set minReadySeconds in the Pod spec.
Answer: C) Use maxUnavailable in the Deployment spec.
Explanation: The maxUnavailable field specifies how many Pods can be unavailable during an update.
3. What is the default DNS policy for a Pod in Kubernetes?
A) ClusterFirst
B) Default
C) HostNetwork
D) None
Answer: A) ClusterFirst
Explanation: ClusterFirst is the default DNS policy, prioritizing cluster DNS over external DNS.
4. What is the purpose of a Persistent Volume Claim (PVC)?
A) To configure network traffic for a Pod.
B) To request storage resources for a Pod.
C) To manage CPU and memory limits.
D) To expose a Pod externally.
Answer: B) To request storage resources for a Pod.
Explanation: PVCs allow Pods to request and use specific storage resources.
5. Which component ensures desired state reconciliation in Kubernetes?
A) Controller Manager
B) Scheduler
C) Kubelet
D) API Server
Answer: A) Controller Manager
Explanation: The Controller Manager ensures the cluster’s state matches the desired configuration.
Exam Checklist:
- ✅ Understand core Kubernetes concepts (Pods, Deployments, Services, etc.).
- ✅ Familiarise yourself with YAML configurations and kubectl commands.
- ✅ Practise troubleshooting scenarios and mock tests.
- ✅ Stay calm, manage your time well, and read questions carefully.
Conclusion
The Certified Kubernetes Administrator (CKA) and Certified Kubernetes Application Developer (CKAD) certifications are your gateway to mastering Kubernetes and excelling in the DevOps and cloud industry. By following this structured 21-day plan, you can break down the vast syllabus into manageable segments, ensuring focused learning and sufficient hands-on practice.
These certifications not only validate your skills but also open doors to high-paying roles like DevOps Engineer, Kubernetes Specialist, and Cloud Consultant. With consistent effort, strategic preparation, and the right resources, you can confidently tackle these exams and stand out as a Kubernetes expert in your field.
Related/References
- Subscribe to our YouTube channel on “Docker & Kubernetes”
- Docker & Certified Kubernetes Administrator (CKA) Training
- CKA/CKAD Exam Questions & Answer
- Kubernetes Monitoring: Prometheus Kubernetes & Grafana Overview
- How To Setup A Three Node Kubernetes Cluster For CKA: Step By Step
Join FREE Masterclass of Kubernetes
Discover the Power of Kubernetes, Docker & DevOps – Join Our Free Masterclass. Unlock the secrets of Kubernetes, Docker, and DevOps in our exclusive, no-cost masterclass. Take the first step towards building highly sought-after skills and securing lucrative job opportunities. Click on the below image to Register Our FREE Masterclass Now!

![Microsoft Agentic AI Business Solutions Architect [AB-100] | K21 Academy](https://test.k21academy.com/wp-content/uploads/2025/11/Microsoft-Agentic-AI-Business-Solutions-Architect-AB-100-Exam-Overview1.png)