


![]()
In today’s fast-paced development environments, where efficiency is key, Continuous Integration and Continuous Deployment (CI/CD) have become the backbone of modern software delivery. As a result, Kubernetes, a leading container orchestration platform, has emerged as a powerful tool for deploying and managing containerized applications at scale. At the same time, CircleCI, a popular CI/CD platform, integrates seamlessly with Kubernetes, enabling developers to automate the entire build, test, and deployment pipeline.
In this blog, we’ll explore:
Let me provide a brief introduction to CI/CD and Kubernetes to ensure everyone is on the same page.
Introduction to CI/CD and Kubernetes
CI/CD stands for Continuous Integration and Continuous Deployment, a methodology that encourages developers to integrate code into a shared repository multiple times a day. Each integration is automatically verified by an automated build, allowing teams to detect problems early and improve software quality.
Kubernetes is an open-source platform designed to automate the deployment, scaling, and operation of application containers. Its ability to simplify the management of complex applications makes it an ideal environment for implementing CI/CD practices, providing the scalability and automation that modern development workflows demand.
What is CircleCI?
CircleCI is a continuous integration and continuous delivery (CI/CD) tool that helps software developers automate the process of building, testing, and deploying their code. When developers make changes to their code, CircleCI automatically runs a series of steps to ensure everything is working correctly before the code is merged into the main project. Compared to other CI/CD tools, CircleCI is known for its ease of use and powerful integration capabilities, making it a preferred choice for many teams.

To know more about CircleCI, click here.
Why Choose CircleCI for Kubernetes?
CircleCI is a widely used CI/CD platform that integrates smoothly with various development workflows. Here’s why it’s a great choice for Kubernetes:
- Easy to Use: CircleCI is straightforward to set up and configure, making it easy for developers to create and manage CI/CD pipelines.
- Scalable: CircleCI can handle multiple build environments, making it suitable for projects of any size. As your project grows, CircleCI scales effortlessly to meet your needs.
- Seamless Integration: CircleCI integrates smoothly with Kubernetes, Docker, and other essential tools, allowing you to automate your build, test, and deployment processes efficiently. This integration is particularly beneficial for teams looking to streamline their workflows and reduce manual intervention.
To know more about Kubernetes, click here.
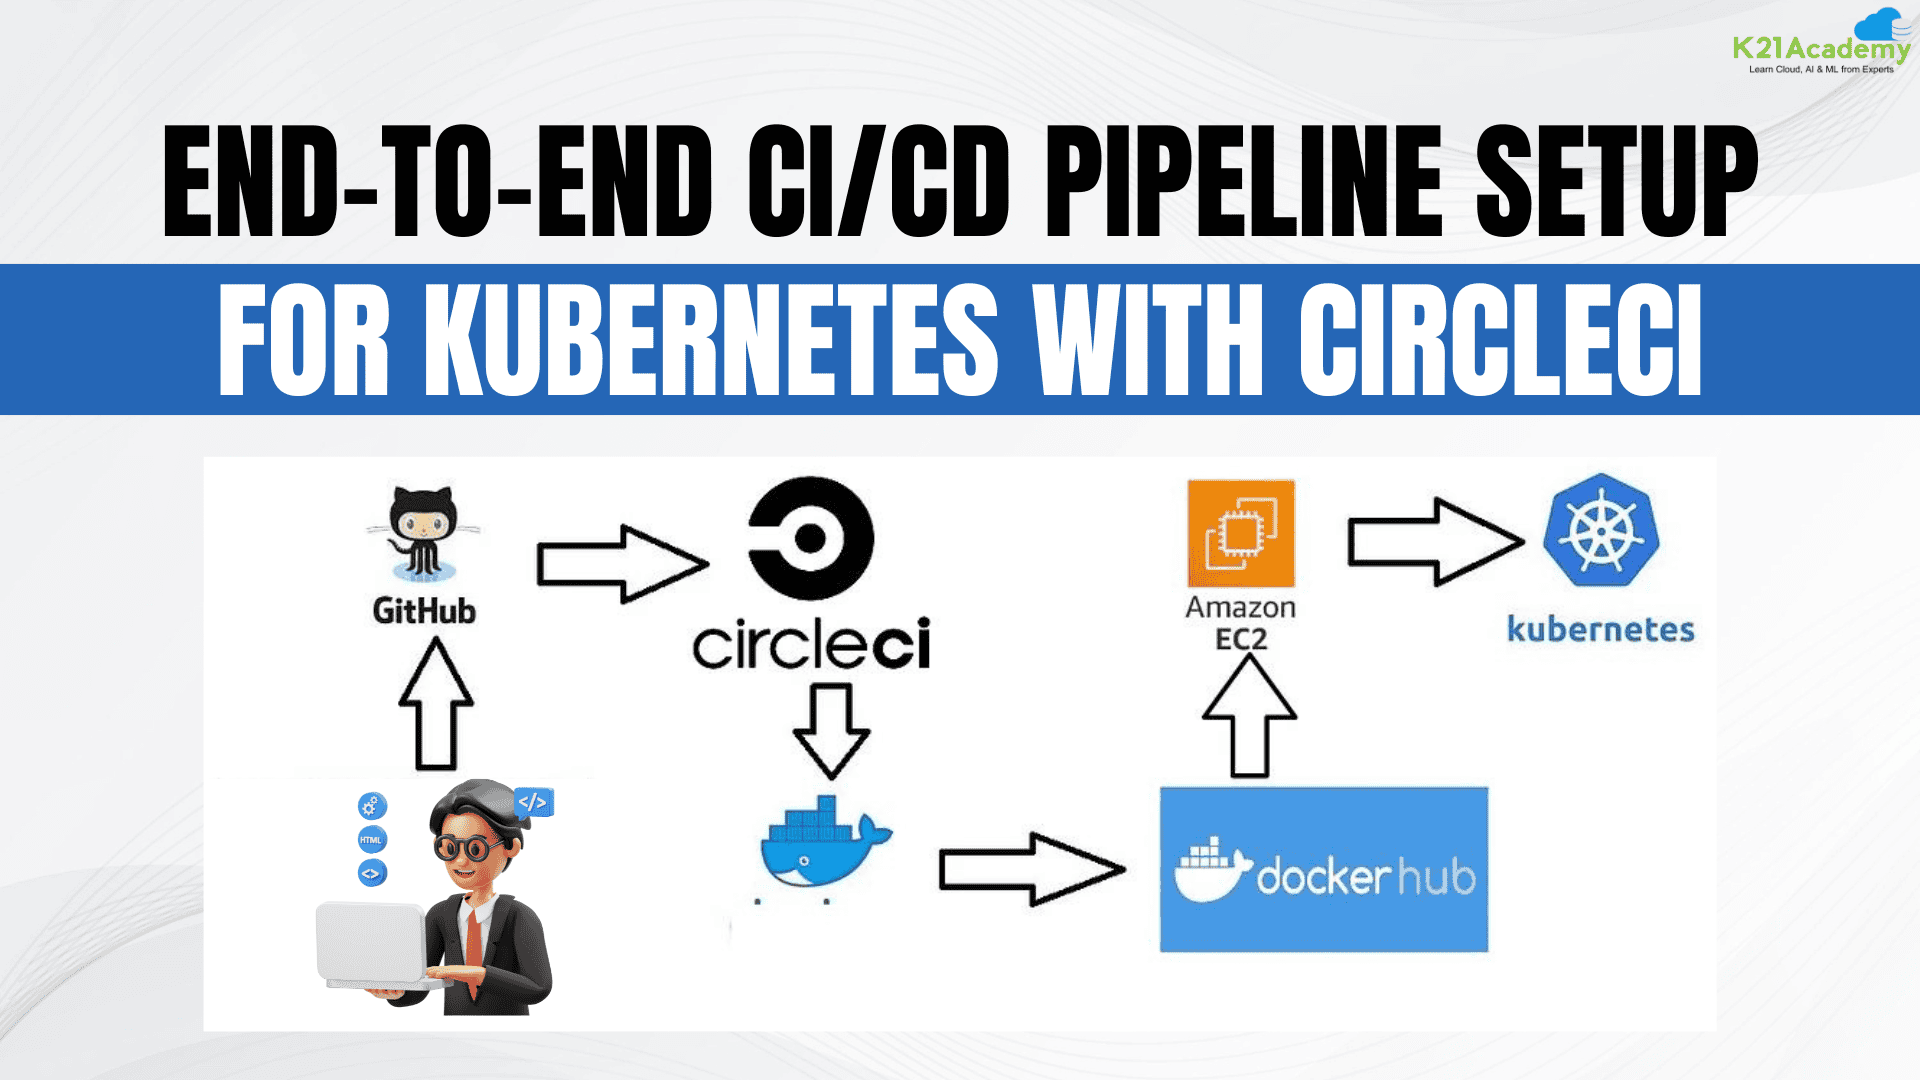
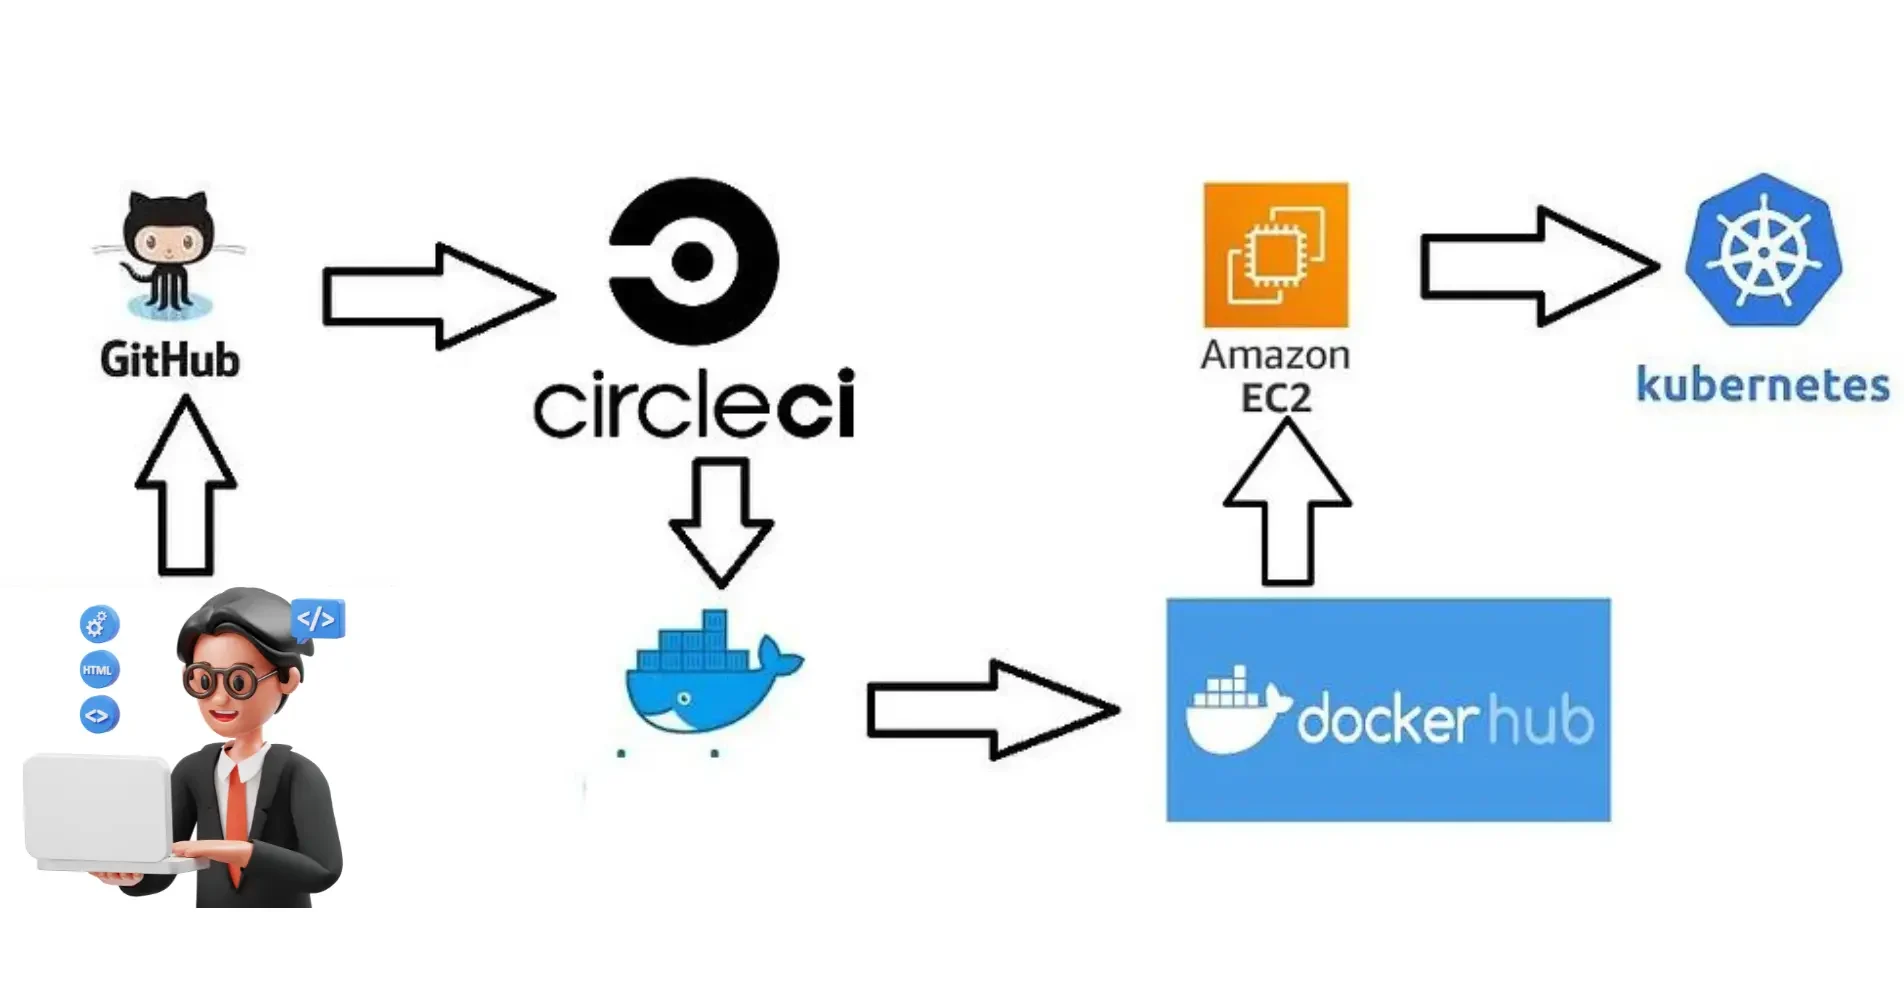
Setting Up CI/CD Deployment for Kubernetes Using CircleCI
This project involves using Git and GitHub for version control and collaboration. CircleCI automates the build, testing, and Docker containerization process. The Docker image is stored in Docker Hub and deployed on Amazon EC2. Finally, Kubernetes manages and orchestrates the deployment, ensuring scalability and reliability.
With a foundational understanding of CI/CD, Kubernetes, and CircleCI, let’s dive into the step-by-step process of setting up a CI/CD pipeline for a Kubernetes application.
Step 1: Setting Up Your Environment
Before you begin, make sure you have the following components in place:
- Kubernetes Cluster: To deploy your application, you’ll need a Kubernetes cluster. You can either set up a local cluster using Minikube or opt for a cloud-based Kubernetes service such as Google Kubernetes Engine (GKE), Amazon Elastic Kubernetes Service (EKS), or Azure Kubernetes Service (AKS).
- CircleCI Account: If you don’t already have a CircleCI account, sign up and connect it to your GitHub or Bitbucket account. This will allow CircleCI to automatically pull your code and start building your application.
- Docker Hub Account: Create a Docker Hub account to store the Docker images that CircleCI will build during the CI/CD process.
- kubectl: Finally, install kubectl, the command-line tool that lets you interact with your Kubernetes cluster.
Step 2: Create a Simple Application
Let’s assume you have a simple Node.js application you want to deploy. If you don’t have an application yet, you can create a basic one using the following steps:
- Create a New Directory: Open your terminal and create a new directory for your project.
mkdir my-k8s-app
cd my-k8s-app
- Initialize a Node.js Project: Initialize a new Node.js project.
npm init -y
- Create an
index.jsFile: Create a simple server in anindex.jsfile.// index.js const http = require('http'); const server = http.createServer((req, res) => { res.statusCode = 200; res.setHeader('Content-Type', 'text/plain'); res.end('Hello World\n'); }); server.listen(3000, () => { console.log('Server running at http://localhost:3000/'); }); - Create a
Dockerfile: Add aDockerfileto containerize your application.# Dockerfile FROM node:14 WORKDIR /app COPY package*.json ./ RUN npm install COPY . . EXPOSE 3000 CMD ["node", "index.js
Want to understand Dockerfile better? Click here.
Step 3: Push Your Code to a Git Repository
- Initialize a Git Repository: If you haven’t already, initialize a git repository in your project directory.
git init
git add .
git commit -m "Initial commit"
- Push to GitHub/Bitbucket: Create a new repository on GitHub or Bitbucket and push your code.
git remote add origin https://github.com/your-username/my-k8s-app.git
git push -u origin master
Step 4: Set Up CircleCI Configuration
- Create a
.circleciDirectory: In your project root, create a.circlecidirectory and add aconfig.ymlfile.mkdir .circleci touch .circleci/config.yml
- Add CircleCI Configuration: Open the
config.ymlfile and add the following configuration:version: 2.1 jobs: build: docker: - image: circleci/node:14 steps: - checkout - setup_remote_docker: version: 20.10.7 - run: name: Build Docker Image command: | docker build -t your-dockerhub-username/my-k8s-app:$CIRCLE_SHA1 . - run: name: Push Docker Image command: | docker login -u $DOCKERHUB_USERNAME -p $DOCKERHUB_PASSWORD docker push your-dockerhub-username/my-k8s-app:$CIRCLE_SHA1 deploy: docker: - image: circleci/python:3.8 steps: - checkout - setup_remote_docker: version: 20.10.7 - run: name: Install kubectl command: | curl -LO "https://storage.googleapis.com/kubernetes-release/release/$(curl -s https://storage.googleapis.com/kubernetes-release/release/stable.txt)/bin/linux/amd64/kubectl" chmod +x ./kubectl mv ./kubectl /usr/local/bin/kubectl - run: name: Deploy to Kubernetes command: | kubectl set image deployment/my-k8s-deployment my-container=your-dockerhub-username/my-k8s-app:$CIRCLE_SHA1
-
- Build Job: This job builds the Docker image of your application and pushes it to Docker Hub.
- Deploy Job: This job updates your Kubernetes deployment with the new Docker image
Step 5: Set Up Environment Variables in CircleCI
- Navigate to Project Settings: Go to your project in CircleCI and navigate to Project Settings > Environment Variables.
- Add Environment Variables: Add the following environment variables:
DOCKERHUB_USERNAME: Your Docker Hub username.DOCKERHUB_PASSWORD: Your Docker Hub password.
Step 6: Create Kubernetes Deployment Configuration
- Create a Deployment YAML: In your project directory, create a
k8s-deployment.yamlfile.apiVersion: apps/v1 kind: Deployment metadata: name: my-k8s-deployment spec: replicas: 2 selector: matchLabels: app: my-k8s-app template: metadata: labels: app: my-k8s-app spec: containers: - name: my-container image: your-dockerhub-username/my-k8s-app:latest ports: - containerPort: 3000 - Deploy to Kubernetes: Apply this deployment to your Kubernetes cluster using
kubectl.kubectl apply -f k8s-deployment.yaml
This command will create a deployment in Kubernetes that uses the Docker image stored in Docker Hub.
Step 7: Push Changes and Trigger the Pipeline
- Commit and Push Changes: Commit your CircleCI configuration and Kubernetes deployment YAML file, then push it to your repository.
git add .
git commit -m "Add CircleCI configuration and Kubernetes deployment"
git push origin master
- Monitor CircleCI Pipeline: Once you push your changes, CircleCI will automatically trigger the pipeline. You can monitor the build and deployment process on the CircleCI dashboard.
Step 8: Verify the Deployment
- Check Kubernetes Pods: After the deployment, check the status of your pods in Kubernetes to ensure they are running.
kubectl get pods
- Access Your Application: Depending on your Kubernetes setup, you may need to expose your service to access your application. For example, using a NodePort or LoadBalancer service.
apiVersion: v1 kind: Service metadata: name: my-k8s-service spec: selector: app: my-k8s-app ports: - protocol: TCP port: 80 targetPort: 3000 type: NodePort - Apply the Service Configuration:
kubectl apply -f k8s-service.yaml
Now you should be able to access your application using the external IP provided by your Kubernetes service.
Conclusion
This blog provided a clear path to setting up a CI/CD pipeline for Kubernetes using CircleCI. By following these steps, you should be able to automate the building, testing, and deployment of your applications to a Kubernetes cluster, ensuring continuous delivery of updates with minimal manual intervention.
Remember, you can extend and modify this pipeline to fit your specific needs as your project grows. The key is to start simple and gradually incorporate more advanced features and best practices as you become more comfortable with CircleCI and Kubernetes.
Frequently Asked Questions
What is CircleCI?
CircleCI is a continuous integration and continuous delivery (CI/CD) platform that automates the process of software development, testing, and deployment. It allows developers to build, test, and deploy their code automatically, ensuring faster delivery cycles and higher software quality.
Why should I use CircleCI for Kubernetes deployments?
CircleCI simplifies the automation of the entire CI/CD pipeline for Kubernetes. It integrates well with Kubernetes, allowing seamless deployment of applications, automated testing, and scaling, which enhances development efficiency and reduces the risk of errors.
How do I configure CircleCI for Kubernetes deployments?
ou need to create a .circleci/config.yml file in your repository, define jobs for building Docker images, testing the application, and deploying to the Kubernetes cluster. You also need to set up environment variables and secrets in CircleCI for Kubernetes credentials and other configurations.
What are some common issues when deploying to Kubernetes using CircleCI?
Common issues include misconfigurations in the config.yml file, incorrect Kubernetes credentials, network connectivity problems between CircleCI and the Kubernetes cluster, and failed Docker image builds due to incorrect Dockerfile syntax or dependencies.
How do I secure Kubernetes deployments in CircleCI?
Security best practices include storing sensitive information like Kubernetes credentials and API keys in CircleCI's environment variables or secrets manager, using role-based access control (RBAC) in Kubernetes, and regularly auditing your CircleCI configuration for vulnerabilities.
Related/References
- Terraform Beginner’s Guide: Everything You Should Know
- Ansible for Beginners’: Step By Step Activity Guides/Hands-On Lab Exercise
- How to create CI CD Pipeline Jenkins Step by Step Guide
- Azure Pipelines | Uses | It’s Advantages
- Azure Pipelines vs Jenkins
Next Task For You
Begin your journey towards becoming a DevOps expert and significantly increase your earning potential by landing a high-paying job.
Join our FREE CLASS to learn about DevOps roles and responsibilities, job opportunities in the market, and the essential studies, hands-on labs, and projects you must complete to secure your dream job.
Click the image below to register for our FREE class on Mastering DevOps on Cloud: How to Build In-Demand Skills and Land High-Paying Jobs.

![Microsoft Agentic AI Business Solutions Architect [AB-100] | K21 Academy](https://test.k21academy.com/wp-content/uploads/2025/11/Microsoft-Agentic-AI-Business-Solutions-Architect-AB-100-Exam-Overview1.png)