

![]()
We are going to discuss how to create a Windows Azure Virtual Machine and connect to it.
The following sections have been covered in this blog:
- Introduction
- Pre-Requisite
- How to Install a Virtual Machine
- How to Connect to the Virtual Machine
- Connect from Windows PC
- Connect from MAC (RDP On Mac)
- Reset Password for Windows Instance
- Deleting Resources/Cleanup Resources
- Troubleshooting Section
Introduction
Azure Virtual Machines (VM) is one of several types of on-demand, scalable computing resources that Azure offers. Typically, you choose a VM when you need more control over the computing environment than the other choices offer. This article gives you information about what you should consider before you create a VM, how you create it, and how you manage it.

An Azure VM gives you the flexibility of virtualization without having to buy and maintain the physical hardware that runs it. However, you still need to maintain the VM by performing tasks, such as configuring, patching, and installing the software that runs on it.
Azure virtual machines can be used in various ways. Some examples are:
- Development and test – Azure VMs offer a quick and easy way to create a computer with specific configurations required to code and test an application.
- Applications in the cloud – Because demand for your application can fluctuate, it might make economic sense to run it on a VM in Azure. You pay for extra VMs when you need them and shut them down when you don’t.
- Extended data center – Virtual machines in an Azure virtual network can easily be connected to your organization’s network.
- The number of VMs that your application uses can scale up and out to whatever is required to meet your needs.
Note: Stop the Virtual Machine if you are not using the machine.

Pre-Requisite
- An Azure Cloud Account ( you can learn how to create free azure cloud account from our previous blog.)
How to Create a Virtual Machine
- Sign in to the Azure portal (https://portal.azure.com).

Note: Please make sure you have a subscription before doing all this. If you created a free account for the first time, you’ll already have a FREE TRIAL subscription for 1 month. - From the All services blade, search for and select Virtual machines, and then click + Add and choose +Virtual machine.


- Enter the following values:
Subscription: Select your Azure subscription
Resource group: Enter a new resource group name (Note: If this is the first time you are creating any resource then select Create New to create a new resource group)
Virtual Machine name: It should be a unique name throughout the Azure network.
Region: Select an Azure location, such as Central India, East US, etc


- Select inbound port

- Switch to the Monitoring Tab, and select the following setting:

- Leave the remaining defaults and then click the Review + Create button at the bottom of the page.

- Once Validation is passed click the Create button. It can take anywhere from five to seven minutes to deploy the virtual machine.

- You will receive updates on the deployment page and via the Notifications area (the bell icon in the top menu).

How to Connect to the Virtual Machine
-
- Search for demovm and select your new virtual machine.

Note: You could also use the Go to Resource link on the deployment page or the link to the resource in the Notification area.
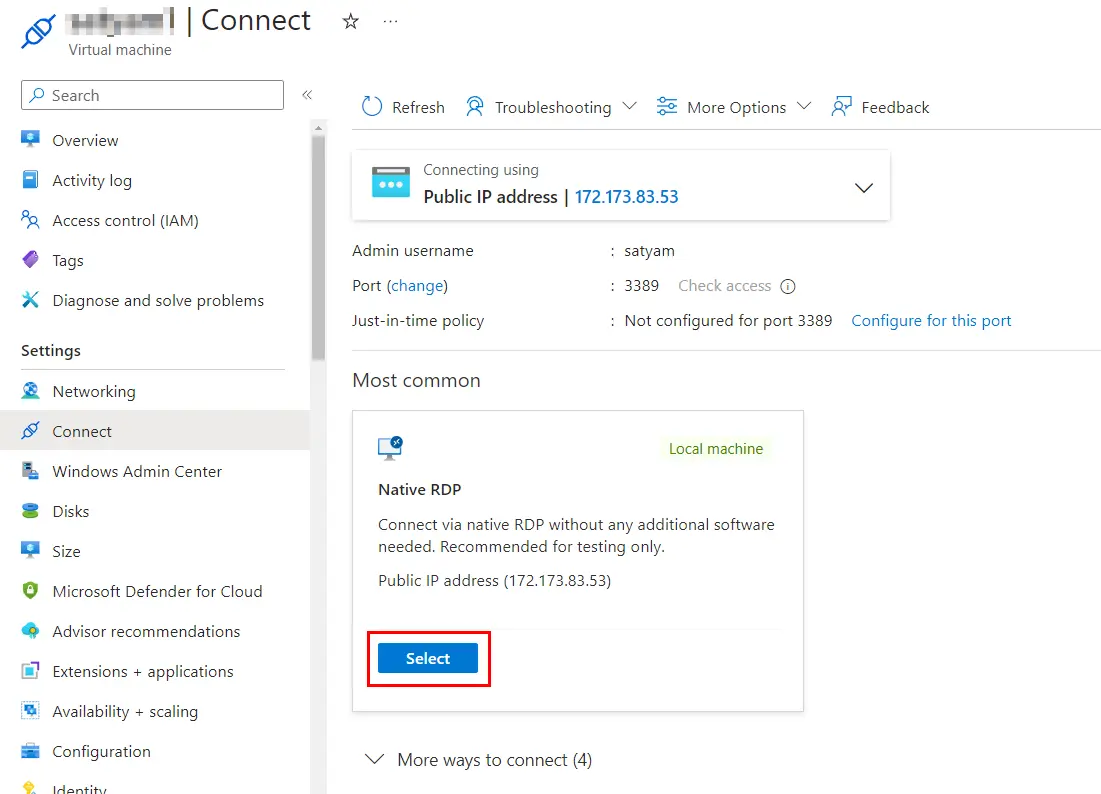
- On the virtual machine Overview blade, click the Connect button and choose RDP.

Note: The following directions tell you how to connect to your VM from a Windows computer. On a Mac, you need an RDP client such as this Remote Desktop Client from the Mac App Store, and on a Linux computer, you can use an open-source RDP client.
- Search for demovm and select your new virtual machine.
Connect from Windows PC
- If you are using a Windows PC, then follow the below steps else you can skip this section.
Note: The connection screen will look like this from now onwards. You can proceed in the same way as usual.
- In the Connect to Virtual Machine page, keep the default options to connect with the public IP address over port 3389 and click Download RDP File.
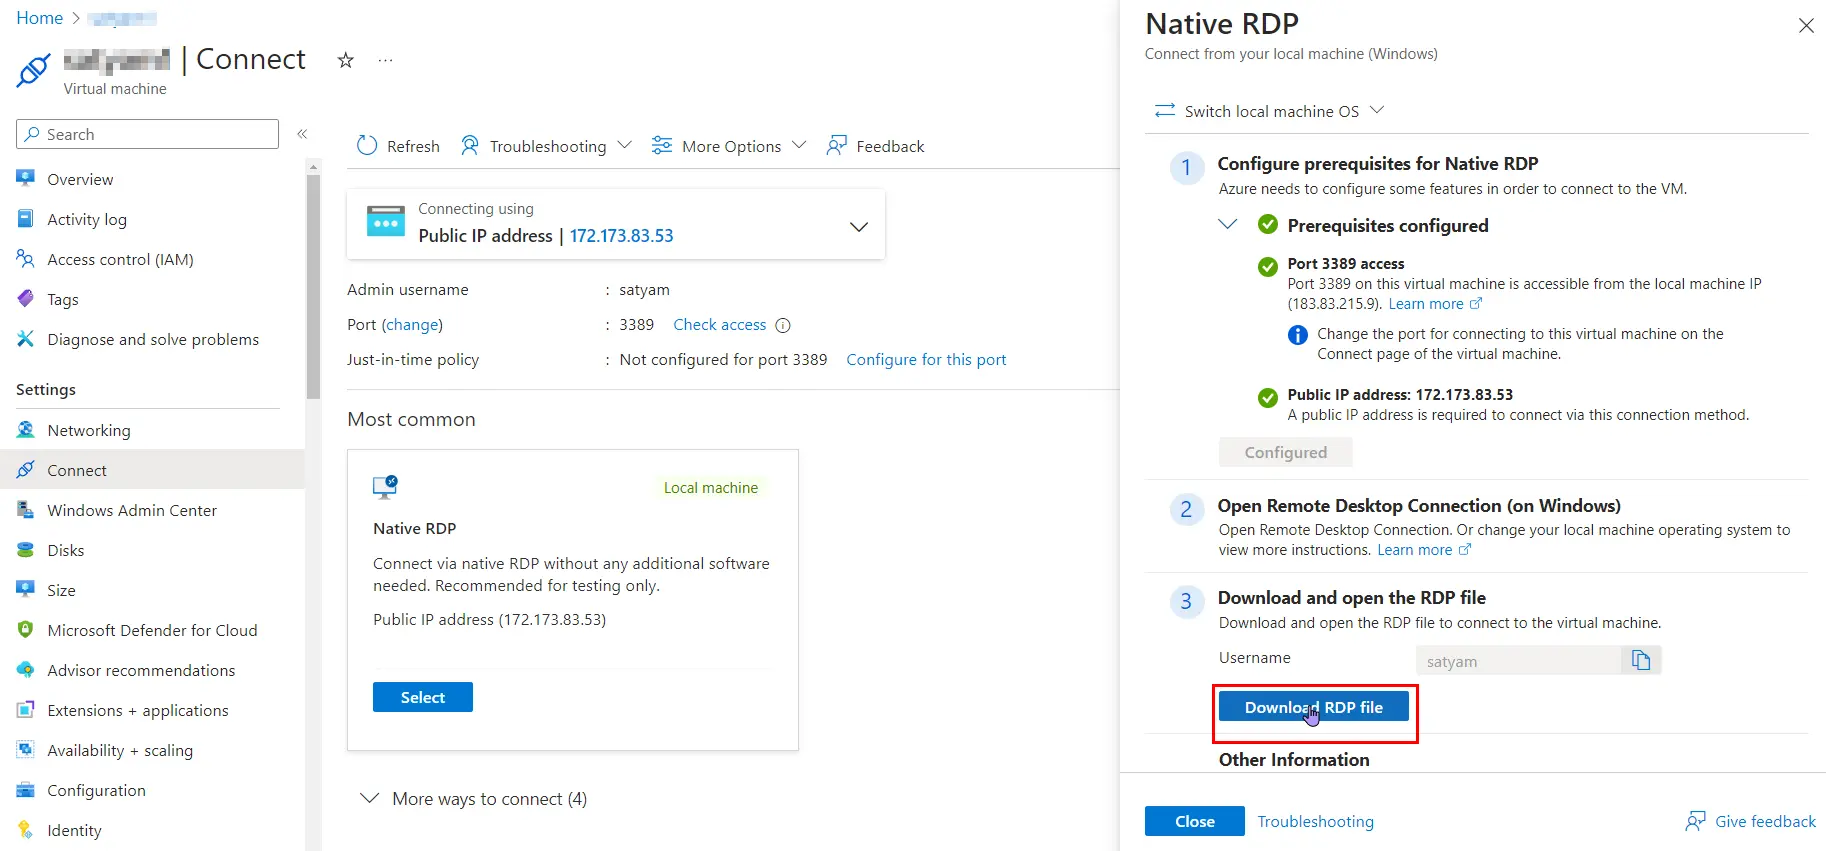
- Open the downloaded RDP file and click Connect when prompted.

- In the Windows Security window, Provide the username and the password. Click OK to connect.

- You may receive a certificate warning during the sign-in process. Click Yes to create the connection and connect to your deployed VM. You should connect successfully.

Connect from MAC (RDP On Mac)
If you are using MAC, then follow the below steps you can skip this section.
- In the Search box, type RDP, and from results choose the RDP app.

- Click on Get

- Open the app and click on Add PC.

- Give the PC Name (Host Name or IP Address)

- Now Add a User Account by giving the Username and Password and click on Add.

- Now your remote desktop is working.

Thus, we have successfully connected to the Windows Machine on Mac and configure VM Windows instance
Reset Password for Windows Instance
In this section, we will be providing detailed steps to reset the password of the Windows Instance
- First, you need to log in to the Windows instance.

- Open the Control Panel

- Under User Accounts, click on Change Account Type

- Click on the Administrator account.

- Click on Change Password.

- In order to change the password, first type the old password of the Windows Instance, then new password and then finally confirm the new password. Then click on Change password.

Note: For old password, you have to give the password of the Windows Instance with the help of which you logged in to the instance. Then you have to type a new password and confirm new password by typing it again. You can type any password of your choice for the new password. You can also type a hint for your password if you want. - Now disconnect from the Windows Instance. By clicking on Start button> Power > Disconnect.

- Now in order to connect to the instance again, search for RDP in the Start menu and open it.

- Now copy the Public IP of the Windows Instance and paste it here and click on Connect

- Now enter the new password that you had reset.

- Click on Yes.

- You will be logged in to the Windows Instance again.

We have successfully reset the password of the Windows Instance and logged back into the Instance using the new password
Deleting Resources/Cleanup Resources
In this section, we are going to explain how you can delete the Resources which you created. After completing Labs, we need to delete the resources to prevent cost and use of services in the Azure cloud.
Note: If you want to delete the whole resource group, it will save your whole cost because there will be no resource available on the portal.
- Go to Resource group, select your Resource group, and on Top right
 Click on Delete Resource group and it will prompt to delete resource group, just fill the name and click on Delete.
 If you want to delete your Virtual machine then Go to Virtual machine and click on Delete on the top right.
 Troubleshooting Section
Below are some issues faced while creating the Virtual Machine.
1. Not able to connect to RDP
Issue: Sometimes we may face this kind of issue which may be due to one of the reasons mentioned in the screenshot
 Cause:
- This error can occur due to your laptop it blocking the outgoing traffic of port 3389, there may be a Windows Defender, or
- The laptop you are using is maybe your office laptop so they don’t allow the traffic to go outside, or
- You have enabled some VPN devices on your local system.
- Your firewall is preventing the traffic from the outgoing port, or
- This can be due to the backend side of Microsoft.
Fix:
- For cause no 1: Refer to section 2
- For cause no 2. Use a personal laptop.
- For cause no 3. Turn off the VPN.
- For cause no 4. You need to create the VM again.
2. Not able to connect to RDP due to 3389 port error
Issue: Sometimes we may face this kind of issue if we haven’t selected the 3389 port mentioned in the screenshot
 Fix: Try the following to resolve this issue:
- Add an inbound network security group rule with destination port 3389.

- Select the option on services as RDP and then click on “add”

- A security rule will get created and then you can connect to RDP

3. RDP displays a Black Screen
Issue: Sometimes we may face this kind of issue that RDP displays a black screen instead of the desktop.
 Cause: This error is caused by RDP’s old Version or you are not logged in as Administrator or the server is over-utilized.
Fix: Try the following to resolve this issue:
- Check the console output for additional information. To get the console output for your instance using the Azure portal, select the instance, and then choose Actions, Monitor and troubleshoot, and Get system log.
- Verify that you are running the latest version of your RDP client.
- If the server is running a full-screen application, it might have stopped responding. Use Ctrl+Shift+Esc to start Windows Task Manager, and then close the application.
- If the server is over-utilized, it might have stopped responding. To monitor the instance using the Amazon EC2 console, select the instance and then select the Monitoring tab.
- If you are using Remote Desktop Connection, try starting it with the /admin option as follows.
mstsc /v:instance /admin
4. Forgot login password for Virtual Machine
Issue: can’t remember your login password for the Virtual Machine.
 Fix: Here are the steps you can perform:
- Go to the Azure portal and navigate to the virtual machine for which you want to reset the password.
- scroll down and Click on the “Reset password” button in the toolbar.
- Add the new password you want to create and click on update.

- Once the password has been reset, you can use it to log in to your virtual machine.
Next Task For You
Begin your journey toward Mastering Azure Cloud and landing high-paying jobs. Just click on the register now button on the below image to register for a Free Class on Mastering Azure Cloud: How to Build In-Demand Skills and Land High-Paying Jobs. This class will help you understand better, so you can choose the right career path and get a higher paying job.
![Microsoft Agentic AI Business Solutions Architect [AB-100] | K21 Academy](https://test.k21academy.com/wp-content/uploads/2025/11/Microsoft-Agentic-AI-Business-Solutions-Architect-AB-100-Exam-Overview1.png)