

![]()
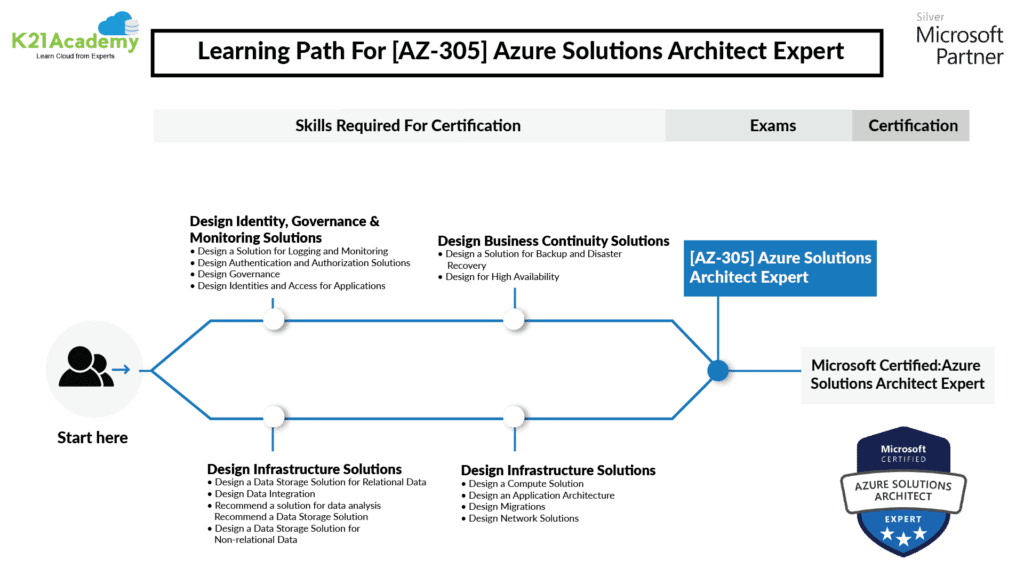
Here we cover a walkthrough of the Step-By-Step Activity Guides of the Azure Solutions Architect Expert Training that you must perform to learn this course. If you need to learn more about the certification, you can visit our blog about Microsoft Azure Solution Architect Expert[AZ-305].
The AZ-305 exams mesh with those who advise collaborators and translate business requirements into scalable, protected, and well-founded solutions.
The Step-By-Step Activity Guides for Microsoft Azure Solutions Architect Expert Training program walkthrough will prepare you thoroughly for the AZ-305 certifications. There are 25+ hands-on labs for AZ305.
AZ-305 Hands-On Lab
- Register For A Free Azure Cloud Account
- Entra ID Synchronization with On-Premise Active Directory using Entra Connect
- Create Virtual Machine
- Implementing user-assigned managed identities for Azure resources
- Role Based Access Control
- Implementing Custom Role Based Access
- Governance and Azure Blueprints & Policy
- Create a Virtual Machine with Custom VM Image
- How to Encrypt A Virtual Machine Disk
- Deploying and Testing Virtual Machine Scale Sets
- Deploy containers to Azure Container Instances (ACI)
- Deploy containers to Azure Kubernetes Service (AKS) clusters
- Create an Application Gateway
- Creating Virtual Network using Azure Portal
- Create & delete Subnet in Virtual Network
- Create and Configure VNet Peering
- Create an Azure Bastion host
- VNet-VNet VPN Gateway Connection
- Deploy App service & Traffic manager
- Create an Azure Front Door
- Create & manage Storage Account & access it
- Exploring Monitoring Capabilities of VMSS
- Network Watcher In Azure
- VM Replication via Azure Site Recovery
- Azure Resource Migration Across Regions
- Case Study: Azure Database migration case study
- Case Study: Building a resilient IAAS Architecture
- Case Study: Building Microservice Architecture
AZ-305: Designing Microsoft Azure Infrastructure Solutions
Here is the Learning Path for AZ-305 Azure Solutions Architect Expert and the list of Hands-On labs that will help you clear the certification.
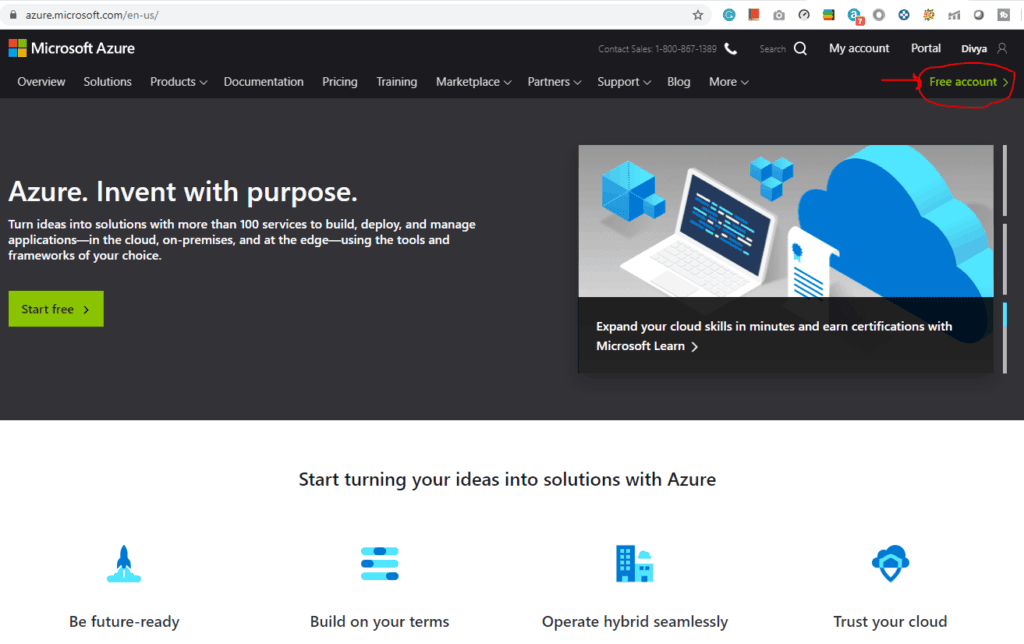
1) Register For A Free Azure Cloud Account
Creating an Azure free account is one way to access Azure services. When you start using Azure with a free account, you get USD2001 credit to spend in the first 30 days after you sign up. In addition, you get free monthly amounts of two groups of services: popular services, which are free for 12 months, and more than 25 other services that are free always.
2) Syncing Entra ID with On-Premise Active Directory Using Entra Connect
In the field of Solution Architect, the Idenities are the first thing to handle. This lab guides you through the process of configuring and synchronizing your on-premises Active Directory with Entra ID (Azure Active Directory) using Entra Connect (formerly AD Connect), enabling seamless identity and access management across hybrid environments.

Key Steps:
-
- Install and configure the Entra Connect tool on your on-premises environment.
- Set up directory synchronization between your on-premises Active Directory and Entra ID.
- Customize synchronization settings to include specific organizational units (OUs) and attributes.
- Verify successful synchronization of users, groups, and attributes in the Azure portal.
- Test single sign-on (SSO) functionality for cloud applications using synchronized identities.
By the end of this lab, you will have successfully established a hybrid identity solution, ensuring smooth integration and management of identities across your on-premises and cloud environments.
3) Create Virtual Machine
This lab guides you through the process of creating a Windows Virtual Machine (VM) in Azure, enabling you to deploy and manage virtualized workloads in the cloud.
Key Steps:
- Access the Azure portal and navigate to the “Create a resource” section to select “Virtual Machine.”
- Configure basic settings, including VM name, region, size, and the Windows operating system image.
- Set up administrative credentials and network settings for the VM.
- Review and create the VM, then validate its deployment.
By the end of this lab, you will have successfully created a Windows Virtual Machine in Azure, gaining practical experience in deploying and configuring virtualized environments.
4) Implementing user-assigned managed identities for Azure resources
This lab guides you through the process of implementing user-assigned managed identities for Azure resources, enabling secure and seamless access to Azure services without the need for credentials.
Key Steps:
- Access the Azure portal and create a user-assigned managed identity.
- Assign the managed identity to an Azure resource, such as a Virtual Machine or App Service.
- Configure role-based access control (RBAC) permissions for the managed identity to access specific Azure services.
- Test the managed identity by retrieving secrets or connecting to services using the identity.
- Monitor and verify access activity through Azure logs and metrics.
By the end of this lab, you have successfully created and implemented a user-assigned managed identity, gaining practical experience in securing Azure resources with managed identities.
5) Role Based Access Control
This lab guides you through the process of designing a governance solution by implementing Role-Based Access Control (RBAC) in Azure, ensuring secure and structured access management for resources.

Key Steps:
- Access the Azure portal and navigate to the IAM (Identity and Access Management) blade.
- Define and create custom roles or use built-in roles based on specific access requirements.
- Assign RBAC roles to users, groups, or managed identities at the appropriate scope (subscription, resource group, or resource level).
- Test role assignments by verifying access permissions for assigned users or identities.
- Monitor and audit access activity using Azure Activity Logs to ensure governance policies are being followed.
By the end of this lab, you will have successfully implemented Role-Based Access Control (RBAC) and designed a governance solution, gaining practical experience in managing secure access to Azure resources.
6) Implementing Custom Role Based Access
This lab guides you through the process of implementing custom Role-Based Access Control (RBAC) roles in Azure, enabling precise and tailored access permissions for resources.

Key Steps:
- Access the Azure portal and navigate to the IAM (Identity and Access Management) blade.
- Design a governance solution by identifying specific access requirements and defining custom role permissions.
- Create a custom RBAC role using the Azure portal, Azure PowerShell, or Azure CLI.
- Assign the custom role to users, groups, or managed identities at the appropriate scope (subscription, resource group, or resource level).
- Test the custom role by verifying access permissions for assigned users or identities.
- Monitor and audit access activity using Azure Activity Logs to ensure governance policies are being followed effectively.
By the end of this lab, you will have successfully implemented custom RBAC roles, gaining practical experience in designing and managing precise access control solutions in Azure.
7) Governance and Azure Blueprints & Policy
This lab guides you through the process of creating and updating custom Role-Based Access Control (RBAC) roles using the Azure portal, enabling granular access control for Azure resources.

Key Steps:
- Design a governance solution by identifying specific permissions and creating a custom RBAC role in the Azure portal.
- Assign the custom role to users or managed identities and validate their access.
- Update the custom role to modify permissions as needed.
By the end of this lab, you will have successfully created and updated custom RBAC roles, gaining practical experience in managing precise access control in Azure.
Also Read: Microsoft Azure Governance: Azure Blueprints & Azure Policy
8) Create a Virtual Machine with Custom VM Image
This lab guides you through the process of creating a Virtual Machine (VM) using a custom VM image in Azure, enabling the deployment of pre-configured environments tailored to specific requirements.
Key Steps:
- Access the Azure portal and navigate to the “Create a resource” section to select “Virtual Machine.”
- Choose the custom VM image from the Shared Image Gallery or your existing storage account.
- Configure basic settings, including VM name, region, size, and networking options.
- Set up administrative credentials and additional custom configurations as needed.
- Review and create the VM, then validate its deployment using the custom image.
By the end of this lab, you will have successfully created a Virtual Machine using a custom image, gaining practical experience in deploying tailored environments in Azure.
9) How to Encrypt A Virtual Machine Disk
This lab guides you through the process of encrypting a Virtual Machine (VM) disk in Azure, ensuring enhanced security for your data at rest.

Key Steps:
- Access the Azure portal and navigate to the desired Virtual Machine’s settings.
- Enable disk encryption by configuring Azure Disk Encryption and selecting a Key Vault.
- Use the Key Vault to manage encryption keys, ensuring secure storage and access.
- Apply encryption to the VM’s OS and data disks and validate the encryption status.
By the end of this lab, you will have successfully encrypted a Virtual Machine disk, gaining practical experience in securing data at rest in Azure.
10) Deploying and Testing Virtual Machine Scale Sets
This lab guides you through the process of deploying and testing Virtual Machine Scale Sets (VMSS) in Azure, enabling scalable and high-availability solutions for your workloads.

Key Steps:
- Access the Azure portal and create a Virtual Machine Scale Set by configuring basic settings like region, VM size, and instance count.
- Attach a load balancer to distribute traffic across VM instances.
- Configure scaling policies to adjust the number of instances based on performance metrics.
- Deploy the scale set and validate its functionality by testing traffic distribution and scaling behavior.
By the end of this lab, you will have successfully deployed and tested a Virtual Machine Scale Set, gaining practical experience in creating scalable and resilient solutions in Azure.
11) Deploy containers to Azure Container Instances (ACI)
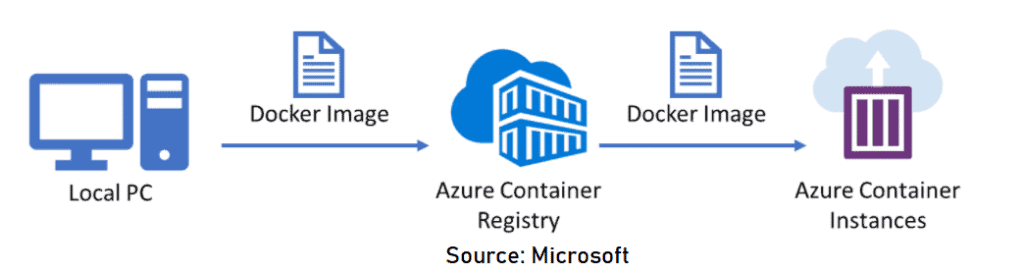
Key Steps:
- Access the Azure portal and create a new Azure Container Instance by specifying a container image from a registry (e.g., Azure Container Registry or Docker Hub).
- Configure resource settings, including CPU, memory, and networking options.
- Deploy the container and monitor its status through the Azure portal.
- Validate the deployment by accessing the containerized application via the public IP or DNS name.
By the end of this lab, you will have successfully deployed containers to Azure Container Instances, gaining practical experience in running containerized applications in Azure.
12) Deploy containers to Azure Kubernetes Service (AKS) clusters
This lab guides you through the process of deploying containers to Azure Kubernetes Service (AKS) clusters, enabling you to orchestrate and manage containerized applications at scale.

Key Steps:
- Access the Azure portal and create an AKS cluster, specifying cluster size and node configurations.
- Deploy a containerized application to the AKS cluster using Kubernetes manifests or Helm charts.
- Expose the application using Kubernetes services and configure networking options.
- Validate the deployment by accessing the application via the external IP or DNS name.
By the end of this lab, you will have successfully deployed containers to an AKS cluster, gaining practical experience in container orchestration and management using Kubernetes in Azure.
13) Create an Application Gateway
This lab guides you through the process of creating an Application Gateway in Azure, enabling secure and efficient load balancing for your web applications.

Key Steps:
- Access the Azure portal and create an Application Gateway by configuring basic settings like name, region, and resource group.
- Set up the frontend IP configuration, backend pool, and routing rules.
- Configure listeners and health probes to monitor backend endpoints.
- Validate the deployment by accessing the Application Gateway’s public IP or DNS name.
By the end of this lab, you will have successfully created an Application Gateway, gaining practical experience in managing web traffic and ensuring application reliability in Azure.
14) Creating Virtual Network using Azure Portal
This lab guides you through the process of creating a Virtual Network (VNet) using the Azure portal, enabling secure and organized communication between Azure resources.

Key Steps:
- Access the Azure portal and navigate to the “Create a resource” section to select “Virtual Network.”
- Configure basic settings, including VNet name, region, address space, and subnet details.
- Set up additional subnets and configure network security groups (NSGs) as needed.
- Review and create the Virtual Network, then validate its deployment.
By the end of this lab, you will have successfully created a Virtual Network, gaining practical experience in organizing and securing Azure resources.
15) Create & delete Subnet in Virtual Network
This lab guides you through the process of creating and deleting subnets within a Virtual Network (VNet) using the Azure portal, enabling efficient management of network segments for Azure resources.
Key Steps:
- Access the Azure portal and navigate to the Virtual Network where you want to manage subnets.
- Add a new subnet by specifying the name, address range, and optional configurations like network security groups (NSGs).
- Validate the new subnet and assign it to resources as needed.
- Delete an existing subnet by ensuring no resources are associated with it and confirming the deletion.
By the end of this lab, you will have successfully created and deleted subnets within a Virtual Network, gaining practical experience in managing network configurations in Azure.
16) Create and Configure VNet Peering
This lab guides you through the process of creating and configuring Virtual Network (VNet) peering in Azure, enabling seamless connectivity between VNets for resource communication.

Key Steps:
- Access the Azure portal and navigate to the first Virtual Network to initiate peering.
- Configure VNet peering by specifying the peer VNet and enabling options like gateway transit or forwarded traffic.
- Repeat the process on the peer VNet to establish a bidirectional connection.
- Validate the peering by testing resource communication between the VNets.
By the end of this lab, you will have successfully created and configured VNet peering, gaining practical experience in enabling secure and efficient connectivity between Azure VNets.
17) Create an Azure Bastion host
This lab guides you through the process of creating an Azure Bastion host, enabling secure and seamless RDP and SSH access to virtual machines without exposing them to the public internet.

Key Steps:
- Access the Azure portal and navigate to the Virtual Network where you want to deploy the Bastion host.
- Create an Azure Bastion resource by specifying the name, region, and Virtual Network.
- Configure the subnet for Azure Bastion, ensuring it uses the required name (
AzureBastionSubnet) and address range. - Validate the deployment and connect to a virtual machine using Azure Bastion.
By the end of this lab, you will have successfully created an Azure Bastion host, gaining practical experience in securing VM access in Azure.
18) VNet-VNet VPN Gateway Connection
This lab guides you through the process of creating a VNet-to-VNet VPN Gateway connection in Azure, enabling secure communication between two Virtual Networks over a private network.

Key Steps:
- Access the Azure portal and create a VPN Gateway for each Virtual Network, configuring gateway types and public IPs.
- Configure the local network gateway settings for each VNet to define the IP address range of the peer VNet.
- Establish a VPN connection by linking the two VPN Gateways and specifying the shared key.
- Validate the connection by testing resource communication across the Virtual Networks.
By the end of this lab, you will have successfully set up a VNet-to-VNet VPN Gateway connection, gaining practical experience in securely connecting Azure Virtual Networks.

Key Steps:
- Access the Azure portal and create an App Service by selecting the appropriate runtime, region, and resource group.
- Deploy your application to the App Service and validate its functionality.
- Create a Traffic Manager profile and configure the desired routing method (e.g., Priority, Performance, or Geographic).
- Add the App Service endpoints to the Traffic Manager profile and configure health checks.
- Validate the setup by accessing the application through the Traffic Manager’s DNS name and testing traffic distribution.
By the end of this lab, you will have successfully deployed an App Service and configured Traffic Manager, gaining practical experience in enhancing application availability and performance.
20) Create an Azure Front Door
This lab guides you through the process of creating an Azure Front Door, enabling global load balancing, fast content delivery, and enhanced application availability.

Key Steps:
- Access the Azure portal and create an Azure Front Door profile by specifying the name and resource group.
- Configure frontend hosts (custom domain or default Azure Front Door domain) for your application.
- Set up backend pools by adding your application endpoints and health probes for monitoring.
- Define routing rules to control how requests are distributed across backends.
- Validate the deployment by accessing your application through the Azure Front Door URL.
By the end of this lab, you will have successfully created an Azure Front Door, gaining practical experience in optimizing and securing global application delivery.
21) Create & manage Storage Account & access it
This lab guides you through the process of creating a container, uploading BLOBs, managing a storage account via Azure Storage Explorer, and configuring access with Access Keys and SAS Keys, enabling efficient storage management and secure access.

Key Steps:
- Access the Azure portal and create a Storage Account, specifying the storage type and redundancy options.
- Navigate to the Storage Account and create a container for storing BLOB data.
- Upload BLOBs (files) to the container using the Azure portal or Storage Explorer.
- Manage the Storage Account using Azure Storage Explorer to view, edit, or organize your data.
- Configure Access Keys and generate SAS Keys to control secure access to the Storage Account and its resources.
- Validate access by using the SAS Key or Access Key to interact with the container and BLOBs.
By the end of this lab, you will have successfully managed a Storage Account, gaining practical experience in BLOB storage, access management, and Azure Storage Explorer.
22) Exploring Monitoring Capabilities of VMSS
This lab guides you through the process of exploring the monitoring capabilities of Virtual Machine Scale Sets (VMSS) in Azure, enabling you to gain insights into performance, availability, and resource usage.
Key Steps:
- Access the Azure portal and navigate to your Virtual Machine Scale Set.
- Enable Azure Monitor and configure diagnostic settings to collect metrics and logs for the VMSS.
- Use the “Insights” feature to visualize performance metrics such as CPU usage, memory, and network traffic.
- Configure alerts to notify you about critical events or performance thresholds.
- Review activity logs and usage trends to analyze the scale set’s performance and scaling behavior.
By the end of this lab, you will have successfully explored the monitoring capabilities of VMSS, gaining practical experience in tracking and optimizing the performance of scalable Azure resources.
23) Network Watcher In Azure
This lab guides you through the process of exploring and utilizing Network Watcher in Azure, enabling you to monitor, diagnose, and gain insights into the performance and connectivity of your network resources.


Key Steps:
- Access the Azure portal and enable Network Watcher for the desired region.
- Use the Connection Monitor feature to test and monitor network connectivity between Azure resources or external endpoints.
- Utilize the IP Flow Verify tool to validate traffic flow and troubleshoot connectivity issues.
- Analyze network security using the Security Group View and verify effective NSG rules applied to your resources.
- Review diagnostic logs and metrics to identify performance issues and optimize network configurations.
By the end of this lab, you will have successfully explored the features of Network Watcher, gaining practical experience in monitoring and troubleshooting Azure network resources.
24) VM Replication via Azure Site Recovery
This lab guides you through the process of configuring Virtual Machine (VM) replication using Azure Site Recovery (ASR), enabling disaster recovery and business continuity for your workloads.

Key Steps:
- Access the Azure portal and enable Azure Site Recovery for your subscription.
- Configure a Recovery Services Vault and set up the replication policy.
- Select the source VM and configure the target settings, such as region, storage, and network.
- Enable replication and monitor the initial replication process to ensure data synchronization.
- Perform a test failover to validate the replication and recovery process.
By the end of this lab, you will have successfully configured VM replication using Azure Site Recovery, gaining practical experience in implementing disaster recovery solutions in Azure.
25) Azure Resource Migration Across Regions
This lab guides you through the process of migrating Azure resources across regions, enabling better performance, compliance, or disaster recovery planning.

Key Steps:
- Access the Azure portal and identify the resources to be migrated.
- Create a Resource Migration project using the Azure Migrate service or manual resource configurations.
- Prepare the target region by replicating required configurations, such as networks, storage accounts, and resource groups.
- Use tools like Azure PowerShell, Azure CLI, or Azure Resource Manager (ARM) templates to migrate resources.
- Validate the migration by testing resource functionality in the target region.
By the end of this lab, you will have successfully migrated Azure resources across regions, gaining practical experience in optimizing resource placement for performance and compliance.
26) Case Study: Azure Database migration case study
This case study explores the migration of Toys company on-premises gaming services to Azure, addressing scalability, performance, and security challenges while ensuring cost efficiency and disaster recovery readiness.

Key Steps:
- Use Azure Migrate to assess the current infrastructure and dependencies.
- Compare Azure SQL hosting options (SQL Database, Managed Instance, SQL on VMs) and evaluate compatibility using Data Migration Assistant (DMA).
- Enhance security with Azure Virtual Network, ExpressRoute, and Advanced Threat Protection.
By the end of this case study, Toys company will have successfully migrated to Azure, gaining scalability, enhanced security, and improved user experience while minimizing costs and avoiding vendor lock-in.
27) Case Study: Building a resilient IAAS Architecture
This case study focuses on Contoso Insurance’s efforts to enhance the reliability, resiliency, and scalability of their claims application infrastructure in Azure, addressing current challenges and preparing for future PaaS migration.

Key Steps:
- Implement redundancy for AD DS, web, and database servers to meet the 99.95% SLA requirement.
- Enhance VPN reliability for branch offices by deploying redundant Site-to-Site connections.
- Configure Azure Site Recovery for automated disaster recovery with RTO.
- Set up regular backups and implement monitoring solutions for VMs, databases, and critical infrastructure with proactive alerts.
- Plan for high availability and disaster recovery in the next-generation PaaS architecture, including Azure Web Apps and Azure SQL Database.
By the end of this case study, Contoso Insurance will have a resilient cloud infrastructure, a clear path to PaaS adoption, and a detailed understanding of associated costs.
28) Case Study: Building Microservice Architecture
This case study explores Fabrikam Medical Conferences’ transition to Azure to enhance their DevOps processes, simplify tenant management, and leverage AI for improved attendee experiences.

Key Steps:
- Implement a containerization strategy using Docker to deploy tenant-specific microservices in Azure.
- Migrate the on-premises MongoDB to Cosmos DB with minimal application changes and PostgreSQL databases to Azure Database for PostgreSQL.
- Use GitHub Actions for CI/CD pipelines, enabling efficient deployment and rollback processes.
- Employ Azure services for container orchestration (Azure Kubernetes Service) and monitoring (Azure Monitor) to improve visibility into system health.
- Develop and test a streamlined deployment process for a single tenant to refine workflows and train the team.
- Integrate Azure Cognitive Services for real-time language translation and AI-based content moderation for session feedback.
By the end of this case study, Fabrikam Medical Conferences will achieve simplified tenant onboarding, improved reliability, enhanced DevOps efficiency, and enriched attendee experiences.
Also Read: Microservices architecture design
Related
- [Recap] Day 1: Azure Active Directory [Azure Solutions Architect]
- [Recap] Day 2: Implement and Manage Hybrid Identities & Virtual Networking: [Azure Solutions Architect]
- [Recap] Day 3: Implement VMs for Windows and Linux: [Azure Solutions Architect]
- 25 Sample Questions Microsoft Azure Solutions Architect Expert [AZ-305] Certification
- AZ 305: Microsoft Azure Solutions Architect: Step By Step Activity Guides (Hands-On Labs)
- PTA vs PHS vs ADFS in Azure AD
- Top Azure CLI Commands For Managing Azure Resources
- Azure Landing Zone Overview | Architecture | Accelerator
- [Recap] Day 12: Design a Network Solution [Azure Solutions Architect]
Next Task For You
Begin your journey toward Mastering Azure Cloud and landing high-paying jobs. Just click on the register now button on the below image to register for a Free Class on Mastering Azure Cloud: How to Build In-Demand Skills and Land High-Paying Jobs. This class will help you understand better, so you can choose the right career path and get a higher paying job.
![Microsoft Agentic AI Business Solutions Architect [AB-100] | K21 Academy](https://test.k21academy.com/wp-content/uploads/2025/11/Microsoft-Agentic-AI-Business-Solutions-Architect-AB-100-Exam-Overview1.png)


