


![]()
This post covers the step-by-step Integration of Power BI with Azure and FAQs which are part of the Microsoft Power BI Data Analyst Certification Program. [To register for a Free Class, find the link at the bottom]. So let’s get started.
Power BI has made a massive growth in the past couple of years in the IT industry. With the exponential growth of data, employees face a lot of trouble governing their data. To manage this unmeasurable data, we need to store it somewhere. So Microsoft Azure helps to Integrate Power BI with Azure services such as SQL, stream analytics, and many other services. This makes a great combination of Azure Power BI to work with complex data.
In this post, we will discuss the following topics:
- What services of Azure can we connect to Power BI?
- Hands-on: Integrate Power BI with Azure
- FAQs
- Conclusion
What services of Azure can we connect to Power BI?
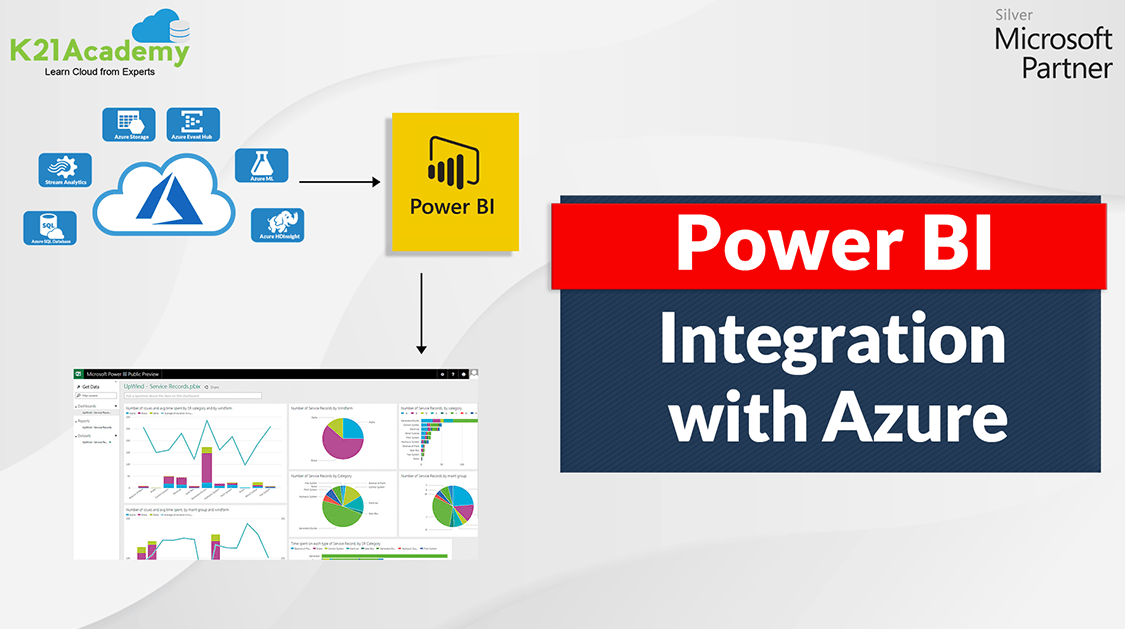
By combining Azure services with Power BI, you can turn Data processing efforts into analytics and reports for real-time insight that benefits your business. Azure Power BI has the built-in connectivity and integration to develop complex business intelligent solutions. There is no need to write any code to connect Power BI to Azure services.
We can connect the following services of Azure with Power BI:
- Azure SQL Database
- Stream Analytics
- Azure ML
- Azure Event Hub
- Azure Storage
- Azure HDInsight
Hands-on: Integrate Power BI with Azure
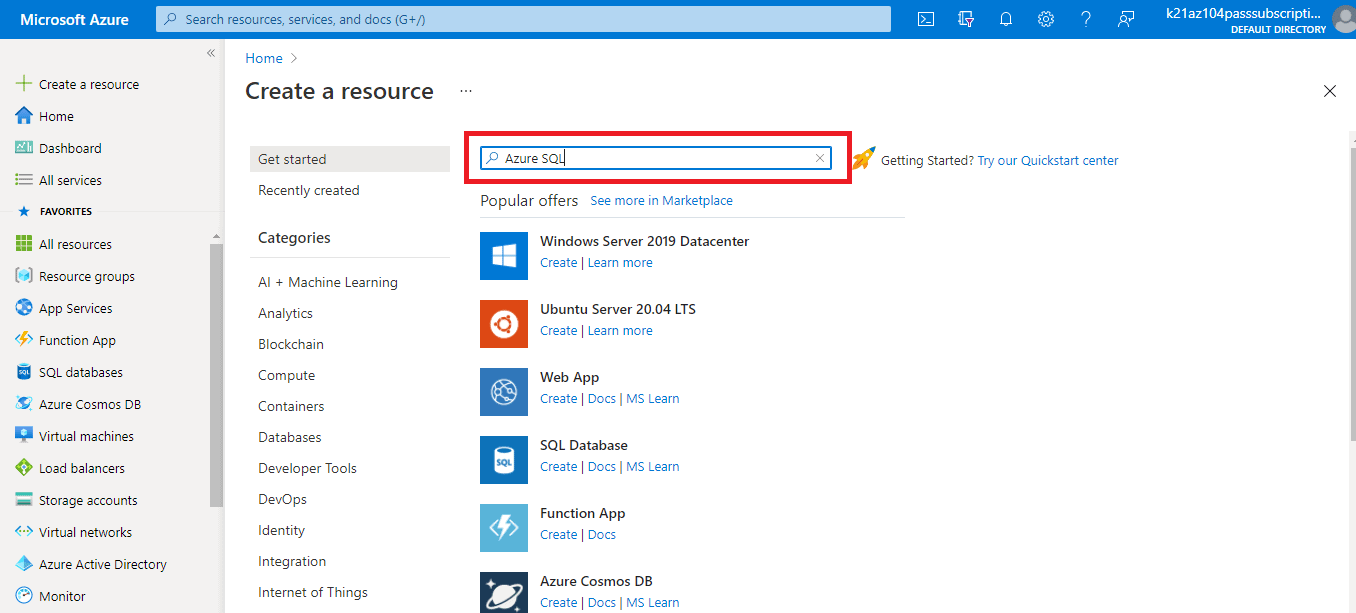
There are straightforward steps to Integrate Power BI with Azure. In this demo, we will connect the Azure SQL database with Power BI.
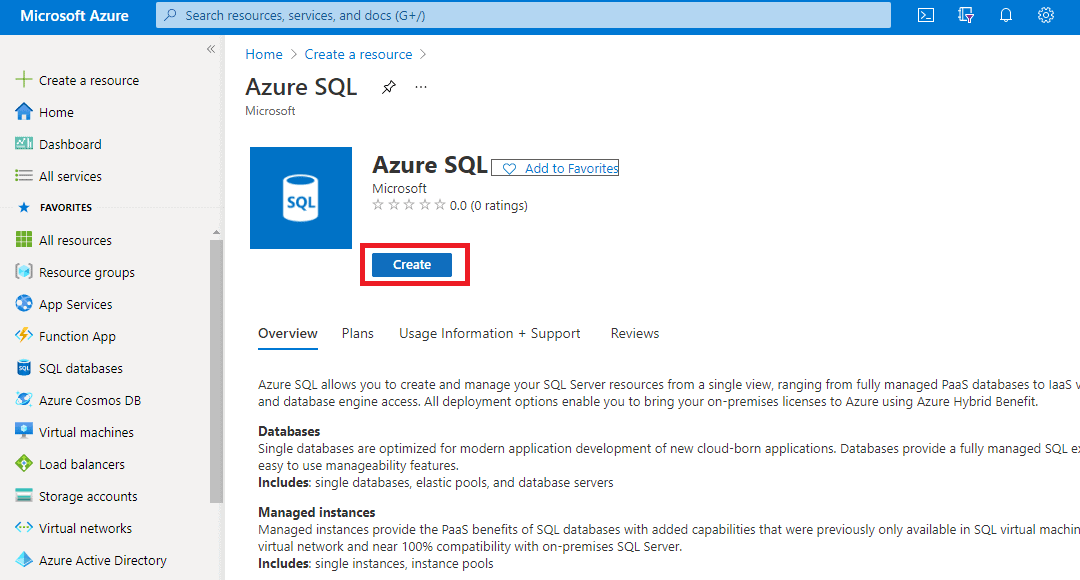
Step 1) Go to Azure Portal and click on Create a resource.

Check out: Power BI Real-Time Data Streaming
Step 2) Now search for Azure SQL and press enter.
Step 3) Click on create.
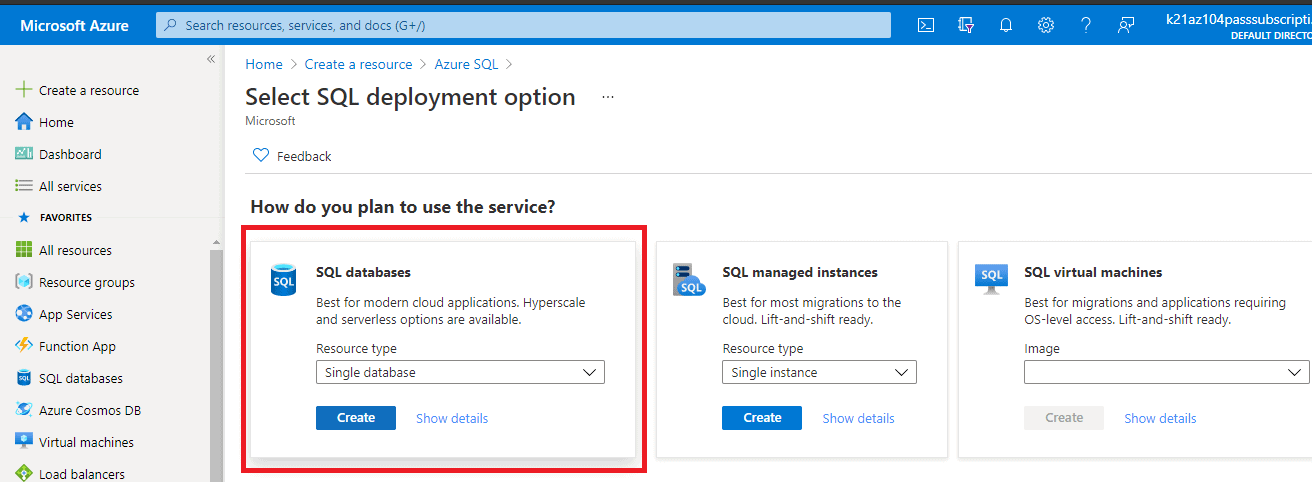
Step 4) Now, you will see three options. As you need to create SQL databases, select the resource type as Single Database and click on create.
Step 5) Now fill in the necessary details such as specifying a resource group, creating a server for the database, and click on review and create and then click on create.

You will notice that the deployment is in progress. Once the database is deployed, open it.
Check out: Data Analysis in Power BI
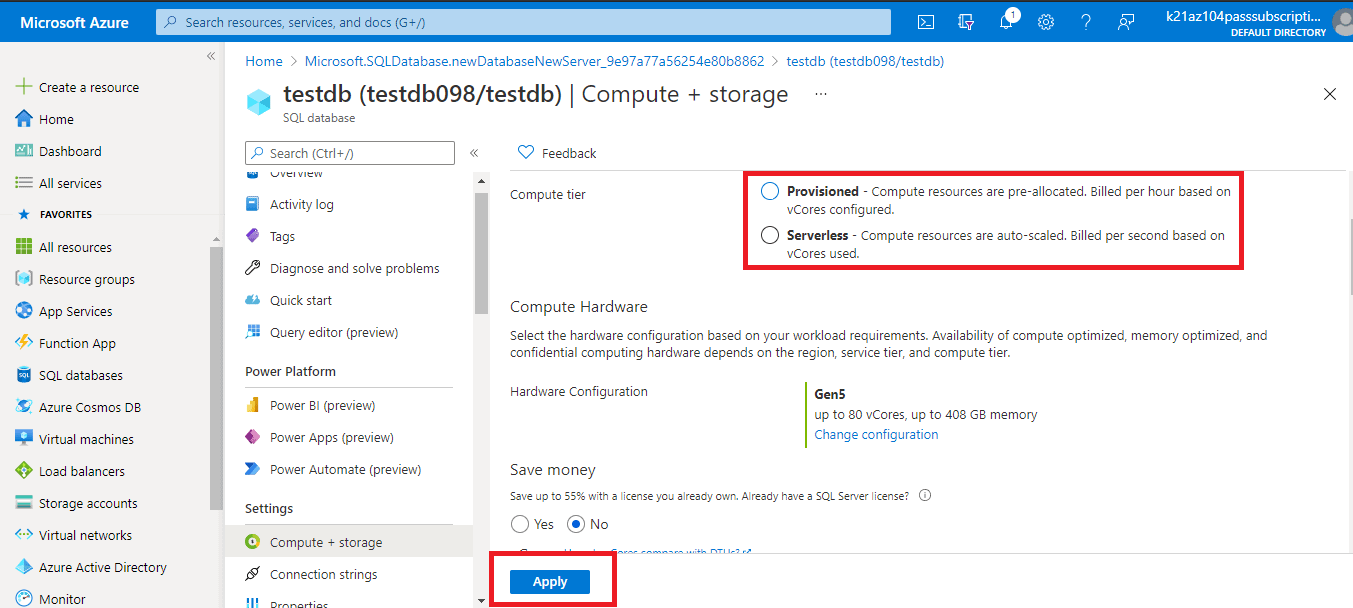
Step 6) Make sure to configure the resources first so that you don’t get extra charged. keep the compute tier serverless, decrease the data max size as per your requirement, and then click on apply.
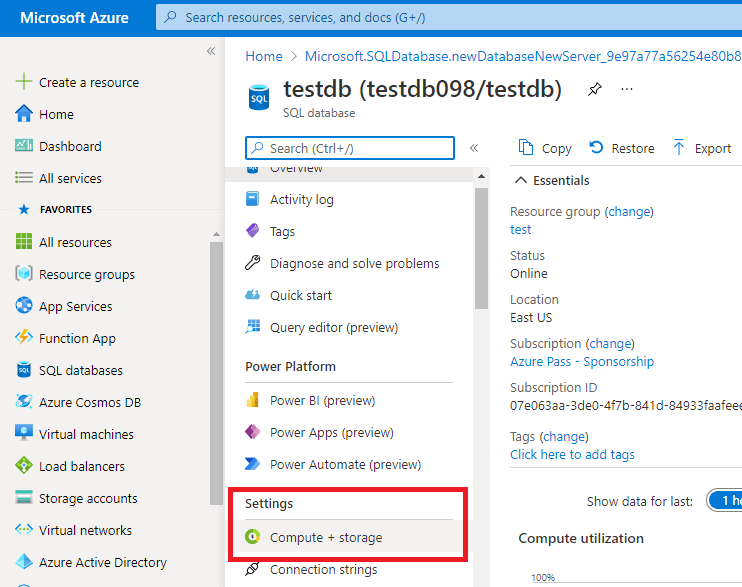
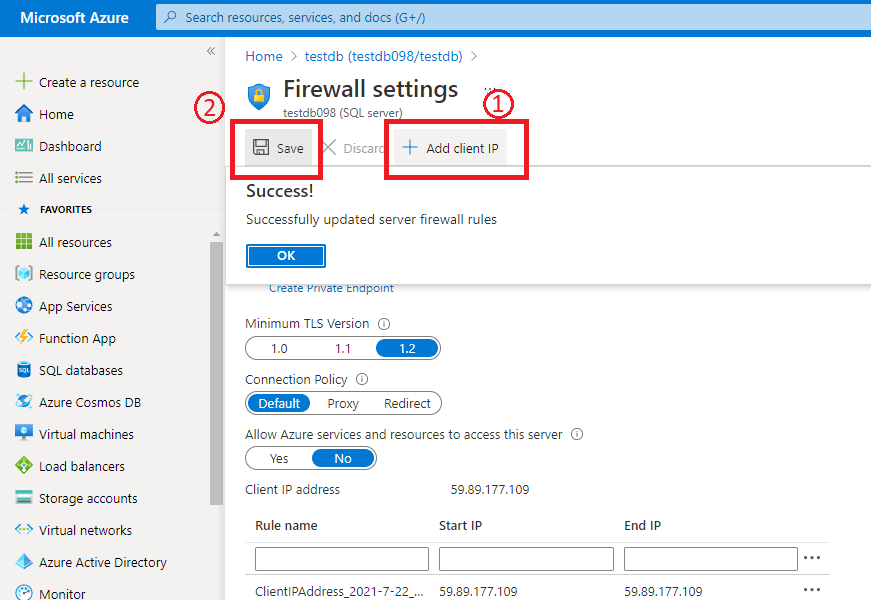
Step 7) Now, you need to set the server firewall to access the data from the database on the Power BI desktop. Click on the set server firewall option as shown in the image.

Now click on add client IP and save it.
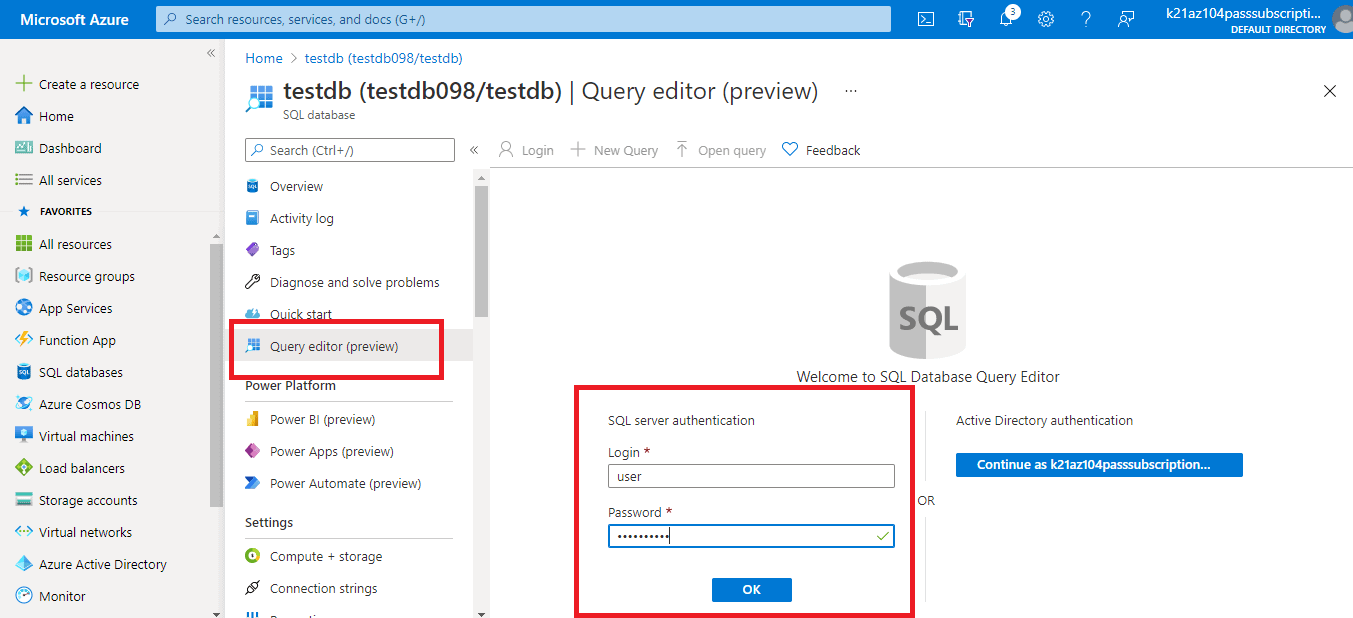
Step 8) Now, we will add some data into the SQL database. For that, go to your SQL database and click on query editor. Enter the credentials you set while creating the server for the database.
Also, check out: Power Query in Power BI.
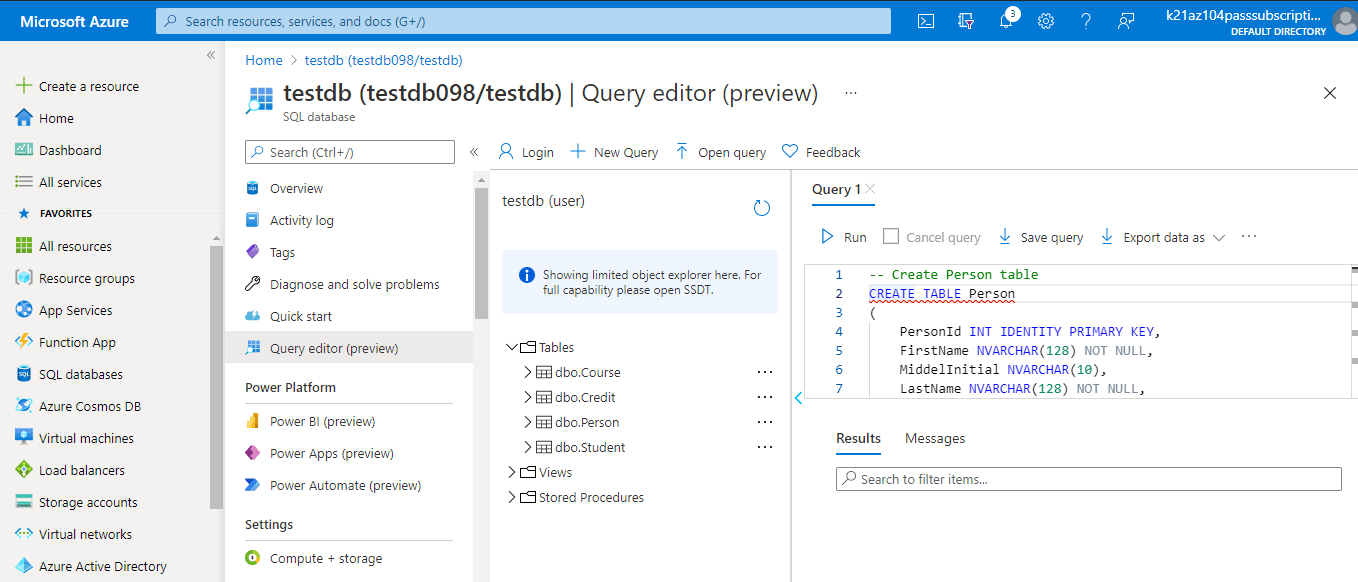
Step 9) Let’s add a simple query and run it.
-- Create Person table
CREATE TABLE Person
(
    PersonId INT IDENTITY PRIMARY KEY,
    FirstName NVARCHAR(128) NOT NULL,
    MiddelInitial NVARCHAR(10),
    LastName NVARCHAR(128) NOT NULL,
    DateOfBirth DATE NOT NULL
)

-- Create Student table
CREATE TABLE Student
(
    StudentId INT IDENTITY PRIMARY KEY,
    PersonId INT REFERENCES Person (PersonId),
    Email NVARCHAR(256)
)

-- Create Course table
CREATE TABLE Course
(
    CourseId INT IDENTITY PRIMARY KEY,
    Name NVARCHAR(50) NOT NULL,
    Teacher NVARCHAR(256) NOT NULL
)

-- Create Credit table
CREATE TABLE Credit
(
    StudentId INT REFERENCES Student (StudentId),
    CourseId INT REFERENCES Course (CourseId),
    Grade DECIMAL(5,2) CHECK (Grade <= 100.00),
    Attempt TINYINT,
    CONSTRAINT [UQ_studentgrades] UNIQUE CLUSTERED
    (
        StudentId, CourseId, Grade, Attempt
    )
)
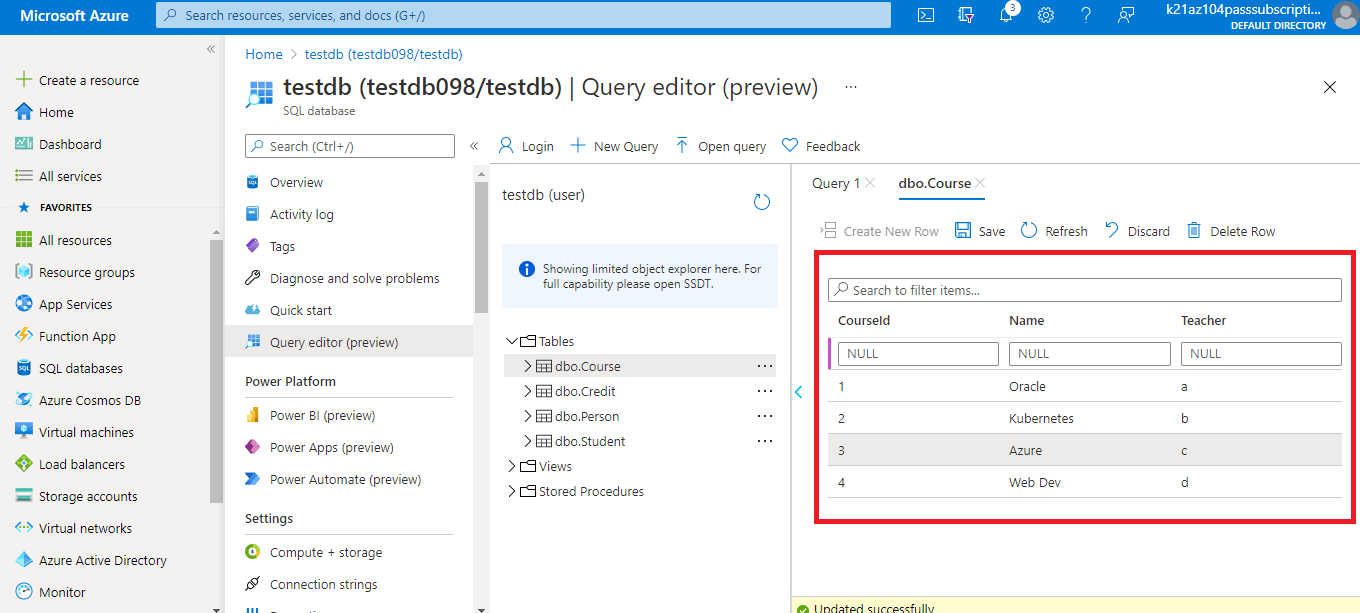
Step 10) Next step is to add data to the table. Select the dbo.course table and add rows to it by clicking on Create New Row.
Now we have the data present in the SQL database. Now we will visualize the data in Power BI.
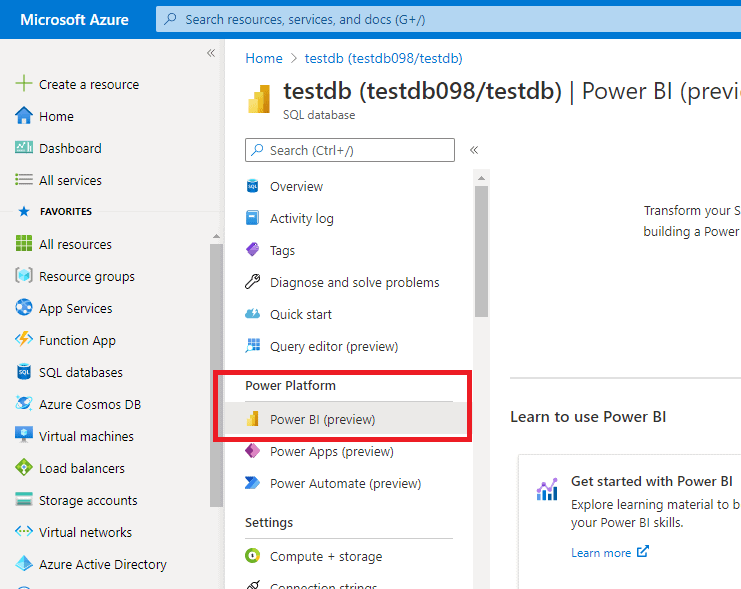
Step 11) Click on Power BI (preview) option under the Power platform as shown below.
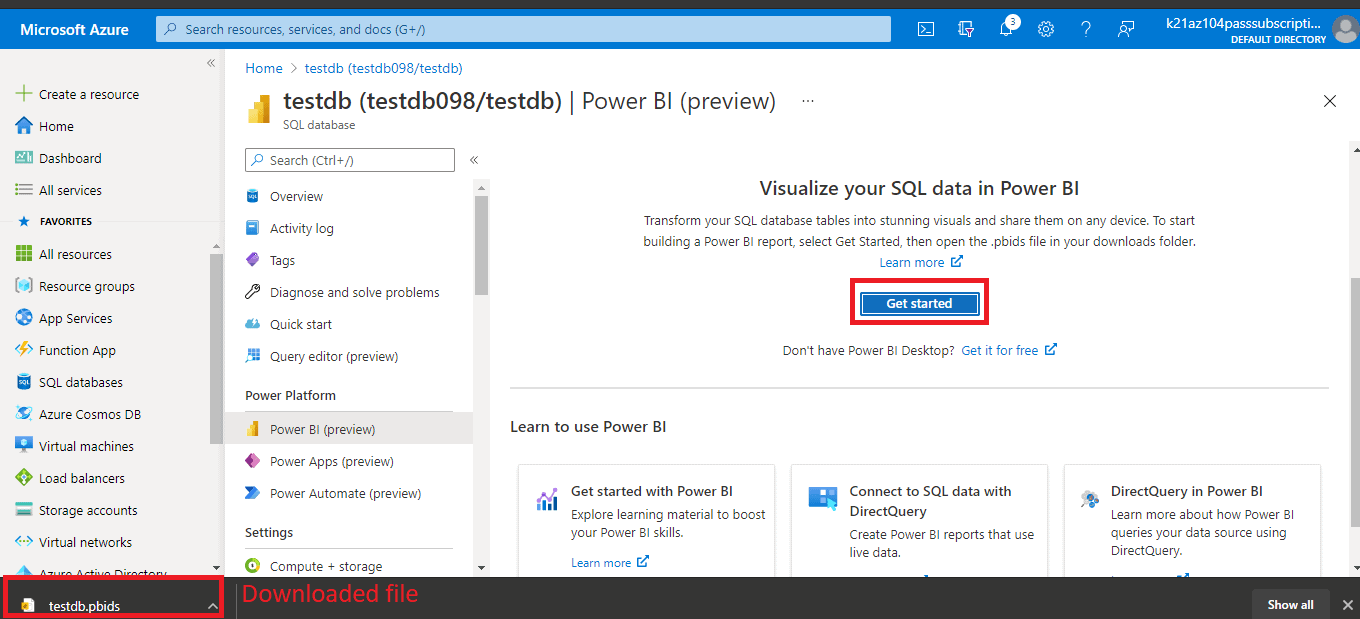
Click on get started, and it will download the pbids file.
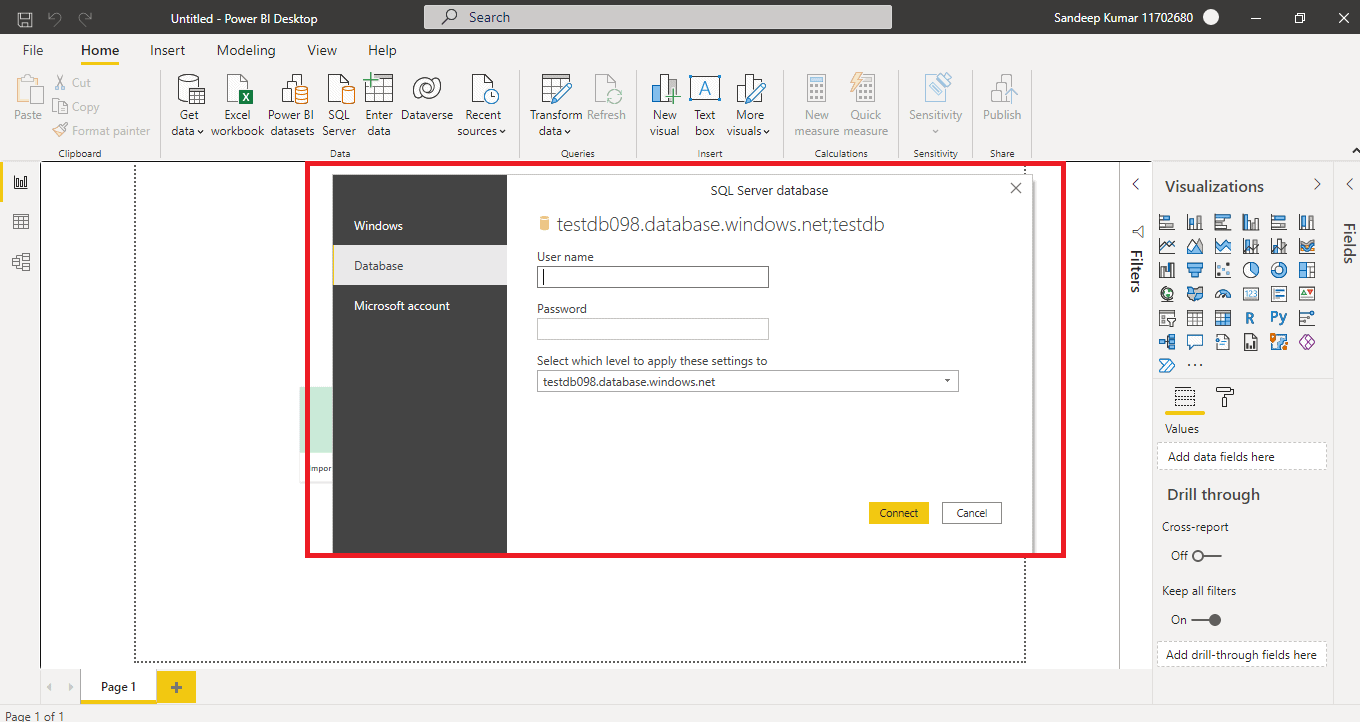
Step 12) Open the pbi file, and it will open up the Power BI desktop application. It will ask for the username and password under Database. Provide the username and password you set while creating a database server.
As we added some sample values under the course table, preview the data by clicking on course and click on load.
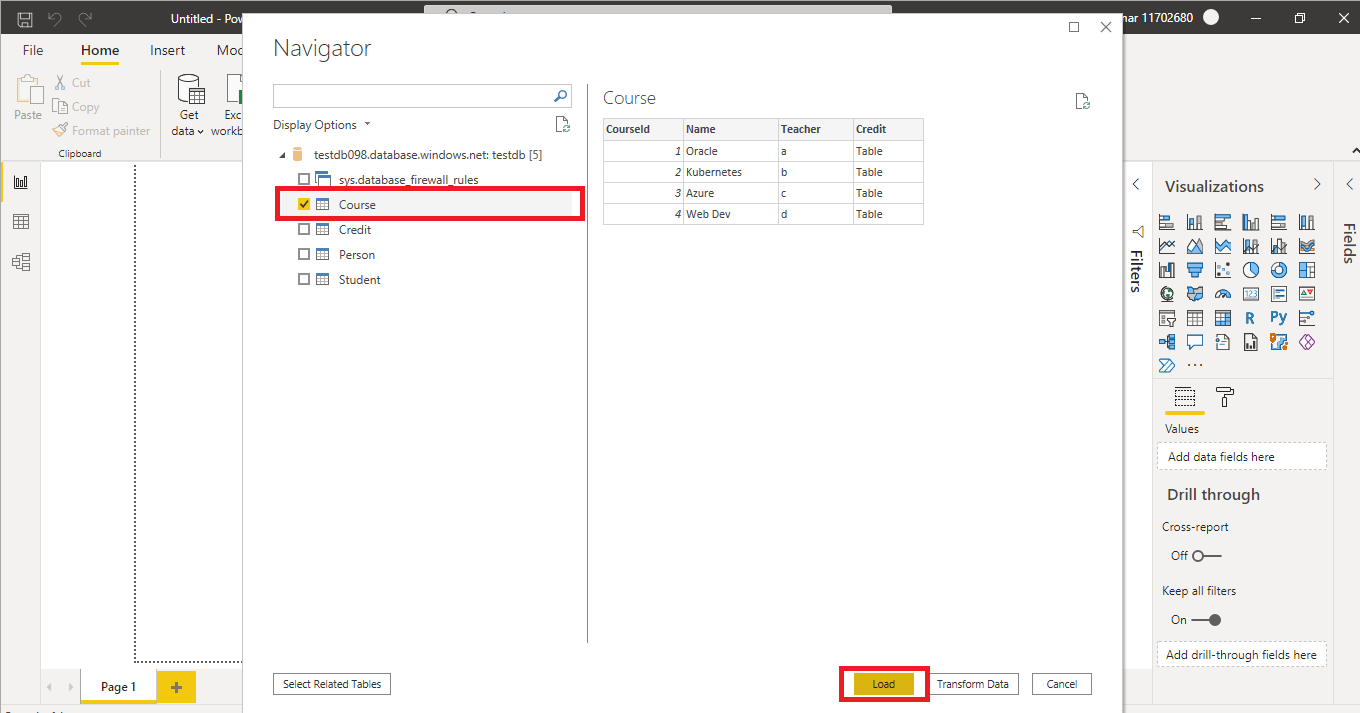
As you can see that we added CourseID, Name, and Teacher rows.
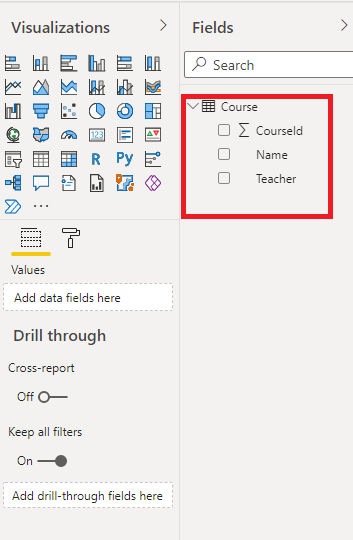
Just check the CourseID, Name, and Teacher. It will create a visualization out of this data. You can choose any visualization from the visualization section, as shown below.

Hence it is a straightforward process to create a visualization using Power BI Integration with Azure.
FAQs
Q1: How does Power BI integrate with Azure?
Ans: Using Azure Services with Power BI, you can shift your data processing efforts to analytics and reports to get real-time insights for business growth. You can connect to an Azure data source, or a handful and then shape and refine data to build customized reports and dashboards.
Q2: Does Power BI work with Azure?
Ans: Yes, Power BI does work with Azure to unify your data. It reduces the complexity of data and makes data easy to understand through visualizations and graphs. Hence, Azure Power BI is a great collab to handle enormous data easily.
Q3: What is the use of Power BI embedded in Azure?
Ans: Microsoft Power BI Embedded in Azure allows app developers to embed stunning, attractive, interactive reports and dashboards into applications in no time. It changes the way data looks into files to graphical forms and visualizations.
Conclusion
Power BI integration with Azure provides whole new stability to handle a larger amount of data. Not only can we connect to Azure services very easily, but we also create some powerful visualizations. Storing data in Azure provides enhanced governance and cataloging capabilities to users. And they can understand a huge amount of data using visuals effortlessly.
References
- Introduction to Microsoft Power BI Platform | Everything You Must Know
- Exam PL-300: Microsoft Power BI Data Analyst | A Replacement Of DA-100
- Microsoft Certified Data Analyst Associate [PL-300] Step By Step Activity Guides (Hands-On Labs)
- Case Study: Display Live Data Streaming Using Power BI Service
- Introduction to Data Modeling in Power BI
- What is Power Query | Microsoft Azure Power BI Tool
- Top 15 Differences Between SSRS vs Power BI
- How to Become a Power BI Developer?
Next Steps to begin with PL-300 Certification:
In our PL-300 Certification Training Program, we’ll cover 10+ Hands-On Labs. If you wish to start your journey towards becoming a Microsoft Certified: Power BI Data Analyst Associate, try our FREE CLASS.

![Microsoft Agentic AI Business Solutions Architect [AB-100] | K21 Academy](https://test.k21academy.com/wp-content/uploads/2025/11/Microsoft-Agentic-AI-Business-Solutions-Architect-AB-100-Exam-Overview1.png)